background image

4

WARNING:

To reduce the risk of fire, electrical

shock, injury to persons, or damage when using the
range, follow basic precautions, including the 
following:

WARNING: 

TO REDUCE THE RISK OF 

TIPPING OF THE RANGE, THE RANGE MUST BE
SECURED BY PROPERLY INSTALLED ANTI-TIP
DEVICES. TO CHECK IF THE DEVICES ARE
INSTALLED PROPERLY, SLIDE RANGE FORWARD,
LOOK FOR ANTI-TIP BRACKET SECURELY
ATTACHED TO FLOOR, AND SLIDE RANGE BACK
SO REAR RANGE FOOT IS UNDER ANTI-TIP
BRACKET.

CAUTION: 

Do not store items of interest to

children in cabinets above a range or on the back-
guard of a range – children climbing on the range to
reach items could be seriously injured.

Proper Installation – Be sure the range is properly
installed and grounded by a qualified technician.

Never Use the Range for Warming or Heating the
Room.

Do Not Leave Children Alone – Children should not
be left alone or unattended in area where the range
is in use. They should never be allowed to sit or
stand on any part of the range.

Wear Proper Apparel – Loose-fitting or hanging 
garments should never be worn while using the
range.

User Servicing – Do not repair or replace any part of
the range unless specifically recommended in the
manual. All other servicing should be referred to a
qualified technician.

Storage in or on the Range – Flammable materials
should not be stored in an oven or near surface
units.

Do Not Use Water on Grease Fires – Smother fire or
flame or use dry chemical or foam-type extinguisher.

Use Only Dry Potholders – Moist or damp 
potholders on hot surfaces may result in burns from
steam. Do not let potholder touch hot heating 
elements. Do not use a towel or other bulky cloth.

DO NOT TOUCH SURFACE UNITS OR AREAS
NEAR UNITS – Surface units may be hot even
though they are dark in color. Areas near surface
units may become hot enough to cause burns.
During and after use, do not touch, or let clothing or
other flammable materials contact surface units or
areas near units until they have had sufficient time
to cool. Among those areas are the cooktop and 
surfaces facing the cooktop.

IMPORTANT SAFETY INSTRUCTIONS

Use Proper Pan Size – The range is equipped with
one or more surface units of different size. Select
utensils having flat bottoms large enough to cover
the surface unit heating element. The use of under-
sized utensils will expose a portion of the heating
element to direct contact and may result in ignition
of clothing. Proper relationship of utensil to burner
will also improve efficiency.

Never Leave Surface Units Unattended at High Heat
Settings – Boilover causes smoking and greasy
spillovers that may ignite.

Make Sure Reflector Pans or Drip Bowls Are in
Place – Absence of these pans or bowls during
cooking may subject wiring or components under-
neath to damage.

Protective Liners – Do not use aluminum foil to line
surface unit drip bowls or oven bottoms, except as
suggested in the manual. Improper installation of
these liners may result in a risk of electric shock, or
fire.

Glazed Cooking Utensils – Only certain types of
glass, glass/ceramic, ceramic, earthenware, or other
glazed utensils are suitable for range-top service
without breaking due to the sudden change in 
temperature.

Utensil Handles Should Be Turned Inward and Not
Extend Over Adjacent Surface Units – To reduce the
risk of burns, ignition of flammable materials, and
spillage due to unintentional contact with the utensil,
the handle of a utensil should be positioned so that
it is turned inward, and does not extend over 
adjacent surface units.

Do Not Soak Removable Heating Elements –
Heating elements should never be immersed in
water.

Do Not Cook on Broken Cooktop – If cooktop
should break, cleaning solutions and spillovers may
penetrate the broken cooktop and create a risk of
electric shock. Contact a qualified technician 
immediately.

Clean Cooktop With Caution – If a wet sponge or
cloth is used to wipe spills on a hot cooking area,
be careful to avoid steam burn. Some cleaners can
produce noxious fumes if applied to a hot surface.

Use Care When Opening Door – Let hot air or
steam escape before removing or replacing food.

Do Not Heat Unopened Food Containers – Build-up
of pressure may cause container to burst and result
in injury.

SAVE THESE INSTRUCTIONS

Summary of Contents for RF340BXK

Page 1: ... CareGuide For questions about features operation performance parts accessories or service call 1 800 253 1301 or visit our website at www whirlpool com Table of Contents 2 8522770A Models RF340BXK RF361PXK RF341BXK RF366LXK RF352BXK ...

Page 2: ...e Canning 8 Cookware 9 Electronic Clock Timer 9 Display 9 Clock 9 Timer 10 Oven Temperature Control 10 OVEN USE 10 Aluminum Foil 10 Positioning Racks and Bakeware 10 Bakeware 11 Oven Vent 11 Baking and Roasting 11 Broiling 12 RANGE CARE 13 Self Cleaning Cycle 13 General Cleaning 14 Storage Drawer 15 Oven Light 15 Oven Door 16 TROUBLESHOOTING 17 ASSISTANCE OR SERVICE 18 WARRANTY 20 ...

Page 3: ...essages in this manual and on your appliance Always read and obey all safety messages This is the safety alert symbol This symbol alerts you to potential hazards that can kill or hurt you and others All safety messages will follow the safety alert symbol and either the word DANGER or WARNING These words mean Tip Over Hazard A child or adult can tip the range and be killed Connect anti tip bracket ...

Page 4: ...e the cooktop and surfaces facing the cooktop IMPORTANT SAFETY INSTRUCTIONS Use Proper Pan Size The range is equipped with one or more surface units of different size Select utensils having flat bottoms large enough to cover the surface unit heating element The use of under sized utensils will expose a portion of the heating element to direct contact and may result in ignition of clothing Proper r...

Page 5: ...gasket is essential for a good seal Care should be taken not to rub damage or move the gasket Do Not Use Oven Cleaners No commercial oven cleaner or oven liner protective coating of any kind should be used in or around any part of the oven Clean Only Parts Listed in Manual Before Self Cleaning the Oven Remove broiler pan and other utensils For units with ventilating hood Clean Ventilating Hoods Fr...

Page 6: ...ght 6 Oven Temperature Control Knob 7 Right Rear Control Knob 8 Right Front Control Knob 9 Surface Area Locator 3 1 8 7 9 6 4 5 2 1 Surface Cooking Area 2 Anti Tip Bracket 3 Door Stop Clip 4 Model and Serial Number Plate behind left side of storage drawer 5 Removable Storage Drawer on some models 6 Manual Oven Light Switch on some models 7 Control Panel 8 Hot Surface Indicator Light on ceramic gla...

Page 7: ...allow objects that could melt such as plastic or aluminum foil to touch any part of the entire cooktop Do not use the cooktop as a cutting board Use cookware about the same size as the surface cooking area Cookware should not extend more than 1 in 2 5 cm outside the area Use flat bottomed cookware for best heat conduction and energy efficiency Cookware with rounded warped ribbed or dented bottoms ...

Page 8: ... cooktop provides easy access for cleaning beneath Be careful not to drop the cooktop Damage could occur to the finish and the cooktop frame For more information see the General Cleaning section To Lift 1 Lift the cooktop by both front corners until the supports lock into place To Replace 1 Lift the cooktop from both sides while pressing the support rods back to unlock them 2 Slowly lower the cook...

Page 9: ...hen the oven is not in use the display will show the time of day Clock This is a 12 hour clock and does not show a m or p m To Set Before setting make sure the oven and Timer are off 1 Press CLOCK The colon will flash during Clock programming 2 Press the up or down arrow pads to set the time of day The time can be changed in either small or 10 minute increments by pressing a pad briefly or by pres...

Page 10: ...he current calibration for example 00 if not yet adjusted or about 5 seconds 2 Press the up or down arrow pads to increase or to decrease the temperature in 5 F amounts The adjustment can be set between 35 F and 35 F 3 Press CLOCK to enter the new temperature OVEN USE Odors and smoke are normal when the oven is used the first few times or when it is heavily soiled IMPORTANT The health of some bird...

Page 11: ...or to BAKE and turn the oven temperature control knob to the desired temperature setting The OVEN ON indicator light will turn on and will turn off once the oven is preheated 2 Place food in oven The bake and roasting elements will turn on and off to keep the oven temperature at the setting The OVEN ON indicator light s will turn on and off with the elements 3 Push in and turn oven control knob to...

Page 12: ...ob to BROIL On some models set the oven selector and oven temperature control knob to BROIL The OVEN ON indicator light will turn on 2 After broiling turn the oven control knob to OFF On some models turn both the oven selector and oven temperature control knob to OFF The OVEN ON indicator light will turn off To Broil at a Lower Temperature If food is cooking too fast turn the oven temperature cont...

Page 13: ...f gloss hairline cracks and popping sounds The Self Cleaning cycle uses very high temperatures burning soil to a powdery ash The oven is preset for a 3 hour 30 minute clean cycle but the time can be changed Suggested clean times are 2 hours 30 minutes for light soil and between 3 hours 30 minutes to 4 hours 30 minutes for average to heavy soil Once the oven has completely cooled remove ash with a ...

Page 14: ...treaks specks and discoloration Cooktop Polishing Creme or non abrasive cleanser Rub product into soil with a damp paper towel or soft cloth Continue rubbing until white film disappears Burned on soil Cooktop Polishing Creme and Cooktop Scraper Rub creme into soil with damp paper towel Hold scraper as flat as possible on surface and scrape Repeat for stubborn spots Polish entire cooktop with creme...

Page 15: ... Porcelain enamel only not chrome Dishwasher STORAGE DRAWER on some models Make sure drawer is cool and empty before cleaning For more information see Storage Drawer section Mild detergent Drawer Liner on some models Remove all stored items from drawer and lift out drawer liner Clean with mild detergent StorageDrawer The storage drawer can be removed Before removing make sure drawer is cool and em...

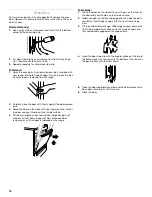
Page 16: ...door and your thumbs on the inside surface 4 Pull door straight up then toward you Hinge hangers will slide out of front frame hinge slot Do not remove door removal pins until the door is replaced on the range To Replace 1 Grasp the door on the sides with your fingers on the front of the door and your thumbs on the inside surface 2 Hold oven door so that the top edge of each hinge hanger is horizo...

Page 17: ...ction Oven will not operate On some models is the electronic clock timer set correctly See Electronic Clock Timer section On some models has the oven selector been set to a BAKE or BROIL function See Baking and Roasting or Broiling sections Cooktop cooking results not what expected Is the proper cookware being used See Cookware section Is the control knob set to the proper heat level See Cooktop C...

Page 18: ...ry and repair parts sales Specialized customer assistance Spanish speaking hearing impaired limited vision etc Referrals to local dealers repair parts distributors and service companies Whirlpool designated service technicians are trained to fulfill the product warranty and provide after warranty service anywhere in the United States To locate the Whirlpool designated service company in your area ...

Page 19: ...19 Notes ...
Page 20: ... Guide 6 Repairs to parts or systems resulting from unauthorized modifications made to the appliance 7 Replacement parts or repair labor costs for units operated outside the United States 8 Any labor costs during the limited warranty period WHIRLPOOL CORPORATION SHALL NOT BE LIABLE FOR INCIDENTAL OR CONSEQUENTIAL DAMAGES Some states do not allow the exclusion or limitation of incidental or consequ...

Reviews: