background image

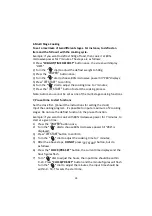
Press power  button 


Cooking power 


P100


100%


P80


80%


P50


50%


P30


30%


P10


10%


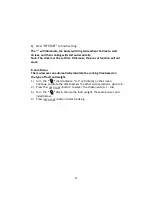
To stop the cooking process at anytime press the 

"STOP

" button


Press the  

button to microwave cook at 100% 

power level for 30 seconds.  
The microwave will start cooking immediately. 
Each press on the same key will increase the cooking time by 30 seconds. 
The maximum cooking time is 95 minutes. 
Note: this function does not work for

defrost and auto menu  

or 

Turn the 

dial left to adjust the desired cooking 

. The oven will start cooking 

 weig

cooking

ht 

for the selected length of time 

at 100% power. 

time, then press 

"        " 


1) Press 

  button once, the oven will display  

dEF1". 

2) Turn the 

dial to select the weight of the 

weight

 should be set between 100-2000g. 

3) Press 

button to start defrosting. 


1) Press 

" WEIGHT/TIME DEFROST "

 button twice, the oven will display 

"dEF2".


2) Turn the


dial to select the defrosting 

time is 95

 minutes. 

3) Press 

button to start defrosting. 

The defrosting power is 30%, and cannot be changed. 

"

     "

food in grams. The 

time, the maximum 

"        " 

"       " 

WEIGHT/TIME DEFROST

3.Speedy  Cooking 

4.Defrosting by Weight 

5.Defrosting by Time 

"JET START"

"JET START"

"JET START"

"JET START"

25

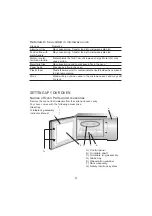
Summary of Contents for MWH 303

Page 1: ...用户手册 MWH 303 ...

Page 2: ...微波爐 用戶手册 使用微波爐之前請仔細閱讀用戶手册 幷請妥善保管 型號 MWH 303 ...

Page 3: ...門打開時請勿實施操作 否則您可能會受微波能量的輻射傷害 請勿打破或損壞安全 連鎖裝置 b 請勿在微波爐前面和爐門之間放置任何物體 或使污物或清潔劑殘留聚積在密封表面 c 警告 若爐門或爐門封條已損壞 在專業人員維修之前請勿操作 附錄 若設備沒有得到很好的清潔維護 其表面可能會受到侵蝕 從而影響設備的使用壽命幷導致 危險狀態 規格 型號 額定電壓 額定輸入功率 微波 1270W 額定輸出功率 微波 800W 230V 50Hz MWH 303 2 ...

Page 4: ...時 由于加熱會 産生高溫 故小孩只能在大人監督下才可使 用該微波爐 僅限于燒烤系列 5 請使用適合于微波爐中使用的器皿 6 微波爐需定期清洗 任何殘留的食物均需 清理乾淨 7 閱讀幷遵從 避免可能暴露于過多微波能 量的注意事項 8 當在塑料或紙質容器內加熱食物時 請密 切注意微波爐 因爲有著火的可能 9 若發現有冒烟 請關閉或拔掉微波爐電 源 保持爐門關閉狀態以便熄滅火焰 10 請勿過度烹調食物 11 請勿將爐腔用作儲存之用 請勿在微波爐 內存放食物 比如麵包或餅乾等 12 將紙質或塑料容器 袋放入微波爐之前 請將金屬扎帶和金屬提手取下 13 請按照隨附安裝說明安裝或放置微波 爐 14 微波爐不能用來加熱帶殼的鮮蛋或已煮 熟的蛋 因爲它們在用微波加熱時甚至在加 熱之後可能會發生爆炸 15 請勿將微波爐用作說明書規定以外的其 他用途 勿在器具內使用腐蝕性化學藥品或 氣體 此微波爐專爲加熱食物...

Page 5: ...喂食之前請先將食物加以攪拌幷檢查 溫度 確保熱力分布均勻和避免燙傷或灼傷 的危險 確保加熱之前已將蓋子與奶嘴取 出 23 此器具不適用于身體 感官或精神上有 缺陷或缺少經驗和知識的人 包括兒童 使 用 除非在對他們安全負責的人的監督或指 導下使用 24 兒童使用時需有大人監督 確保他們不 會將微波爐當作玩具玩 25 微波爐不可置于橱櫃內 已在橱櫃內測 試過除外 微波爐不可通過外部計時器或遙控系統 進行操作 27 28 使用時可接觸部位可能會變燙 小孩應 遠離蒸汽 請勿使用清潔器 29 器具背面需靠墻放置 26 因此要小心處理盛飲料的容器 以免燙傷 飲料經微波加熱後會引起延時沸騰 4 ...

Page 6: ...請勿將其插入電源插座 清洗 清洗之前 確保微波爐已與電源斷開 1 使用稍微濕點的濕布後 清潔微波爐內 部 2 在肥皂水中用常規方法清洗附件 3 門框和封口以及附近部件變髒時 需用 濕布小心清洗 該器具必須接地 如果發生綫路短路 接地 可通過爲電流提供排電綫减少觸電的危 險 器具附帶有一條具有接地插頭的接地綫 的軟綫 該插頭需插入已正確安裝和接地的 電源插座 器具必須進行接地 不遵守該要求而造成對 人 動物或物體的任何傷害 製造商概不負 責 若對接地說明不完全明白或懷疑器具是否 正確接地 可咨詢合格電工或修護人員 由于用戶沒有遵守說明書的指示而造成的 問題 製造商概不負責 BS 插頭 5 ...

Page 7: ...1 英寸 2 5 厘米 燒烤盤 遵從廠商說明 燒烤盤底部必須在轉盤上面至少 3 16 英寸 5 毫米 不正確 的使用可能會使轉盤破裂 餐具 僅限于微波安全型餐具 遵從廠商說明 請勿使用破裂或有缺口的盤或碟 玻璃瓶 任何情况下均應取下蓋子 僅用于加熱食物至剛熱狀態 大多數玻璃瓶幷不 耐熱 可能會破裂 玻璃器具類 僅限于耐熱微波爐專用玻璃器具 確保無金屬包邊 請勿使用破裂或有缺口 的盤或碟 烤箱袋 遵從廠商說明 請勿用金屬綫系緊 預留一些縫隙以便蒸汽溢出 紙盤或紙杯 僅用于短時間的烹飪或加熱 烹飪時請勿離開 生活用紙 用于覆蓋于食物進行重新加熱和吸收脂肪 僅用于有人監控的短時間烹飪 羊皮紙 用于覆蓋食物 防止食物發生潑濺或在蒸汽加熱時用作包裹 塑料 僅限于微波安全型 遵從廠商說明 必須標示 微波安全 某些塑料容器 在裏面的食物變熱時即變軟 可煮袋和密封包裝的塑料袋須按包裝上的指示 切開 刺破或...

Page 8: ...物轉移至微波專用盤 金屬或金屬包邊的器皿 金屬會隔離微波能量接觸食物 金屬包邊會引起擊穿 金屬扎口綫 可能引起擊穿和引起爐內著火 紙袋 可能引起爐內著火 塑料泡沫 塑料泡沫暴露于高溫時可能會溶化或污染裏面的液體 木材 木材在微波爐中使用時會燒幹 可能會裂開或破裂 設置微波爐 各部件和附件的名稱 從紙箱和爐腔中取下微波爐和所有材料 微波爐隨附有以下附件 玻璃托盤 1 轉盤圈 1 說明書 1 A 控制面板 B 轉盤軸 C 轉盤圈 D 玻璃托盤 E 觀察窗口 F 爐門部件 G 安全連鎖裝置 F G A C B E D 7 ...

Page 9: ...下烤箱內部表面的任何保護膜 請 勿弄掉依附在爐腔上用于保護磁電管的淺 褐色雲母 安裝 1 選擇一個進氣口和 或出氣口均有足够 空間的水平面 1 微波爐上面至少留 12 英寸 30 厘 米 的空隙 2 請勿從微波爐底部取下支架 3 阻塞進氣口和 或出氣口會損害微波 爐 4 微波爐應儘量遠離收音機和電視擺 放 微波爐工作時會對你的收音機 或電視的接收信號造成干擾 2 請將微波爐插入標準家用電源 確保電 源的電壓和頻率與銘牌標簽上標示的電 壓和頻率相同 警告 請勿將微波爐安裝于爐灶面或其他發 熱電器上 若安裝于熱源附近 或上面 微波爐可能會受到損 壞 保證書將無效 操作過程 中可接觸表面可能會變燙 空曠面 12 英寸 30 厘米 3 0 英寸 7 5 厘米 輪軸 下 面 微波爐與任何相鄰墻面間的最小空隙要求 空曠面 爲 3 0 英寸 7 5 厘米 其中一個面必須爲 8 ...

Page 10: ...操作 控制面板和功能 9 ...

Page 11: ...2 微波烹調 1 按 鍵 LED 閃爍顯示 P100 2 繼續按此鍵若干次 選擇微波功率 LED 依次閃爍顯示 P100 P 80 P 50 P 10 此時也可旋轉 選擇微波功率 3 按 鍵確認所選火力 4 旋轉 調整烹調時間 烹調時間設定範圍 0 05 95 00 5 按 鍵開始烹調 顯示 P100 P80 P50 P30 P10 3 快速烹調 1 在待機狀態 按 鍵一次 可立即啟動 30 秒 100 微波火力烹調 每按一次可增加 30 秒烹調時間 最長可設定 95 分鐘 待機狀態下左旋 直接選擇烹調時間 按 鍵 烹調開始 烹調火力為 100 微波 注意 自動功能表和按重解凍烹調過程中 不能按 鍵增加烹調 時間 微波 在 烹調過程中 可以按 鍵增加烹調時間 2 3 功率 50 10 80 100 30 如要終止微波烹調 可隨時按 停止 鍵 10 ...

Page 12: ...分鐘 3 按 鍵 解凍開始 解凍火力為 P 30 且不能再修 改火力 6 多段烹調 最多可輸入兩段烹調 若有解凍程式設置時可設定為第 段 例如 解凍 500g 食物 解凍完成後 執行 7 分鐘 80 微波烹調 1 按 鍵 LED 顯示 dEF1 2 旋轉 選擇解凍重量 500g 3 按 鍵一次 LED 閃爍顯示 P100 4 繼續按 鍵或旋轉 選擇 80 火力 LED 顯示 P 80 5 按 鍵確認當前火力 6 旋轉 選擇微波烹調的時間 7 分鐘 7 按 鍵 烹調開始 一次 鍵 LED 顯示 dEF1 一次 長 一 隨後的第二段可設置為其它 烹調程式 注意 自動烹調 不能應用于多段烹調 11 ...

Page 13: ... 80 火力 LED 顯示 P 80 3 按 鍵確認當前火力 4 旋轉 選擇微波烹調的時間 7 分鐘 此時不要按 鍵 進行如下操作 1 按 鍵 小時位閃爍 2 旋轉 設置預約時間小時位 設置範圍0 23 3 按 鍵 分鐘位閃爍 4 旋轉 設置預約時間分鐘位 設置範圍 0 59 5 按 鍵 完成預約設置 預約時間到 此時若爐門關閉 則微波爐鳴 叫 2 聲自動開始烹調 注意 設定 預約烹調 程式前 必須先設定時鐘 否則無法設置預約烹調 8 自動烹調 1 在待機狀態下直接右旋 LED A 1 A 2 A 8 2 按 鍵確認所選菜單 3 旋轉 選擇重量 4 按 鍵 烹調開始 顯示 至 共 8 款自動烹調選擇 12 ...

Page 14: ... 80 微波 350 450 A 4 肉類 250 100 微波 350 450 A 5 義大利麵條 加冷水 450 50 80 微波 加冷水 800 100 A 6 200 100 微波 400 600 A 7 200 100 微波 400 A 8 湯 200 80 微波 400 200克 克 克 200克 克 克 克 克 克 2 克 克 克 200克 克 克 200克 克 200 400 400 600 400 450 350 50 450 350 250 400 300 600 400 亳升 克 50 克 100 亳升 亳升 亳升 薄餅 加水 薯仔 13 ...

Page 15: ...3 一旦設定好烹調狀態 而在 1 分鐘內沒按 鍵 則顯示器恢復到時鐘 顯示 所設定內容無效 4 有效按鍵蜂鳴器鳴叫一聲 無效按鍵無反應 5 烹調結束時蜂鳴器鳴叫五聲 提示用戶烹調完畢 童锁功能 上電加鎖 爐門關閉 通電後直接進入童鎖狀態 LED 顯示 解鎖 打開爐門或按住 鍵 3 秒 蜂鳴器一聲長 嘀 即可解鎖 自動加鎖 在待機狀態 若連續 1 分鐘無操作 蜂鳴器一聲長 嘀 即表示進入童鎖 狀態 LED 顯示 如果設置了時鐘則顯示時鐘 解鎖 打開爐門或按住 鍵 3 秒 蜂鳴器一聲長 嘀 即可解鎖 加鎖 在待機狀態 按住 鍵 3 秒 一聲長 嘀 即表示進入童鎖狀態 LED 顯示 如果設置了時鐘則顯示時鐘 解鎖 在鎖定狀態 按住 鍵 3 秒 一聲長 嘀 即可解鎖 LED 返回正常 狀態下的顯示 旋鈕 可繼續烹調 14 ...

Page 16: ...象 爐內沒有食物時微波爐意 外開始操作 禁止爐內無任何食物時操作該微波爐 此操作非常危險 很可 能會損壞微波爐 故障 可能原因 解决方法 1 電源綫沒有插緊 拔下插頭 待 10 秒鐘後重插 2 保險絲燒斷或斷路器工作 更換保險絲或重新設置斷路 器 由本公司專業人員負責維 修 微波爐無法啓動 3 電源插座有問題 用其他電器測試插座是否有 問題 微波爐不加熱 4 爐門未關好 關好爐門 微波爐運行時玻璃轉盤會 發出響聲 5 滾筒支托和微波爐底變髒 參考 微波爐的維修保養 對不潔的部件進行清洗 産品或産品隨附文件上的此標志表示本産品不可視爲家庭廢弃物 相反需 將其交至相應的回收點對電氣和電子設備進行回收 如日後需要弃置 請遵循本地的廢物弃置條例 有關産品處理 恢復使用和回收的詳細數據 請聯繫本地政府機構 家庭 廢弃物處理服務機構或購買本産品的商店 弃置前請切斷電源綫 使本産品不能連接電源 15 ...

Page 17: ...SAVE THESE INSTRUCTIONS CAREFULLY Read these instructions carefully before using your microwave oven and keep it carefully MODEL MWH 303 16 ...

Page 18: ... face and the door or allow soil or cleaner residue to accumulate on sealing surfaces c WARNING If the door or door seals are damaged the oven must not be operated until it has been repaired by a competent person If the apparatus is not maintained in a good state of cleanliness its surface could be degraded and affect the lifespan of the apparatus and lead to a dangerous situation ADDENDUM Model R...

Page 19: ...the installation instructions provided 14 Eggs in the shell and whole hard boiled eggs should not be heated in microwave ovens since they may explode even after microwave heating has ended 15 Use this appliance only for its intended uses as described in manual Do not use corrosive chemicals or vapors in this appliance This oven is especially designed to heat It is not designed for industrial or la...

Page 20: ...is appliance is equipped with a cord having a grounding wire with a grounding plug The plug must be plugged into an outlet that is properly installed and grounded Consult a qualified electrician or serviceman if the grounding instructions are not completely understood or if doubt exists as to whether the appliance is properly grounded 27 Appliances are not intended to be operated by means of an ex...

Page 21: ...king warming only Do not leave oven unattended while cooking Use to cover food for reheating and absorbing fat Use with supervision for a short term cooking only Use as a cover to prevent splattering or a wrap for steaming Microwave safe only Follow the manufacturer s instructions Should be labeled Microwave Safe Some plastic containers soften as the food inside gets hot Boiling bags and tightly c...

Page 22: ... the oven and all materials from the carton and oven cavity Your oven comes with the following accessories Glass tray 1 Turntable ring assembly 1 Instruction Manual 1 Metal shields the food from microwave energy Metal trim may cause arcing May cause a fire in the oven Plastic foam may melt or contaminate the liquid inside when exposed to high temperature Wood will dry out when used in the microwav...

Page 23: ...ized service center Turntable Installation Turntable shaft Installation 1 Select a level surface that provide enough open space for the intake and or outlet vents A minimum clearance of 7 5cm is required between the oven and any adjacent walls One side must be open 1 Leave a minimum clearance of 30cm above the oven 2 Do not remove the legs from the bottom of the oven 3 Blocking the intake and or o...

Page 24: ...Control Panel and Features OPERATION 23 ...

Page 25: ...2 During the process of clock setting if you press STOP the oven will go back to the previous status the input time should be within figures the input time should be within CLOCK PRE 1 Press the button once and and flash 2 Turn the to select the microwave P80 P50 P30 P10 will display in order or Press the button to scroll through the power levels 3 Press to confirm 4 Turn the dial to adjust the co...

Page 26: ...sired cooking The oven will start cooking weig cooking ht for the selected length of time at 100 power time then press 1 Press button once the oven will display dEF1 2 Turn the dial to select the weight of the weight should be set between 100 2000g 3 Press button to start defrosting 1 Press WEIGHT TIME DEFROST button twice the oven will display dEF2 2 Turn the dial to select the defrosting time is...

Page 27: ...2 cooking stages Do not use the defrost function in the pre set function Example if you want to cook with 80 microwave power for 7 minutes to start at a given time 1 Press the button once 2 Turn the dial to choose 80 is displayed microwave power till P80 3 Press button to confirm 4 Turn the dial to adjust the cooking time to 7 minutes 5 After the above steps DO NOT press as follows 6 Multi Stage C...

Page 28: ... microwave can automatically calculate the cooking time based on the type of food and weight 1 Turn the dial clockwise A 1 will display on the screen Continue to rotate the dial to access the other auto selections up to A 8 2 Press the to select the chosenauto A 1 A 8 3 Turn the dial to choose the food weight these are pre set and listed below 4 Press button to start cooking 8 Auto Menu button JET...

Page 29: ...he cooking cycle press the button and the 2 In pre set state press the CLOCK PRE SET button to check the time when the cooking will start The pre set time will flash for 3 seconds then the oven will turn back to the clock display 3 During the cooking cycle press the CLOCK PRE SET button to check the current time It will be displayed for 3 seconds 9 Checking Functions current power will be displaye...

Page 30: ...time will display and the setting will be cancelled The buttons will beep if they are pressed correctly if not pressed correctly they will not beep The buzzer will sound five times to remind you when cooking is finished 10 Child lock 11 General information LED display Lock on The microwave oven will be locked on directly when powered on firstly with the door closed LED will display Lock off Open t...

Page 31: ... be separately collected and treated If at any time in future you need to dispose of this product please do NOT dispose of this product with household waste Please send this product to WEEE collecting points where available It is forbidden to run the unit without any food inside It is very dangerous 30 ...

Reviews: