background image

5

INSTALLATION INSTRUCTIONS

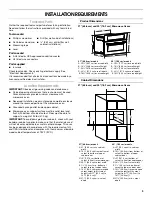
Prepare Built-In Microwave Oven 

1. To avoid floor damage, set the microwave oven onto 

cardboard prior to installation. Do not use handle or any 
portion of the front frame for lifting.

2. Remove the shipping materials and tape from the microwave 

oven.

3. Remove and set aside racks and other items from inside the 

microwave oven.

4. Remove the hardware package from inside the bag 

containing literature.

5. Move the microwave oven and cardboard close to the 

microwave oven’s final location.

Install Microwave Oven

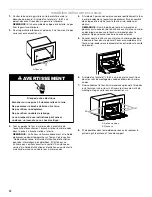
1. Center bottom trim over the lower edge of the cabinet cutout. 

Using an 

¹⁄₈

" (0.32 cm) drill bit, predrill pilot holes through the 

bottom trim.

NOTE: If a spacer kit has been installed, do not install the 
bottom trim.

2. Fasten the bottom trim using 2 screws provided. Do not 

overtighten the screws.

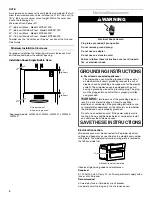
3. With the microwave oven near the opening, plug the 

microwave oven into the grounded 3 prong outlet.

NOTE: The display will light briefly, and the Welcome Guide 
should appear in the display. See “Welcome Guide” section 
of the Use and Care Guide for more detailed information. If 
the display does not light, please reference the “Assistance or 
Service” section of the Use and Care Guide or contact the 
dealer from whom you purchased your microwave oven.

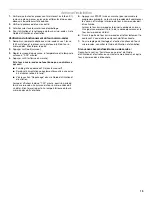
4. Using 2 or more people, lift microwave oven partially into 

cabinet cutout. If a spacer kit has been installed, lift the 
microwave oven over it.

NOTE: Open microwave oven door and push against seal 
area of microwave oven front frame when pushing microwave 
oven into cabinet. Do not push against outside edges.

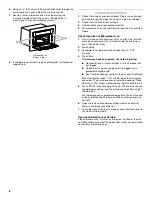
5. Push against the front frame of the microwave oven to push 

oven into cabinet. Push microwave oven completely into 
cabinet and center in cabinet cutout.

A. Two screws

WARNING

Excessive Weight Hazard

Use two or more people to move and install 
microwave oven.

Failure to do so can result in back or other injury.

A

Electrical Shock Hazard

Plug into a grounded 3 prong outlet.

Do not remove ground prong.

Do not use an adapter.

Do not use an extension cord.

Failure to follow these instructions can result in death, 
fire, or electrical shock.

WARNING

Summary of Contents for JMC2127

Page 1: ...3 Location Requirements 3 Electrical Requirements 4 INSTALLATION INSTRUCTIONS 5 Prepare Built In Microwave Oven 5 Install Microwave Oven 5 Complete Installation 6 SÉCURITÉ DU FOUR À MICRO ONDES ENCASTRÉ 8 EXIGENCES D INSTALLATION 9 Outillage et pièces 9 Exigences d emplacement 9 Spécifications électriques 11 INSTRUCTIONS D INSTALLATION 11 Préparation du four à micro ondes encastré 11 Installation ...

Page 2: ...n if the instructions are not followed Your safety and the safety of others are very important We have provided many important safety messages in this manual and on your appliance Always read and obey all safety messages This is the safety alert symbol This symbol alerts you to potential hazards that can kill or hurt you and others All safety messages will follow the safety alert symbol and either...

Page 3: ...ional and complies with the maximum allowable wood cabinet temperatures of 194 F 90 C Product Dimensions 27 68 6 cm and 30 76 2 cm Microwave Ovens Cabinet Dimensions 27 68 6 cm and 30 76 2 cm Microwave Ovens Phillips screwdriver Flat blade screwdriver Measuring tape Level Drill for wall cabinet installations 0 32 cm drill bit for wall cabinet installations 27 68 6 cm models A 25 64 1 cm recessed w...

Page 4: ...cuit breaker Recommended A time delay fuse or time delay circuit breaker A separate circuit serving only this microwave oven A Upper cabinet B Lower single oven 1 2 5 cm 1 2 5 cm A B A Model serial number plate Electrical Shock Hazard Plug into a grounded 3 prong outlet Do not remove ground prong Do not use an adapter Do not use an extension cord Failure to follow these instructions can result in ...

Page 5: ...and the Welcome Guide should appear in the display See Welcome Guide section of the Use and Care Guide for more detailed information If the display does not light please reference the Assistance or Service section of the Use and Care Guide or contact the dealer from whom you purchased your microwave oven 4 Using 2 or more people lift microwave oven partially into cabinet cutout If a spacer kit has...

Page 6: ...4 Touch Start If microwave does not operate check the following Household fuse is intact and tight or circuit breaker has not tripped Check that the power supply cord is plugged into a grounded 3 prong outlet See Troubleshooting section in the Use and Care Guide When the display reads 1 00 minute open the microwave oven door The microwave oven should stop cooking Close door firmly The interior mic...

Page 7: ...7 Notes ...

Page 8: ... cas de non respect des instructions Votre sécurité et celle des autres est très importante Nous donnons de nombreux messages de sécurité importants dans ce manuel et sur votre appareil ménager Assurez vous de toujours lire tous les messages de sécurité et de vous y conformer AVERTISSEMENT DANGER Voici le symbole d alerte de sécurité Ce symbole d alerte de sécurité vous signale les dangers potenti...

Page 9: ...support du four à micro ondes doit être robuste horizontale et en affleurement avec le bas de l ouverture découpée dans le placard Le plancher doit pouvoir supporter un poids de 90 lb 41 0 kg REMARQUE Pour éviter d endommager les placards consulter le constructeur de la maison ou le fabricant des placards pour déterminer si les matériaux utilisés peuvent subir un changement de couleur une déstrati...

Page 10: ... approuvés JJW3430 JJW2430 JJW2427 JJW2330 JJW2327 Modèles de 27 68 6 cm A 27 68 6 cm min de largeur de placard B 19 48 9 cm entre le bas de la découpe et le bas de la porte du placard supérieur C 40 101 6 cm entre le bas de la découpe et le plancher recommandé D 25 64 8 cm de largeur de découpe E 1 3 8 cm min entre le bas de la découpe et le haut de la porte du placard F Hauteur de découpe recomm...

Page 11: ... broche de liaison à la terre Ne pas utiliser un adaptateur Ne pas utiliser un câble de rallonge Le non respect de ces instructions peut causer un décès un incendie ou un choc électrique INSTRUCTIONS DE LIAISON À LA TERRE CONSERVEZ CES INSTRUCTIONS Pour tout appareil ménager connecté par un cordon de courant électrique Il faut que le four à micro ondes soit relié à la terre En cas de court circuit...

Page 12: ...ard Si un ensemble de calage a été installé lever le four à micro ondes par dessus REMARQUE Ouvrir la porte du four à micro ondes et pousser sur la zone du joint du châssis avant du four à micro ondes lorsqu on pousse le four à micro ondes dans le placard Ne pas pousser contre les bords externes 5 Pousser contre le châssis avant du four à micro ondes pour introduire le four dans le placard Pousser...

Page 13: ...à une prise à 3 alvéoles reliée à la terre Voir la section Dépannage dans le Guide d utilisation et d entretien Lorsque l afficheur indique 1 00 minute ouvrir la porte du four à micro ondes La cuisson du four à micro ondes doit s arrêter Bien fermer la porte La lampe intérieure du four à micro ondes doit s éteindre 5 Appuyer sur START mise en marche pour poursuivre le programme préréglé Le four à ...

Page 14: ...14 Notes ...

Page 15: ...15 Notes ...

Page 16: ...W10284419B 2009 Whirlpool Corporation All rights reserved Tous droits réservés 8 09 Printed in U S A Imprimé aux É U ...

Reviews: