background image

6

PARTS AND FEATURES

This manual may cover several different models. The model you 
have purchased may have some or all of the features shown here. 
The appearance of your particular model may differ slightly from 
the illustrations in this manual.

Turntable

The turntable can rotate in either direction to help cook food 
more evenly. Do not operate the oven without the turntable in 
place. See “Assistance or Service” to reorder any of the parts.

To Install:

1. Remove tape from the hub.

2. Place the support on the oven cavity bottom.

3. Place the turntable on the support.

Fit the raised, curved lines in the center of the turntable 
bottom between the three spokes of the hub. The rollers on 
the support should fit inside the turntable bottom ridge.

Turning Off the Turntable

The turntable can be turned off (except during an auto function). 
This is helpful when cooking with plates that are larger than the 
turntable or when cooking with two 10¼" (26 cm) plates that are 
side by side.

To Turn Off: Touch TURNTABLE ON-OFF. A “turntable off” icon 
will appear in the display. The turntable will turn back on 
automatically when cooking is over or CANCEL is touched.

Cooking Rack

The cooking rack is ideal for two-level cooking. It provides extra 
cavity space for cooking 2 or more containers at the same time. 
Insert the rack securely into the rack supports on the side walls of 
the oven. See “Assistance or Service” section to reorder rack.

Rack will become hot. Always use oven mitts or pot holders 
when handling.

Do not allow the rack to touch the inside cavity walls, ceiling 
or floor.

Do not store the rack in the oven. Damage to the oven could 
result if someone accidentally turns on the oven.

Use the rack only when cooking on two levels.

Do not use metal cookware, utensils, or a browning dish with 
the rack.

Do not let food container on rack touch the top or sides of the 
oven.

Do not place popcorn bags on rack.

Do not cook food directly on the rack. Always use a 
microwave-safe container.

The rack is designed specifically for this oven. Do not attempt 
to use any other rack in this oven.

Clean rack supports often (see “General Cleaning” section). 
Damage to the oven could result due to soil buildup.

A. Microwave Inlet Cover
B. Microwave Oven Light

C. Vent Grille
D. Metal Shielded Window

E. Model and Serial Number Plate
F. Cooking Rack

G. Charcoal and Grease Filters 

(shipped in oven cavity)

H. Cooking Guide Label

I. Cooktop Light

J. Control Panel

Parts and Features not shown
Turntable
Steamer Vessel

A. Turntable
B. Hub

C. Support
D. Shaft

A

B

C

G

F

D

J

I

H

E

A

B

C

D

Summary of Contents for GH4155XP

Page 1: ...INATION Use CareGuide For questions about features operation performance parts accessories or service call 1 800 253 1301 or visit our website at www whirlpool com Table of Contents 2 8204919 4619 652 64141 Model GH4155XP ...

Page 2: ...Mode 8 MICROWAVE OVEN USE 9 Food Characteristics 9 Cooking Guidelines 9 Cookware and Dinnerware 9 Aluminum Foil and Metal 10 Cooking Power 10 Cooking 11 Sensor Cooking 11 Preset Cooking 12 Cooking in Stages 12 Reheating 12 Defrosting 13 Steaming 14 Simmering 14 Warm Hold 14 MICROWAVE OVEN CARE 15 General Cleaning 15 Replacing Filters 16 Replacing Cooktop Light 16 Replacing Microwave Oven Light 16 ...

Page 3: ...Some products such as whole eggs in the shell and sealed containers for example closed glass jars are able to explode and should not be heated in the microwave oven Use the microwave oven only for its intended use as described in this manual Do not use corrosive chemicals or vapors in the microwave oven This type of oven is specifically designed to heat cook or dry food It is not designed for indu...

Page 4: ...e overheating of the oven Do not store anything directly on top of the microwave oven when the microwave oven is in operation To reduce the risk of injury to persons Liquids such as water coffee or tea are able to be overheated beyond the boiling point without appearing to be boiling Visible bubbling or boiling when the container is removed from the microwave oven is not always present THIS COULD ...

Page 5: ...urrent The microwave oven is equipped with a cord having a grounding wire with a grounding plug The plug must be plugged into an outlet that is properly installed and grounded WARNING Improper use of the grounding plug can result in a risk of electric shock Consult a qualified electrician or serviceman if the grounding instructions are not completely understood or if doubt exists as to whether the...

Page 6: ...ng rack is ideal for two level cooking It provides extra cavity space for cooking 2 or more containers at the same time Insert the rack securely into the rack supports on the side walls of the oven See Assistance or Service section to reorder rack Rack will become hot Always use oven mitts or pot holders when handling Do not allow the rack to touch the inside cavity walls ceiling or floor Do not s...

Page 7: ...udes one or more of the following cooking power cook time and food quantity or weight See the charts in the Cooking and or Reheating sections for additional information Start The START pad begins any function If not touched within 5 seconds after touching a pad START will appear on the display as a reminder If not touched within 1 minute after touching a pad the display will return to the time of ...

Page 8: ...d function will be canceled When the set time ends END will appear on the display and 1 tone will sound 4 Touch TIMER OFF at any time to cancel the Timer The length of time can be changed during the countdown by repeating the above steps ChildLock The Child Lock shuts down the control panel pads to prevent unintended use of the microwave oven When the control is locked only the Vent Fan and Light ...

Page 9: ...h a higher temperature and heat faster than other foods Heavy dense foods such as meat and potatoes require a longer cook time than the same size of a light porous food such as cake CookingGuidelines Covering Covering food helps retain moisture shorten cook time and reduce spattering Use the lid supplied with cookware If a lid is not available wax paper paper towels or plastic wrap approved for mi...

Page 10: ... the following chart as a general guide for the suggested cooking power of specific foods Melamine Follow manufacturer s recommendations Paper Towels Dinnerware Napkins Use nonrecycled and those approved by the manufacturer for microwave oven use Plastic Wraps Bags Covers Dinnerware Containers Use those approved by the manufacturer for microwave oven use Pottery and Clay Follow manufacturer s reco...

Page 11: ...the SENSOR pads named in chart The microwave oven will automatically turn on after a short delay The progress bar will show the approximate time remaining When the cycle ends END will appear in the display 4 end of cycle tones will sound and then reminder tones will sound every minute 2 Touch CANCEL or open the door to clear the display and or stop reminder tones The cook time except POPCORN can b...

Page 12: ... tones The cook time and cook power of the cycling stage can be changed after touching START without interrupting cooking To Change Cook Time Touch COOK TIME The countdown will freeze for a few seconds Enter the new cook time and touch START or wait a few seconds for the countdown to resume To Change Cook Power Touch COOK POWER repeatedly to scroll through the cook power levels Touch START Reheati...

Page 13: ...eats and Poultry can be set from 0 2 to 6 6 lb 90 g to 3 kg Fish can be set from 0 2 to 4 4 lb 90 g to 2 kg 4 Touch START The display will count down the defrost time About halfway through defrosting TURN will appear on the display while the oven continues to operate Open door turn food close door then press START to resume When the cycle ends END will appear in the display 4 end of cycle tones wi...

Page 14: ... to cup 60 to 125 mL of water to vegetables and cover dish with its lid not plastic wrap 1 Touch SIMMER COOK 2 Touch the number pads to set a length of time to simmer 3 Touch START BOIL will appear on the display When water begins to boil the display will count down the simmer time When the cycle ends END will appear in the display 4 end of cycle tones will sound and then reminder tones will sound...

Page 15: ...d should be kept clean Mild nonabrasive soaps and detergents Rinse with clean water and dry with soft lint free cloth Glass cleaner and paper towels or nonabrasive plastic scrubbing pad Apply glass cleaner to towel not directly to surface Stainless Steel on some models Do not use soap filled scouring pads abrasive cleaners steel wool pads gritty washcloths or some paper towels Damage may occur Rub...

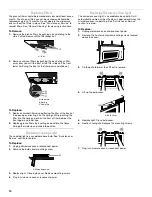
Page 16: ...er and lower lips 2 Replace grease filters by inserting one end into the frame Swing other side up and slide into position ReplacingCooktopLight The cooktop light is a candelabra base bulb See Assistance or Service section to reorder To Replace 1 Unplug microwave oven or disconnect power 2 Remove the bulb cover mounting screw A Mounting screw 3 Replace light Close bulb cover Replace mounting screw...

Page 17: ...erate the oven without turntable and turntable support working properly Turntable rotates both directions This is normal and depends on motor rotation at the beginning of the cycle Display shows messages Is the display showing There has been a power failure or the clock time has been turned off See Display section to clear display See Clock section to reset the clock or to turn it on Is the displa...

Page 18: ...ion Use and maintenance procedures Accessory and repair parts sales Specialized customer assistance Spanish speaking hearing impaired limited vision etc Referrals to local dealers repair parts distributors and service companies Whirlpool designated service technicians are trained to fulfill the product warranty and provide after warranty service anywhere in the United States To locate the Whirlpoo...

Page 19: ...19 Notes ...

Page 20: ...BE LIABLE FOR INCIDENTAL OR CONSEQUENTIAL DAMAGES Some states do not allow the exclusion or limitation of incidental or consequential damages so this exclusion or limitation may not apply to you This warranty gives you specific legal rights and you may also have other rights which may vary from state to state Outside the 50 United States this warranty does not apply Contact your authorized Whirlpo...

Reviews: