background image

7

GB

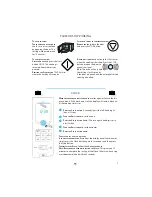
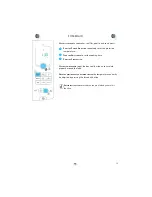
PAUSE OR STOP COOKING

T

O


PAUSE


COOKING

:

T

HE


COOKING


CAN


BE


PAUSED


to 

check, turn or stir the food 
by opening the door. The 
setting will be maintained 
for 10 minutes.

I

F


YOU


DON

T


WANT


TO


CONTINUE


COOKING

:

R

EMOVE


THE


FOOD

,  

close the door 

and press the STOP button.

T

O


CONTINUE


COOKING

:

C

LOSE


THE


DOOR


and press the Start 

button ONCE. The cooking is 
resumed from where it was 
paused. 

P

RESSING


THE

 S

TART


BUTTON


 TWICE will in-

crease the time by 30 seconds.

BEEP


WILL


SIGNAL


once a minute for 10 minutes 

when the cooking is fi nished. Press the STOP 
button or open the door to 
cancel the signal.

N

OTE

:  

The oven will only hold 

the settings for 60 seconds 
if the door is opened and then closed after the 
cooking is fi nished.

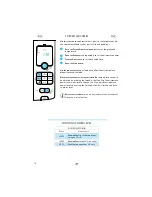
CLOCK

W

HEN


THE


APPLIANCE


IS


FIRST


PLUGGED


IN


 or after a power failure, the dis-

play is blank. If the clock is not set, the display will remain blank un-
til the cooking time is set.

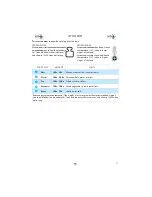
q

  P

RESS


THE

 C

LOCK


BUTTON


 (3 seconds) until the left-hand digits 

(hours) flicker.

w

  T

URN


THE

 A

DJUST


KNOB


 to set the hours.

e

  P

RESS


THE

 C

LOCK


BUTTON


AGAIN

 (The two right-hand digits (min-

utes) flicker).

r

  T

URN


THE

 A

DJUST


KNOB


 to set the minutes.

t

  P

RESS


THE

 C

LOCK


BUTTON


AGAIN

.

T

HE


CLOCK


IS


SET


and in operation.

I

F


YOU


WISH


TO


REMOVE


THE

 C

LOCK


 from the display once it has been set, 

simply press the Clock button again for 3 seconds and then press 
the Stop button.

T

O


REINSTATE


THE

 C

LOCK

 follow the above procedure.

N

OTE

: K

EEP


THE


DOOR


OPEN


WHILE


SETTING


THE

 C

LOCK

.  

This gives you 10 

minutes to complete the setting of the Clock. Otherwise, each step 
must be accomplished within 60 seconds.

q

w

et

r

Summary of Contents for FT 337

Page 1: ...1 GB FT 337 www whirlpool com ...

Page 2: ...ater Keep the cord away from hot surfaces Electrical shock fire or other hazards may result DO NOT REMOVE THE MICROWAVE INLET PROTECTION PLATES located on the side of the oven cavity wall They prevent grease food parti cles from entering the mi crowave inlet channels CHECK THAT THE VOLTAGE on the rating plate corresponds to the voltage in your home THE OVEN CAN BE OPERATED ONLY if the oven door is...

Page 3: ...tic or oth er combustible materials in the cook ing process Paper can char or burn and some plastics can melt if used when heating foods Do not leave the oven unattended if you are using a lot of fat or oil since they can overheat and cause a fire IF MATERIAL INSIDE OUTSIDE THE OVEN SHOULD IGNITE OR SMOKE IS OBSERVED keep oven door closed and turn the oven off Dis connect the power cord or shut of...

Page 4: ...et the teaspoon remain in the container 3 After heating allow standing for a short time stirring again before carefully re moving the container from the oven CAREFUL ALWAYS REFER to a microwave cookbook for de tails Especially if cooking or reheating food that contains alcohol AFTER HEATING BABY FOOD or liquids in a baby bottle or in a baby food jar always stir and check the temperature before ser...

Page 5: ...icro wave oven ensure that they do not come in contact with the interior of the oven This is especially important with accesso ries made of metal or metal parts ALWAYS ENSURE that the turntable is able to turn freely before starting the oven If the turnta ble isn t able to turn freely you should use a smaller vessel or the TurnTable stop function see Large vessels THERE ARE a number of accessories...

Page 6: ...urposes such as cooking eggs or letting the dough rise before baking etc q PRESS THE CLOCK BUTTON w TURN THE ADJUST KNOB to set the time to measure e PRESS THE START BUTTON FLASHING COLONS indicate that the timer is running AN ACOUSTIC SIGNAL will be heard when the timer has finished to count down ONE PRESS ON THE CLOCK BUTTON displays how much is left on the Timer It s displayed for 3 seconds and...

Page 7: ...ter the cooking is finished CLOCK WHEN THE APPLIANCE IS FIRST PLUGGED IN or after a power failure the dis play is blank If the clock is not set the display will remain blank un til the cooking time is set q PRESS THE CLOCK BUTTON 3 seconds until the left hand digits hours flicker w TURN THE ADJUST KNOB to set the hours e PRESS THE CLOCK BUTTON AGAIN The two right hand digits min utes flicker r TUR...

Page 8: ... THE POWER BUTTON repeatedly to set the microwave power w TURN THE ADJUST KNOB to set the cooking time e PRESS THE START BUTTON q w e MICROWAVES ONLY POWER SUGGESTED USE JET 950 W REHEATING of beverages water clear soups coffee tea or other food with a high water content If the food contains egg or cream choose a lower power 750 W COOKING of fish meat vegetables etc 650 W COOKING dishes not possib...

Page 9: ...s TURN LARGE JOINTS halfway through the defrost ing process FROZEN FOOD IN PLASTIC BAGS plastic films or card board packages can be placed directly in the oven as long as the package has no met al parts e g metal twist ties THE SHAPE OF THE PACKAGE alters the de frosting time Shallow packets defrost more quickly than a deep block SEPARATE PIECES as they begin to defrost Individual slices defrost m...

Page 10: ...OST BUTTON repeatedly to select food class see table w TURN THE ADJUST KNOB to set the weight of the food e PRESS THE START BUTTON MIDWAY THROUGH THE DEFROSTING PROCESS the oven stops and prompts you to TURN FOOD Open the door Turn the food Close the door and restart by pressing the Start button NOTE The oven continues automatically after 2 min if the food hasn t been turned The defrosting time wi...

Page 11: ... than deep freeze temperature 18 C choose higher weight of the food JET DEFROST FOOD CLASS AMOUNT HINTS q MEAT 100G 2KG Minced meat cutlets steaks or roasts w POULTRY 100G 2 5KG Chicken whole pieces or fillets e FISH 100G 1 5KG Whole steaks or fillets r VEGETABLES 100G 1 5KG Mixed vegetables peas broccoli etc t BREAD 100G 1KG Loaf buns or rolls FOR FOOD NOT LISTED IN THIS TABLE and if the weight i...

Page 12: ... switches the Grill element on and off The timer will continue to count down when the Grill el ement is turned off DO NOT LEAVE THE OVEN DOOR OPEN for long periods when the Grill is in operation as this will cause a drop in temperature ENSURE THAT THE UTENSILS used are heat resistant when you use this function DO NOT USE PLASTIC utensils when grilling They will melt Items of wood or paper are not ...

Page 13: ...ched the oven switches to Grill only mode DO NOT LEAVE THE OVEN DOOR OPEN for long periods when the Grill is in operation as this will cause a drop in temperature IF YOU COOK LARGE GRATINS which require stopped turntable rotation then turn the dish after approximately half the cooking time This is necessary for getting colour on the whole top surface ENSURE THAT THE UTENSILS used are microwave saf...

Page 14: ...THE UTENSILS used are microwave safe and heat resis tant when you use this function Place the utensil on the glass turntable IF YOU COOK LARGE GRATINS which require stopped turntable rotation then turn the dish after approximately half the cooking time This is necessary for getting colour on the whole top surface q PRESS THE GRATIN BUTTON w TURN THE ADJUST KNOB to set the cooking time e PRESS THE ...

Page 15: ... w TURN THE ADJUST KNOB to set the cooking time e PRESS THE START BUTTON USE THE LOW WIRE RACK to put food on to allow the air to circulate properly around the food ONCE THE HEATING PROCESS HAS BEEN STARTED the temperature can easily be adjusted by pressing the forced air button ENSURE THAT THE UTENSILS used are ovenproof when you use this function e q w ...

Page 16: ...djusted by pressing the forced air button Also the microwave power level is possible to change The Max possible microwave power level when using the Forced air Combi is limited to a facto ry preset level USE THIS FUNCTION TO cook roast meats poultry jacket potatoes fro zen convenience foods cakes pastry fish and puddings ENSURE THAT THE UTENSILS used are microwave safe and ovenproof when you use t...

Page 17: ...EEN STARTED the temperature can eas ily be adjusted by pressing the jet preheat button DURING THE PREHEATING PROCESS PRE HEAT is alternately displayed and the forced air icon keeps blinking until the set temperature is reached WHEN THE SET TEMPERATURE IS REACHED the display shows END and the oven automatically switches to the Forced Air function keep ing the set temperature for 10 minutes before s...

Page 18: ... Add or Stir the food Close the door and restart by pressing the Start button NOTE If the door isn t opened at this time within 2 minutes the oven will stop and go to stand by mode q FOOD CLASS RECOMMENDED AMOUNT ACCESSORIES TO USE DURING COOKING q RICE MIX 300G 650G MICROWAVE SAFE VESSEL STIR FOOD w PASTA MIX 250G 550G MICROWAVE SAFE VESSEL STIR FOOD e SOUP 250G 1000G MICROWAVE SAFE VESSEL STIR F...

Page 19: ...N for baking of cake mix and pre baked rolls ALWAYS PLACE THE FOOD on the low wire rack JET AIR q PRESS THE JET AIR BUTTON repeatedly to select food class see ta ble w TURN THE ADJUST KNOB to set the amount of the food if necessary e PRESS THE START BUTTON ENSURE THAT THE UTENSILS used are microwave safe and ovenproof when you use this function FOOD CLASS AMOUNT HINTS q CAKE MIX 400G 800G USE micr...

Page 20: ... function w PROGRAM your settings e PRESS AND KEEP THE MEMO BUTTON PRESSED for 3 seconds until an acoustic signal is heard The setting is now stored You may reprogram the memory as many times as you wish WHEN THE APPLIANCE is plugged in or after a power failure your Memo function will have stored 2 minutes at full microwave power as de fault setting HOW TO USE A STORED SETTING q PRESS THE MEMO BUT...

Page 21: ...erate with the turnta ble in place DO NOT operate the microwave oven when the turntable has been removed for cleaning USE A SOFT AND DAMP CLOTH with mild detergent to clean the interior surfaces front and rear of the door and the door opening DO NOT ALLOW GREASE or food particles to build up around the door FOR STUBBORN STAINS boil a cup of water in the oven for 2 or 3 minutes Steam will soften th...

Page 22: ... against exposure to microwave energy DO NOT REMOVE ANY COVER ENVIRONMENTAL HINTS THE PACKING BOX may be fully re cycled as confirmed by the re cycling symbol Follow lo cal disposal regulations Keep potentially hazardous pack aging plastic bags polysty rene etc out of the reach of chil dren THIS APPLIANCE is marked according to the Euro pean directive 2002 96 EC on Waste Electrical and Electronic ...

Page 23: ...23 GB ...
Page 24: ...lowing for this oven Test Amount Approx time Power level Container 12 3 1 1000 G 11 12 MIN 750 W PYREX 3 226 12 3 2 475 G 5 5 MIN 750 W PYREX 3 827 12 3 3 900 G 14 15 MIN 750 W PYREX 3 838 12 3 4 1100 G 24 26 MIN GRATIN SETTING PYREX 3 827 12 3 5 700 G 24 26 MIN FA 170 C 90 W PYREX 3 827 12 3 6 1200 G 32 35 MIN FA 200 C 350 W PIE PLATE 13 3 500 G 10 12 MIN 160 W PLASTIC PLATE Whirlpool is a regist...

Reviews: