background image

3

AIR CONDITIONER SAFETY

INSTALLATION REQUIREMENTS

Tools and Parts

Assemble the required tools and parts before starting installation. 
Read and follow the instructions provided with any tools listed 
here.

Tools needed

Parts supplied

Check that all parts are included in parts package.

You can be killed or seriously injured if you don't
immediately follow instructions.

You can be killed or seriously injured if you don't
follow instructions.

All safety messages will tell you what the potential hazard is, tell you how to reduce the chance of injury, and tell you
what can happen if the instructions are not followed.

Your safety and the safety of others are very important.

We have provided many important safety messages in this manual and on your appliance. Always read and obey all
safety messages.

This is the safety alert symbol.

This symbol alerts you to potential hazards that can kill or hurt you and others.

All safety messages will follow the safety alert symbol and either the word “DANGER” or
“WARNING.” These words mean:

IMPORTANT SAFETY INSTRUCTIONS

WARNING:


To reduce the risk of fire, electrical shock or injury when using your air conditioner, follow these basic precautions:


SAVE THESE INSTRUCTIONS

Unplug air conditioner before servicing.

Use two or more people to move and install air conditioner.

Plug into a grounded 3 prong outlet.

Do not remove ground prong.

Do not use an adapter.

Do not use an extension cord.

Flat-blade and Phillips 
screwdrivers

Scissors

Tape measure

Drill and 

³⁄₃₂

 in. or smaller 

bit

1. Window-lock bracket 
2. #8 x 

³⁄₈

 in. pan-head screws (6)

3. #8 x 

³⁄₄

 in. round-head screws (5) 

4. #10 x 

³⁄₈

 in. pan-head screws (3)

5. Side curtains (2)  
6. Top channel 
7. Foam seal 
8. Side curtain frames (2)

1

5

4

3

2

6

7

8

Summary of Contents for CA10WXP0

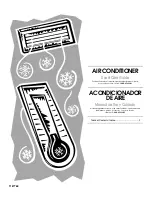
Page 1: ...formance parts accessories or service call 1 800 253 1301 ACONDICIONADOR DE AIRE ManualdeUsoyCuidado Si tiene preguntas respecto a las características funcionamiento rendimiento partes accesorios o servicio técnico llame al 1 800 253 1301 Table of Contents Índice 2 1187768 ...

Page 2: ...ccessories 14 ÍNDICE SEGURIDAD DEL ACONDICIONADOR DE AIRE 15 REQUISITOS DE INSTALACIÓN 15 Herramientas y piezas 15 Requisitos para la ubicación 16 Requisitos eléctricos 16 INSTRUCCIONES DE INSTALACIÓN 17 Desempaque el acondicionador de aire 17 Prepare el acondicionador de aire para la instalación 17 Colocación del acondicionador de aire 18 Complete la instalación 19 CÓMO USAR SU ACONDICIONADOR DE ...

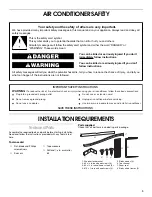
Page 3: ...ppliance Always read and obey all safety messages This is the safety alert symbol This symbol alerts you to potential hazards that can kill or hurt you and others All safety messages will follow the safety alert symbol and either the word DANGER or WARNING These words mean IMPORTANT SAFETY INSTRUCTIONS WARNING To reduce the risk of fire electrical shock or injury when using your air conditioner fo...

Page 4: ...ng specified on the model and serial number label The model and serial number label is located on the right hand side of the cabinet Specific electrical requirements are listed in the chart Follow the requirements for the type of plug on the power supply cord Recommended ground method For your personal safety this air conditioner must be grounded This air conditioner is equipped with a power suppl...

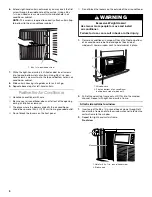
Page 5: ...ower cord exits the air conditioner should be no more than 4 ft 122 cm from a grounded outlet 1 Locate provided bags of screws 2 Place the top channel on top of the air conditioner lining up the holes in top channel with the holes on top of air conditioner 3 Using 3 10 x in pan head screws attach top channel to air conditioner Install side curtains NOTE Attach curtains to unit before placing unit ...

Page 6: ...r conditioner should be no more than 4 ft 122 cm from a grounded outlet Do not block the louvers on the front panel Do not block the louvers on the outside of the air conditioner 1 Center air conditioner in window Check that feet on bottom of air conditioner are behind and against back side of windowsill Lower window sash to hold cabinet in place 2 Pull left hand curtain frame out until it fits in...

Page 7: ...e through the hole in the bracket into the window sash 3 Attach window lock bracket to window sash with 8 x in round head screw to secure window in place 4 Insert foam seal behind the top of the lower window sash and against the glass of the upper window 5 Plug into a grounded 3 prong outlet 1 Side curtain against window channel 2 Window channel 3 8 x in round head screw 1 8 x in round head screws...

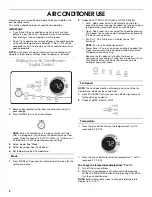
Page 8: ...ting you desire 2 Choose AUTO COOL FAN ONLY or POWER SAVER Auto Cools room while it automatically controls fan speed You cannot change fan speed but you can adjust temperature by pressing the plus or minus button Cool Cools room You can select fan speed by pressing Fan Speed You can then adjust temperature by pressing the plus or minus button Fan Only Only the fan runs Display shows FO fan only NO...

Page 9: ...dicator light will flash 7 Press the plus or minus button to change delay time 1 to 24 hours 8 Press TIMER again or wait 10 seconds Indicator light will remain on To clear Timer delay program NOTE Air conditioner can be either on or off Press and hold TIMER for 3 seconds Indicator light will shut off To see the remaining time in hours 1 Press TIMER once after it has been programmed 2 While the dis...

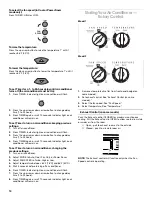
Page 10: ...o set Timer to turn on air conditioner changing the previous settings 1 Turn on air conditioner 2 Adjust MODE to Auto Cool Fan Only or Power Saver 3 Adjust FAN SPEED to Turbo High or Low 4 Adjust temperature between 64 F 18ºC and 86 F 30ºC 5 Wait 3 seconds before turning off air conditioner 6 Press TIMER Indicator light on air conditioner will flash 7 Press the up arrow or down arrow button to cha...

Page 11: ... Model 2 Temperature Turn the TEMPERATURE control to a mid setting Adjust the air conditioner s performance by turning the Temperature control clockwise for maximum cooling For less cooling turn the TEMPERATURE control counterclockwise Experiment to find the setting that suits you best ChangingAirDirection Roll the wheel to direct the air right or left Rotate the whole cartridge to direct air up d...

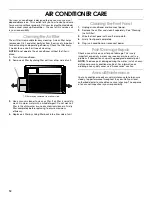
Page 12: ...se any chemical cleaners Air dry filter completely before replacing to ensure maximum efficiency 4 Replace air filter by sliding filter back into either side of unit CleaningtheFrontPanel 1 Unplug air conditioner or disconnect power 2 Remove the air filter and clean it separately See Cleaning the Air Filter 3 Wipe the front panel with a soft damp cloth 4 Air dry front panel completely 5 Plug in ai...

Page 13: ...es during the hottest part of the day A higher capacity air conditioner may be required depending on the size of the room being cooled Air conditioner cycles on and off too much or does not cool The MODE is set to POWER SAVER on some models Use Power Saver only when you are away from home or asleep since the fan does not circulate the room air continuously Use LOW HIGH or TURBO for your best comfo...

Page 14: ...ytime phone number in your correspondence Please record your model s information Whenever you call to request service on your appliance you need to know your complete model number and serial number You can find this information on the model and serial number label See Electrical Requirements for model and serial number location Please record the model and serial number information below Also recor...

Page 15: ...una y de la palabra PELIGRO o ADVERTENCIA Estas palabras significan PELIGRO ADVERTENCIA a usted y a los demás Lea y obedezca siempre todos los mensajes de seguridad Todos los mensajes de seguridad irán a continuación del símbolo de advertencia de seguridad puede morir lesión INSTRUCCIONES IMPORTANTES DE SEGURIDAD ADVERTENCIA Para reducir el riesgo de incendio choque eléctrico o lesiones personales...

Page 16: ...res de 60 Hz sólo de CA en un circuito separado Se requiere un fusible de retardo de 15 amperios o un disyuntor Use solamente alambre de cobre calibre 14 El tamaño del fusible no debe exceder la clasificación del circuito especificada en la etiqueta de modelo y serie La etiqueta con el número de modelo y serie está ubicada en el lado derecho del gabinete Los requisitos eléctricos específicos se in...

Page 17: ... aire Prepareelacondicionadordeaire paralainstalación Trate el acondicionador de aire con cuidado Asegúrese de que el acondicionador de aire no se caiga de la abertura durante la instalación o al quitarlo La parte de donde sale el cordón eléctrico del acondicionador de aire debe colocarse a no más de 4 pies 122 cm de un tomacorriente puesto a tierra 1 Ubique las bolsas provistas con tornillos 2 Co...

Page 18: ...iores para la cortina izquierda Colocacióndelacondicionador de aire Trate el acondicionador de aire con cuidado Asegúrese de que el acondicionador de aire no se caiga de la abertura durante la instalación o al quitarlo La parte de donde sale el cordón eléctrico del acondicionador de aire debe colocarse a no más de 4 pies 122 cm de un tomacorriente puesto a tierra No bloquee las rejillas que están ...

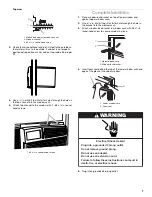
Page 19: ...2 tornillos de cabeza redonda 8 x pulg Completelainstalación 1 Coloque el soporte de seguridad de la ventana en la parte superior de la ventana inferior y contra el marco de la ventana superior 2 Utilice una broca de barrena de pulg para perforar un orificio para comenzar a través del orificio en el marco de la ventana 3 Fije el soporte de seguridad de la ventana al marco de la ventana con un torn...

Page 20: ...rá en la pantalla los ajustes programados Modo Cool Enfriamiento velocidad de ventilación Turbo 72 F 22 C Cuando se encienda todas las otras veces mostrará los ajustes previos en la pantalla 3 Selecccione el modo Vea Mode Modo 4 Selecccione la velocidad de ventilación Vea Fan Speed Velocidad de ventilación 5 Selecccione la temperatura Vea Temperatura Mode Modo 1 Oprima MODE Modo hasta que se encie...

Page 21: ...star Encendido 1 Oprima TIMER Temporizador La luz del indicador se encenderá intermitentemente 2 Oprima el botón de más o de menos para cambiar el tiempo de retardo de 1 a 24 horas 3 Oprima TIMER nuevamente o espere 10 segundos La luz del indicador permanecerá encendida Para programar el temporizador de manera que el acondicionador de aire se encienda manteniendo los ajustes previos 1 Apague el ac...

Page 22: ...icamente Fan Only Sólo ventilación la velocidad de ventilación se ajusta automáticamente en Turbo Cool Enfriamiento o Power Saver Ahorro de energía usted puede ajustar la velocidad de ventilación Para seleccionar la velocidad de ventilación solamente en el modo de Cool o Power Saver Oprima TURBO HIGH Alta or LOW Baja Para subir la temperatura Presione el botón con la flecha hacia arriba para aumen...

Page 23: ...n Only o Power Saver 3 Ajuste el FAN SPEED Velocidad de ventilación a Turbo High or Low 4 Ajuste la temperatura entre 64 F 18 C y 86 F 30 C 5 Espere 3 segundos antes de apagar el acondicionador de aire 6 Oprima TIMER La luz del indicador en el panel de control del acondicionador de aire se encenderá intermitentemente 7 Oprima el botón con la flecha hacia arriba o abajo para cambiar el tiempo de re...

Page 24: ... Power Saver cuando esté fuera del hogar o durmiendo Modelo 1 Modelo 2 Temperatura Gire el control de TEMPERATURE Temperatura a un ajuste medio Ajuste el funcionamiento del acondicionador de aire girando el control de temperatura hacia la derecha para un enfriamiento máximo Para un menor enfriamiento gire el control de TEMPERATURE hacia la izquierda Experimente y busque el ajuste que más le conven...

Page 25: ...mportante especialmente en lugares que están cerca de los océanos o donde la herrumbre es un problema Si es necesario retoque con un esmalte de buena calidad NOTA Para reducir el daño a la pintura durante el invierno instale una cubierta resistente sobre el gabinete del acondicionador de aire Para información sobre cómo pedir una cubierta resistente vea la sección de Accesorios Mantenimientoanual ...

Page 26: ... su acondicionador de aire para habitación Los acondicionadores de aire para habitaciones no están diseñados para enfriar varias habitaciones El filtro está sucio u obstruido por desechos Limpie el filtro El evaporador interno y los serpentines del condensador externo están sucios u obstruidos por desechos Vea Mantenimiento Anual Hay demasiado calor o humedad se está cocinando en recipientes abier...

Page 27: ...espondencia Por favor anote la información sobre su modelo Siempre que llame para solicitar servicio del aparato necesitará saber el número del modelo y el número de serie completos Esta información la encuentra en la placa de número del modelo y número de serie Vea la ubicación del número del modelo y del número de serie en Requisitos eléctricos Por favor anote la información sobre el número del ...

Page 28: ...1187768 2003 All rights reserved Todos los derechos reservados 12 03 Printed in U S A Impreso en EE UU ...

Reviews: