22
CAUTION:
1
. Use an individual power circuit specifically for the air conditioner. As for the wiring method, refer to the
circuit diagram on the inside of the access door .
2. Check that the cable thickness conforms to the power source specification.
3. Check the wires and make sure that they are all tightly fastened after cable connection.
4. Be sure to install an earth leakage circuit breaker in a wet or moist area.
Cable Specifications
Capacity
(Btu/h)
Power cord
Power connecting cord
Power connecting cord 1
Main
power
supply
(Note)
Type
Normal cross -
sectional area
Type
Normal cross -
sectional area
Type
Normal cross -
sectional area
7K,9K,12K
H05VV-F
1.0~1.5mm² X3
H07RN-F
1.0~1.5mm²X3
H05RN-F
0.75mm²X2
(Heat-pump)
To indoor
18K
H05VV-F
RVV
1.5~2.0mm² X3
H07RN-F
1.5mm²X3
H05RN-F
0.75mm²X2
(Heat-pump)
To indoor
24K
H07RN-F
2.5mm² X3
H07RN-F
1.5mm²X3(Heat-pump)
1.5mm²X4(Cooling-only)
H05RN-F
0.75mm²X3
(Heat-pump)
To outdoor
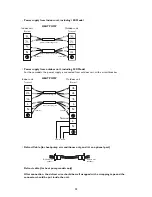
WIRING DIAGRAM
Make sure that the colour of wires of the outdoor unit and the terminal number are the same as those of
the indoor unit.
• Power supply from Indoor unit, including 7K,9K,12K, Model
AC L-IN
AC N-IN
1(N)
2(L)
1(N)
3(SI)
2(L)
3(SI)
HEAT PUMP
Power connecting cord
Indoor unit
Terminal
Outdoor unit
Terminal
Yellow/Green
Blue (Gray)
Brown
Black
Yellow/Green
Blue (Gray)
Brown
Black
Evaporator
Indoor unit control board
Power supply
YE/GN
BN
BU

