18
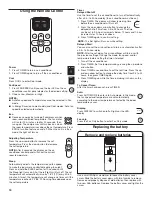
Using the Remote Control
Power
1. Press POWER to turn on air conditioner.
2. Press POWER again to turn off the air conditioner.
Cool
Press COOL to enter Cool mode.
Fan Speed
1. Press FAN SPEED until you see the bar LED on the air
conditioner control panel display for the desired setting.
2. Choose Low, Medium, or High.
NOTES:
■
Auto fan speed and Temperature cannot be selected in Fan
mode.
■
In Energy Saver (on some models) and Cool modes, Auto fan
speed is selected automatically.
Adjusting Temperature
Press the up arrow button to increase the set
temperature. Press the down button to decrease
the set temperature.
NOTE:
After 5 seconds, the display on the air
conditioner control panel will show the current
room temperature.
POWER
COOL
SLEEP
TIMER
ECO
DISPLAY
AUTO
MODE
FAN
ONLY
FAN
SPEED
Timer
Delayed Shutoff:
Use the timer to set the air conditioner to turn off automatically
after a 0.5- to 24-hour delay (the air conditioner must be on):
1. Press TIMER. The display will show remaining time
before the air conditioner will turn off.
2. Press the up or down arrow button to change the
delayed shut-off time from 0.5 to 24 hours. The time
can be set in 0.5-hour increments below 10 hours and 1-hour
increments for 10 hours or above.
3. Press TIMER again to confirm setting.
NOTE:
The Set light will turn on while setting.
Delayed Start:
You can also set the air conditioner to turn on automatically after
a 0.5- to 24-hour delay.
NOTE:
After the set delay, the air conditioner will turn on with
the previous settings. Change the mode, fan speed, and/or
temperature before setting the timer, if desired.
1. Turn off the air conditioner.
2. Press TIMER. Set the temperature by pressing the up or down
arrow button.
3. Press TIMER a second time to set the rest time. Press the up
or down arrow button to change the delay time from 0.5 to 24
hours, then press TIMER again.
4. Press TIMER again while the time remaining is shown on the
display.
To Cancel Timer:
After the timer has been set, press TIMER.
POWER
COOL
SLEEP
TIMER
ECO
DISPLAY
AUTO
MODE
FAN
ONLY
FAN
SPEED
Eco
■
Conserves energy by turning off compressor when
room reaches desired temperature. The fan motor
will run for 10 minutes, stop for 20 seconds, then
run again. The compressor will turn back on when
the room temperature rises above the set temperature. Press
ECO to turn Eco feature on and off. When the unit is in Eco
mode, the light will turn on.
Sleep
Automatically adjusts the temperature and fan speed
to make the room more comfortable during the night.
Press and hold the SLEEP button for 10 seconds until
the Sleep light turns on. All of the left lights will turn off. The set
temperature will automatically raise by 1.8°F (1˚C) every 30-60
minutes. At most, the temperature will change six times until the
temperature reaches 82°F (28°C). Running time depends upon
the set temperature.
POWER
COOL
SLEEP
TIMER
ECO
DISPLAY
AUTO
MODE
FAN
ONLY
FAN
SPEED
POWER
COOL
SLEEP
TIMER
ECO
DISPLAY
AUTO
MODE
FAN
ONLY
FAN
SPEED
Auto:
Press AUTO MODE to enter into Auto mode. In this mode,
the fan speed and temperature are set automatically
according to the room temperature as tested by the indoor
temperature sensor.
Display:
Press DISPLAY to switch on/off all lights or the LED
display.
Fan only:
Press the Fan Only button to enter Fan Only mode.
POWER
COOL
SLEEP
TIMER
ECO
DISPLAY
AUTO
MODE
FAN
ONLY
FAN
SPEED
POWER
COOL
SLEEP
TIMER
ECO
DISPLAY
AUTO
MODE
FAN
ONLY
FAN
SPEED
POWER
COOL
SLEEP
TIMER
ECO
DISPLAY
AUTO
MODE
FAN
ONLY
FAN
SPEED
POWER
COOL
SLEEP
TIMER
ECO
DISPLAY
AUTO
MODE
FAN
ONLY
FAN
SPEED
POWER
COOL
SLEEP
TIMER
ECO
DISPLAY
AUTO
MODE
FAN
ONLY
FAN
SPEED
POWER
COOL
SLEEP
TIMER
ECO
DISPLAY
AUTO
MODE
FAN
ONLY
FAN
SPEED
POWER
COOL
SLEEP
TIMER
ECO
DISPLAY
AUTO
MODE
FAN
ONLY
FAN
SPEED
Replacing the battery
Use a small Phillips screwdriver to loosen the battery cover
screw. Slide the battery cover down with two thumbs to remove.
Remove and properly dispose of old batteries, then replace with
two new AAA batteries. Replace the battery cover and tighten the
screw.
Remove and replace batteries
Summary of Contents for AMAP151BW
Page 67: ...67 ...


