background image

7

Install Air Conditioner in Window

IMPORTANT:


Be sure your air conditioner does not fall out of the opening 

during installation or removal.


The place where the power cord exits the air conditioner 

should be no more than 6 ft (183 cm) from a grounded outlet .


To maximize cooling efficiency and air circulation, do not 

block the air intake or discharge louvers in the front panel.


To reduce cycling on and off of the compressor and reduce 

the risk of freezing up or damage to the unit, do not block the 

louvers on the outside of the air conditioner.

Prepare Window with Storm Window  

or Other Obstruction

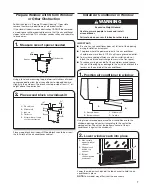
Follow the steps in “Prepare Window Opening”. If possible, 

remove the storm window frame or other obstruction.

If the storm window frame or obstruction CANNOT be removed, 

a wood spacer will be required to ensure that the air conditioner 

slopes to the outside. This will allow condensation and rainwater 

to drain away.

Using a level and measuring tape, determine thickness of wood 

spacer needed to allow the air conditioner to slope downward 

slightly to the outdoors. The block should provide at least 

1

2

" of 

height above the obstruction.

Place wood block on windowsill. Wood block should be at least 

the full width of the air conditioner cabinet.

1

/

2

"

Min.

1

/

2

"

Min.

1.


Measure size of spacer needed

A
B

C

1

/

2

"

Min.

1

/

2

"

Min.

E

D

2.


Place wood block on windowsill

A.  Wood block
B. Windowsill
C Indoors
D. Outdoors
E.   Storm window frame  

or other obstruction

WARNING

Excessive Weight Hazard

Use two or more people to move and install 

air conditioner.
Failure to do so can result in back or other injury.

A

B

C

D

1.


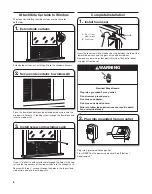
Position air conditioner in window

Using two or more people, place the air conditioner into the 

window opening and center it according to the center line 

marked earlier. Check that the bottom channel of the air 

conditioner is against the windowsill.

A.  Air conditioner
B.  Bottom channel

C Windowsill
D. Outside

C

B

A

2.


Lower window sash into place

Lower the window sash behind the top channel to hold the air 

conditioner in place.

NOTE:

 Your model may differ from the one shown.

A.  Side curtain 

against window 

channel

B.  Window sash 

behind top 

channel

C. Bottom 

channel behind 

windowsill

Spacer

Obstruction

Summary of Contents for AMAP050BW

Page 1: ...factured under license by XLS Products Pennsylvania 2018 Amana Tous droits réservés Fabriqué sous licence par XLS Products Pennsylvania 2018 Amana Todos los derechos reservados Fabricado bajo licencia por XLS Products Pennsylvania Table des matières SÉCURITÉ DU CLIMATISEUR 15 EXIGENCES D INSTALLATION 16 INSTRUCTIONS D INSTALLATION 18 UTILISATION DE VOTRE CLIMATISEUR 22 ENTRETIEN DU CLIMATISEUR 23 ...

Page 2: ...conditioner Plug into a grounded 3 prong outlet Do not remove ground prong Do not use an adapter Do not use an extension cord This appliance is not intended for use by persons including children with reduced physical sensory or mental capabilities or lack experience and knowledge unless they have been given supervision or instruction concerning the use of the appliance by a person responsible for ...

Page 3: ... Location Requirements All Models IMPORTANT Observe all governing codes and ordinances Check the location where the air conditioner will be installed Make sure you have everything necessary for correct installation The location should provide Grounded electrical outlet within 6 ft 183 cm of where the power cord exits the air conditioner NOTE Do not use an extension cord Free movement of air in roo...

Page 4: ...perly grounded 3 prong outlet installed by a qualified electrical installer It is the customer s responsibility To contact a qualified electrical installer To assure that the electrical installation is adequate and in conformance with National Electrical Code ANSI NFPA 70 latest edition and all local codes and ordinances Copies of the standards listed may be obtained from National Fire Protection ...

Page 5: ...le packaging materials in an appropriate way 1 Unpack the Air Conditioner Remove Packaging Materials Handle the air conditioner gently while unpacking the unit Cut the 4 plastic bands that secure the carton Remove the carton top and lift the air conditioner from the base pad Remove tape and glue residue from surfaces before turning on the air conditioner Rub a small amount of liquid dish soap over...

Page 6: ...t side curtain in right track Slide the side curtain frame into the top channel and bottom channels of the air conditioner Repeat steps 1 and 2 for other side curtain and frame 2 Insert curtain frame into channels Curtain frame Prepare Window Opening Measure the width of the window opening A Mark the center line B of the window on the inside windowsill A B 1 Measure and mark center line Attach the...

Page 7: ...ow the air conditioner to slope downward slightly to the outdoors The block should provide at least 1 2 of height above the obstruction Place wood block on windowsill Wood block should be at least the full width of the air conditioner cabinet 1 2 Min 1 2 Min 1 Measure size of spacer needed A B C 1 2 Min 1 2 Min E D 2 Place wood block on windowsill A Wood block B Windowsill C Indoors D Outdoors E S...

Page 8: ...l Insert the foam seal without adhesive strip between the top of the lower window sash and the glass of the upper window Remove any remaining clear plastic film from the control panel and plastic front panel 2 Plug into grounded 3 prong outlet Plug into a grounded 3 prong outlet Press RESET on the power supply cord See Electrical Requirements Electrical Shock Hazard Plug into a grounded 3 prong ou...

Page 9: ...s setting for maximum cooling Fan Low The fan runs at low speed without cooling Fan High The fan runs at high speed without cooling Off Turns the air conditioner off Thermostat The thermostat will automatically control room temperature by cycling the compressor on and off The fan will continue to run Turn to 6 coolest for cooler room temperatures Turn to 1 cool for warmer room temperatures A middl...

Page 10: ...filter is removable for easy cleaning A clean filter helps remove dust lint and other particles from the air and is important for best cooling and operating efficiency Check the filter every 2 weeks to see whether it needs cleaning NOTE Do not operate the air conditioner without the filter in place Cooling performance will be effected when the coil becomes dirty Use a vacuum cleaner to clean air f...

Page 11: ...r relocate appliances that share the same circuit Use time delay fuse or circuit breaker of the wrong capacity is being used Replace with a time delay fuse or circuit breaker of the correct capacity See Electrical Requirements You are trying to restart the air conditioner too soon after turning off the air conditioner Wait at least 3 minutes after turning off the air conditioner before trying to r...

Page 12: ...ditioners are not designed to cool multiple rooms There is excessive heat or moisture open container cooking showers etc in the room Use a fan to exhaust heat or moisture from the room Try not to use heat producing appliances during the hottest part of the day Windows or doors to the outside are open Close all windows and doors Cold air is escaping Check for open furnace registers and cold air ret...

Page 13: ...ywhere in the United States For further assistance If you need further assistance you can write to XLS Products with any questions or concerns at XLS Products Inc Customer Service P O Box 16262 Philadelphia PA 19114 0262 Please include a daytime phone number in your correspondence Call XLS Products Customer Service toll free 1 800 207 1156 Our consultants provide assistance with Features and speci...

Page 14: ...PRODUCT REPAIR AS PROVIDED HEREIN IMPLIED WARRANTIES INCLUDING WARRANTIES OF MERCHANTABILITY OR FITNESS FOR A PARTICULAR PURPOSE ARE LIMITED TO ONE YEAR OR THE SHORTEST PERIOD ALLOWED BY LAW XLS PRODUCTS SHALL NOT BE LIABLE FOR INCIDENTAL OR CONSEQUENTIAL DAMAGES SOME STATES AND PROVINCES DO NOT ALLOW THE EXCLUSION OR LIMITATION OF INCIDENTAL OR CONSEQUENTIAL DAMAGES OR LIMITATIONS ON THE DURATION...

Page 15: ...physiques sensorielles ou mentales réduites ou possédant un manque d expérience et de connaissances à moins qu elles ne soient placées sous supervision ou qu elles aient reçu des instructions concernant l utilisation de l appareil par une personne responsable de leur sécurité Brancher sur une prise à 3 alvéoles reliée à la terre Ne pas enlever la broche de liaison à la terre Ne pas utiliser un ada...

Page 16: ...électrique avec liaison à la terre située à moins de 6 pi 183 cm du point de sortie du cordon d alimentation du climatiseur REMARQUE Ne pas utiliser de rallonge Une libre circulation de l air dans la pièce à refroidir Une ouverture de taille suffisante pour le climatiseur Les pièces d installation sont fournies pour des fenêtres à guillotine à deux châssis mobiles Un support mural adéquat pour le ...

Page 17: ...fié une prise de courant à 3 alvéoles convenablement reliée à la terre Il incombe au client de Contacter un électricien qualifié Veiller à ce que l installation électrique soit réalisée de façon adéquate et en conformité avec le code national de l électricité ANSI NFPA 70 plus récente édition et tous les codes et règlements locaux en vigueur On peut obtenir des exemplaires des normes mentionnées à...

Page 18: ...e doit pas être réparé mais remplacé par un cordon d alimentation neuf que l on peut se procurer auprès du fabricant du produit Le cordon d alimentation ne comprend aucune pièce utilisable Ouvrir le boîtier inviolable annule toute garantie et réclamation pour mauvaise performance INSTRUCTIONS D INSTALLATION AVERTISSEMENT Risque du poids excessif Utiliser deux ou plus de personnes pour déplacer et ...

Page 19: ...x au climatiseur avant de placer celui ci dans la fenêtre 1 Insérer le rideau latéral dans la rainure Glisser le châssis du rideau latéral dans les glissières supérieure et inférieure du climatiseur Répéter les étapes 1 et 2 pour l autre côté 2 Insérer le châssis de rideau dans les glissières Châssis de rideau Préparer l ouverture de la fenêtre Mesurer la largeur d ouverture de la fenêtre A Marque...

Page 20: ...gèrement la partie extérieure du climatiseur vers le bas La cale devrait offrir un minimum de 1 2 po de hauteur au dessus de l obstruction Placer la cale d espacement en bois sur l appui de fenêtre La cale devrait être au moins aussi large que le climatiseur lui même 1 2 Min 1 2 Min 1 Mesurer la taille de la cale d espacement nécessaire A B C 1 2 Min 1 2 Min E D 2 Placer la cale sur l appui de fen...

Page 21: ...aut du châssis de la fenêtre inférieure et la vitre de la fenêtre supérieure Retirer toute pellicule de plastique transparent restante du tableau de commande et du panneau avant en plastique Brancher sur une prise à 3 alvéoles reliée à la terre Appuyer sur le bouton RESET réinitialisation situé sur le cordon d alimentation Consulter les Spécifications électriques AVERTISSEMENT Risque de choc élect...

Page 22: ...nt de l air sous l effet du ventilateur Déclics émis par le thermostat Vibrations ou bruits imputables à une construction médiocre du mur ou de la fenêtre Bourdonnement à fréquence élevée ou pulsations à cause du compresseur moderne à haute efficacité qui se met en marche et s arrête de façon intermittente Utiliser le levier situé sur les évents pour diriger l air vers la gauche ou la droite Utili...

Page 23: ...r le nettoyage Un filtre à air propre aide à retenir les particules de poussière la charpie et les autres débris en suspension dans l air et il est important pour obtenir un refroidissement et une efficacité de fonctionnement de grande qualité Vérifier le filtre toutes les 2 semaines pour déterminer si un nettoyage est nécessaire REMARQUE Ne pas faire fonctionner le climatiseur si le filtre n est ...

Page 24: ...tageant le même circuit Utilisation d un fusible temporisé ou d un disjoncteur de capacité inappropriée Les remplacer par un fusible temporisé ou un disjoncteur de bonne capacité Consulter les Spécifications électriques L utilisateur tente de remettre le climatiseur en marche trop rapidement après l avoir arrêté Attendre au moins 3 minutes après l arrêt du climatiseur avant de tenter une nouvelle ...

Page 25: ...de chaleur ou d humidité dans la pièce cuisson dans des récipients sans couvercle douches etc Utiliser un ventilateur pour évacuer la chaleur ou l humidité de la pièce Essayer de ne pas utiliser des appareils générateurs de chaleur pendant les périodes les plus chaudes de la journée Les fenêtres ou portes sur l extérieur sont ouvertes Fermer toutes les portes et fenêtres De l air froid s échappe V...

Page 26: ...plus d assistance Si vous avez besoin de plus d assistance vous pouvez écrire à XLS Products en soumettant toute question ou tout problème à XLS Products Inc Customer Service P O Box 16262 Philadelphia PA 19114 0262 N oubliez pas d indiquer dans votre correspondance un numéro de téléphone où l on peut vous joindre dans la journée Composer le numéro du service à la clientèle de XLS Products 1 800 2...

Page 27: ... RÉPARATION PRÉVUE CI DESSUS LES GARANTIES IMPLICITES Y COMPRIS LES GARANTIES APPLICABLES DE QUALITÉ MARCHANDE OU D APTITUDE À UN USAGE PARTICULIER SONT LIMITÉES À UN AN OU À LA PLUS COURTE PÉRIODE AUTORISÉE PAR LA LOI XLS PRODUCTS N ASSUME AUCUNE RESPONSABILITÉ POUR LES DOMMAGES FORTUITS OU INDIRECTS CERTAINES JURIDICTIONS NE PERMETTENT PAS L EXCLUSION OU LA LIMITATION DES DOMMAGES FORTUITS OU IN...

Page 28: ...bolo de advertencia de seguridad y de la palabra PELIGRO o ADVERTENCIA Estas palabras significan INSTRUCCIONES IMPORTANTES DE SEGURIDAD ADVERTENCIA Para reducir el riesgo de incendio choque eléctrico o lesiones personales al usar su acondicionador de aire siga estas precauciones básicas CONSERVE ESTAS INSTRUCCIONES Desconecte el acondicionador de aire antes de darle servicio Use dos o más personas...

Page 29: ...n conexión a tierra a una distancia máxima de 6 pies 183 cm del lugar donde el cable eléctrico sale del acondicionador de aire NOTA no use un cable eléctrico de extensión Libertad de movimiento del aire en la habitación que desea enfriar Una abertura con la amplitud suficiente para el acondicionador de aire Se proveen piezas de instalación para las ventanas de guillotina Un soporte en la pared ade...

Page 30: ...corriente de 3 terminales con conexión a tierra por un instalador eléctrico competente Es responsabilidad del cliente Ponerse en contacto con un instalador eléctrico competente Asegurarse de que la instalación eléctrica sea adecuada y de conformidad con el Código Nacional Eléctrico ANSI NFPA 70 última edición y con todos los códigos y las ordenanzas locales Pueden obtenerse copias de las normas se...

Page 31: ...NES DE INSTALACIÓN ADVERTENCIA Peligro de Peso Excesivo Use dos o más personas para mover e instalar el acondicionador de aire No seguir esta instrucción puede ocasionar una lesión en la espalda u otro tipo de lesiones Retire los materiales de empaque Manipule con cuidado el acondicionador de aire mientras lo desempaca Corte las 4 bandas plásticas que aseguran la caja Retire la parte superior de l...

Page 32: ...terales NOTA fije las cortinas al acondicionador de aire antes de colocar el acondicionador de aire en la ventana 1 Inserte la cortina lateral en la guía derecha Deslice el marco de la cortina lateral dentro del canal superior y los canales inferiores del acondicionador de aire Repita 1 y 2 para la otra cortina lateral y el otro marco 2 Inserte el marco de las cortinas en los canales Marco de cort...

Page 33: ...or de aire se deslice ligeramente hacia abajo y hacia el exterior El bloque debe proporcionar al menos 1 2 de altura por encima de la obstrucción Coloque el separador de madera sobre el alféizar El separador debe tener como mínimo el ancho completo del gabinete del acondicionador de aire 1 2 Min 1 2 Min 1 Mida el tamaño del separador que necesita A B C 1 2 Min 1 2 Min E D 2 Coloque el bloque sobre...

Page 34: ...da adhesiva entre la parte superior de la hoja de ventana inferior y el vidrio de la ventana superior Retire toda la película plástica transparente restante del panel de control y del panel delantero de plástico Enchufe en un tomacorriente de 3 patas con conexión a tierra Presione RESET Restablecer en el cable de suministro eléctrico Vea Requisitos eléctricos ADVERTENCIA Peligro de Choque Eléctric...

Page 35: ... el condensador Movimiento de aire del ventilador Chasquidos del ciclo del termostato Vibraciones o ruido causados por la construcción deficiente de la pared o de la ventana Un zumbido agudo o un ruido pulsante producido por el ciclo de encendido y apagado del moderno compresor de alta eficiencia Use la palanca en las persianas de ventilación para regular la dirección del aire hacia la izquierda o...

Page 36: ... el panel frontal Limpieza del filtro de aire El filtro de aire se puede desmontar para facilitar su limpieza Un filtro limpio ayuda a quitar el polvo las pelusas y otras partículas del aire y es importante para una óptima eficiencia del enfriamiento y la operación Revise el filtro cada 2 semanas para ver si debe limpiarlo NOTA no haga funcionar el acondicionador de aire si el filtro no está en su...

Page 37: ...aparatos que estén usando el mismo circuito Se está usando un disyuntor o un fusible de retardo con la capacidad incorrecta Reemplácelo con un disyuntor o un fusible de retardo con la capacidad correcta Vea Requisitos eléctricos Se intenta poner en marcha el acondicionador de aire demasiado pronto después de apagarlo Espere al menos 3 minutos después de apagar el acondicionador de aire antes de in...

Page 38: ...aciones no están diseñados para enfriar varias habitaciones Hay demasiado calor o humedad en la habitación cocción con recipientes sin tapa duchas etc Use un ventilador para extraer el calor o la humedad de la habitación Trate de no usar aparatos que generen calor en las horas más calurosas del día Hay ventanas o puertas que dan al exterior abiertas Cierre todas las puertas y ventanas Hay escape d...

Page 39: ...n cualquier lugar de los Estados Unidos Para obtener más asistencia Si necesita asistencia adicional puede escribir a XLS Products con sus preguntas o dudas a XLS Products Inc Customer Service P O Box 16262 Philadelphia PA 19114 0262 Incluya en su correspondencia un número de teléfono en el que se le pueda localizar durante el día Llame al servicio al cliente de XLS Products sin costo alguno al 1 ...

Page 40: ...R EL PRODUCTO SEGÚN SE ESTIPULA EN LA PRESENTE LAS GARANTÍAS IMPLÍCITAS INCLUSO LAS GARANTÍAS DE COMERCIABILIDAD O DE IDONEIDAD PARA UN PROPÓSITO PARTICULAR SE LIMITARÁN A UN AÑO O AL PERÍODO MÁS CORTO PERMITIDO POR LEY XLS PRODUCTS NO SE RESPONSABILIZARÁ POR DAÑOS INCIDENTALES O CONSECUENTES ALGUNOS ESTADOS Y PROVINCIAS NO PERMITEN LA EXCLUSIÓN O LIMITACIÓN DE DAÑOS INCIDENTALES O CONSECUENTES O ...

Reviews: