background image

4

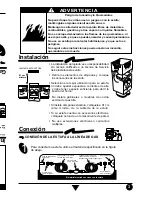
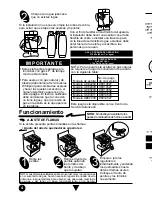
Con el fin de facilitar el movimiento del aparato,

el instalador debe hacer una espiral con el tubo

flexible de cobre e instalar una llave de paso

en la línea de suministro de gas, esta llave debe

estar fuera de la estufa y accesible a las

personas que la usan.

IMPORTANTE

2

Cheque con agua jabonosa

que no existan fugas.

Si la instalación no es nueva, limpie los tubos de cobre,

para evitar que se tapen las espreas y/o pilotos.

PRESIÓN DE OPERACIÓN PARA

GAS NATURAL

1.76 kPa (18 cm Col. agua)

GAS L.P. PRESIÓN DE OPERACIÓN

2.75 kPa (28 cm Col. agua)

NOTA: Para operar esta estufa con gas natural,

se requiere el juego de conversión de acuerdo

con la siguiente tabla:

                                  No. de juego

   Modelo de estufa    de conversión

   Modelo ACE2200    98014527

   Modelo ACE2400    98014527

   Modelo ACE3200    98014562

   Modelo ACE3211    98014528

   Modelo ACE3411    98014528

   Modelo AEE2000    98014527

Este juego está disponible con su Centro de

Servicio Autorizado.

4

To make it easier to move the appliance, the

installer should loop the 3/8" copper tubing as

shown in the illustration.

IM

PO

RT

AN

T

2

Check with soap solution for leaks.

If the installation is not new, you should clean it

in order to avoid the obstruction of orifices and/or pilots.

NATU

RA

L G

AS

 OPE

RATIN

G

PR

ES

SU

RE

7 inches Water C

olumn

GA

S L.P. O

PE

RATIN

G P

RE

SS

UR

E

11 inches W

ater Colum

n

NOTE: To oper

ate this range with natur

al gas, is

required a kit according to the chart:

This kit is availab

le at your nearest A

uthoriz

ed

Service Center

.

   Range Model         Kit Number

   Model ACE2200      98014527

   Model ACE2400      98014527

   Model ACE3200      98014562

   Model ACE321

1      98014528

   Model ACE341

1      98014528

   Model AEE2000      98014527

• Esta estufa está preparada para

   funcionar con gas L.P. de tanque

   móvil o estacionario.

• Para usarse con gas natural ( de

   tubería) debe llamar a Servicio Acros

   Whirlpool para cambiar las espreas

   y hacer los ajustes necesarios, el

   número telefónico aparece en la

   última página. El técnico calificado

   debe cerciorarse que la conexión

   no tiene fugas y que la presión de

   gas en la estufa es la que aparece

   en las tablas.

• This 

range is 

adjusted at 

the factory

  for use with L.P. gas.

• To use this range with natural gas,

  you must replace the surface and

  oven burner orifices, call Servicio

  Acros-Whirlpool, the phone number

  is shown in the last page. The

  technician must make sure that the

  connections have no leaks and the

  gas pressure in the range is the

  same as shown in the charts.

Si la estufa presenta puntas amarillas en las flamas:

Retire las

perillas.

1

Retire el frente de

perillas quitando

los tornillos del

frente y de abajo

que lo sujetan.

2

3

AJUSTE DE FLAMAS

• Ajuste del aire de quemadores superiores:

Empuje o jale los

reguladores

individualmente y encienda

los quemadores hasta

obtener flamas azules.

Coloque el frente de

perillas y los tornillos

nuevamente.

NOTA: Las diferentes altitudes sobre el nivel del mar y las variaciones

en el suministro de gas, hacen necesario regular la entrada de aire

primario a los quemadores para obtener una adecuada mezcla de

aire-gas  y  así  tener  un  buen  funcionamiento  en  la  estufa.

If the range has yellow flames, it may require adjustment to the air

shutters:

Remove the

knobs.

1

Unscrew the  screws

of front and below the

manifold panel and

remove it.

2

Adjust the air shutters

individually. Light the

burner, then push or pull

the air 

shutter until 

you get

a blue flame. Replace the

manifold panel, 

screws and

knobs.

HOW TO ADJUST THE FLAMES

• How to adjust the air for surface burners:

3

NOTE: Because 

of dif

ferent altitudes 

above sea 

level and 

variations

in the supply of gas, you may need to adjust the main air intake

to the 

burners. This 

will result 

in a 

better air-gas 

mixture and 

thus

a better operation.

How to Use Your Range

NOTE:

 D

o not 

obstruct the 

gas

exhaust of the oven or broiler

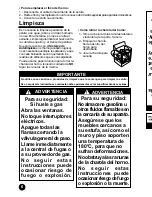
Funcionamiento

NOTA:

 No obstruya la salida de los

gases de combustion de horno o asador

Summary of Contents for ACE2200

Page 1: ...ACE3200 ACE3211 ACE3411 AEE2000 INSTALLATION USE AND CARE M A N U A L Part No 98014237 Rev A Covers the following models THIS MANUAL CONTAINS IMPORTANT INFORMATION READ IT BEFORE FIRST USE OF YOUR RANGE Printed in Mexico 2003 STM00201 Rev A ...

Page 2: ...Part Inst Con Fun Lim Póli For Cen P V 2 In su No Pr Uti Inte Hor Solo e ACE34 Cu Ca Fre Peri ...

Page 3: ...s or multiple outlets To connect the range use the material shown in the bottom figure 1 The material shown is not provided with the range 3 8 shut off valve Gas inlet tube fitting 3 8 brass pipe fitting Hex adapter 3 8 copper pipe with 5 8 flared type nut Gas regulator 3 8 copper pipe with 5 8 flared type nut Necessary length to reach the gas 3 8 brass pipe fitting Hex adapter Fire or Explosion H...

Page 4: ...4 Si l par E f P tu y n ú d n g e Si l NO en pri air F ...

Page 5: ...oven has 4 different supports for the oven rack this rack has a stop to avoid droping from the oven to change the rack position follow the steps To remove the oven rack 1 Pull the oven rack until it stops 2 Lift the front part 3 Pull it again until it is released To install the oven rack 1 Push the oven rack until it stops 2 Lift the front part 3 Push it again until it stops An extra rack position...

Page 6: ... P 1 2 3 6 Li Es estu no esm la c Su Aut no e con resi Pue cha tap e fl v L a a i o f No De ...

Page 7: ...______________ DEALER SIGNATURE AND STAMP AUTHORIZED REPRESENTATIVE Indicate precise steet col state and zip code IMPORTANT NOTE WARRANTY WHIRLPOOL MEXICO S A DE C V Antigua Carretera a Roma km 9 Col Milagro Apodaca N L Mexico C P 66600 phone 81 83 29 21 00 in the terms of this policy we warranty to the buyer and the consumer of this range identified in this following policy COVERED CONCEPTS Manuf...

Page 8: ...8 e Los teléfonos y direcciones pueden cambiar sin previo aviso ...

Page 9: ... ACE3411 AEE2000 INSTRUCTIVO DE INSTALACIÓN USO Y MANEJO No parte 98014237 Rev A Ampara los siguientes Modelos LEA CUIDADOSAMENTE ESTE INSTRUCTIVO ANTES DE USAR POR PRIMERA VEZ SU ESTUFA Impreso en México 2003 STM00201 Rev A T Printed STM00 ...

Page 10: ...e Horno Quemadores Superiores Comal de Sobreponer Respaldo Superior Parrillas Superiores Válvulas de Quemadores Parrilla de Horno Válvula de Quemador Oval Puerta de Horno 2 Instale su estufa en un lugar protegido de las inclemencias del tiempo y sobre una superficie plana y resistente para soportar su peso No permita que la usen niños o personas que no conozcan su funcionamiento Proporciónele el m...

Page 11: ...onectar su estufa utilice el material especificado en la figura de abajo 1 El material mostrado no viene con la estufa Llave de paso de 9 5 mm 3 8 Tubo de alimentación de la estufa Cople Niple de 9 5 mm 3 8 NPT Tubo de cobre con tuercas cónicas de 9 5 mm 3 8 Tubo de cobre con tuercas cónicas de 9 5 mm 3 8 de longitud necesaria para llegar al gas Cople Niple de 9 5 mm 3 8 NPT Regulador de gas 61 c ...

Page 12: ...eparada para funcionar con gas L P de tanque móvil o estacionario Para usarse con gas natural de tubería debe llamar a Servicio Acros Whirlpool para cambiar las espreas y hacer los ajustes necesarios el número telefónico aparece en la última página El técnico calificado debe cerciorarse que la conexión no tiene fugas y que la presión de gas en la estufa es la que aparece en las tablas Si la estufa...

Page 13: ...estufa 1 Jale la parrilla hasta el tope 2 Levante la parrilla de la parte frontal 3 Jale nuevamente para liberarla Para instalarla en la estufa 1 Empuje la parrilla hasta el tope 2 Levante la parrilla de la parte frontal 3 Empújela nuevamente para que llegue hasta el fondo del horno PARRILLA DEL HORNO The avoi To 1 2 3 An oth con clos Para hornear alimentos muy grandes puede usarse el soporte extr...

Page 14: ...as laterales y levántela de la parte trasera 2 Empuje la charola hacia adentro del horno para destrabarla 3 Jale la charola para sacarla Para su seguridad Noalmacenegasolinau otrosfluidosflamablesen lacercaníadesuaparato Asegúrese que los muebles cercanos a su estufa así como el muro y piso soporten una temperatura de 180o C para que no sufran deformaciones Noobstruyalasranuras de la charola del h...

Page 15: ... México C P 66600 Tel 81 83 29 21 00 en los términos de esta póliza garantiza al comprador de la estufa identificada en la presente póliza exclusivamente lo siguiente CONCEPTOS CUBIERTOS POR LA GARANTÍA Defectos de fabricación que impidan total o parcialmente el correcto funcionamiento de la estufa que se presenten dentro del término de vigencia de esta garantía Reparación cambio de piezas y compo...

Reviews: