Through-the-wall
installation
7
It is the customer's responsibility and obligation to have this
product installed by a qualified technician familiar with through-
the-wall room air conditioner installations.
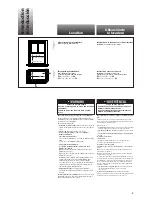
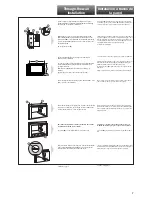
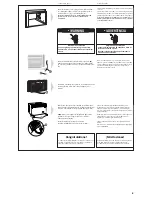
When using a wood, metal or plastic molding
(A)
, the finish
frame
(B)
should line up with inside wall
(C)
as shown. If the
plastered wall
(D)
is to be flush with the cabinet and no molding
is used, the finish frame
(B)
must be set 1/2 inch (13 mm) into
the inside wall
(C)
.
Do not block louvers
(E)
.
Cut opening through the wall (see Page 2 for dimensions).
Remove and save insulation.
Use 1-inch (2.5 cm) or heavier lumber for wood frame. Measure
outside width
(F)
and height
(G)
of frame to determine wall
opening dimensions.
Dimension for
(H)
depends on wall thickness and type of
molding.
Apply wood preservative to the outside exposed surface.
Insert the frame in the wall opening. Square and level frame. Nail
frame securely to the wall studs.
Insert cabinet into the wall opening. The top of the cabinet should
extend 1/2" (13 mm) into the room
(I)
. If there is trim
(J)
, the
cabinet should extend 1/2" (13 mm) past the trim.
Check that air conditioner cabinet is tilted to the outside
so that water will run to the outside.
H
continued on page 8
continúa en la página 8
C
B
D
C
B
E
A
Place level inside cabinet on the right side. The cabinet should tilt
to the outside approximately 1/2 bubble (1.4°)
(L)
for proper
drainage. Place the level on the left side and check.
I
J
K
L
Instalación a través de
la pared
Corte una abertura a través de la pared. Quite y guarde el aislamiento.
Utilice madera de 1 pulgada (2,5 cm) o más pesada para el marco de
madera. Mida el ancho exterior
(F)
y la altura
(G)
del marco para
determinar las dimensiones de la abertura de la pared.
Las dimensiones de
(H)
dependen del espesor de la pared y del tipo
de moldura.
Aplique un preservativo de madera a la superficie exterior expuesta.
Es responsabilidad y obligación del cliente hacer que este producto
sea instalado por un técnico calificado familiarizado con instalaciones
a través de la pared de acondicionadores de aire de habitaciones.
Cuando utilice una moldura de madera, metal o plástico
(A)
, el marco
de sujeción
(B)
debe estar alineado con la pared interior
(C)
como se
muestra. Si la pared enyesada
(D)
va a nivelarse con el gabinete y no
se utiliza ninguna moldura, el marco de sujeción
(B)
debe colocarse
1/2 pulgada (13 mm) dentro de la pared interior
(C)
.
No bloquee las rejillas
(E)
.
Inserte el marco en la abertura en la pared. Cuadre y nivele el marco.
Clave con firmeza el marco en los montantes de la pared.
Inserte el gabinete en la abertura de la pared. La parte superior del
gabinete debe extenderse 1/2"(13 mm) dentro de la habitación
(I)
. Si
hay un resguardo
(J)
, el gabinete debe extenderse 1/2" (13 mm) más
allá del resguardo.
Verifique que el gabinete del acondicionador de aire esté
inclinado hacia afuera para que el agua corra hacia afuera.
Coloque el nivel dentro del gabinete al lado derecho. El gabinete debe
inclinarse hacia afuera aproximadamente 1/2 nivel (1.4°)
(L)
para el
debido desagüe. Coloque el nivel al lado izquierdo y verifique.
Use a level
(K)
to check that cabinet is level side-to-side.
Use un niel
(K)
para verificar que el gabinete esté nivelado de lado a
lado.
F
G


