background image

6

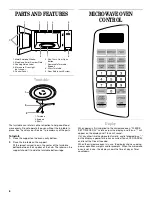
PARTS AND FEATURES

Turntable

The turntable can rotate in either direction to help cook food 
more evenly. Do not operate the oven without the turntable in 
place. See “Assistance or Service” to reorder any of the parts.

To Install:

1. Place the support on the oven cavity bottom.

2. Place the turntable on the support.

Fit the raised, curved lines in the center of the turntable 
bottom between the 3 spokes of the hub. The rollers on the 
support should fit inside the turntable bottom ridge.

MICROWAVE OVEN 

CONTROL

Display

When power is first supplied to the microwave oven, “PLEASE 
SET TIME OF DAY” scrolls across the display, and then a “:” will 
appear on the display and 1 tone will sound.

If at any other time the above text scrolls, and is followed by a “:” 
on the display, a power failure has occurred. Touch OFF/CANCEL 
and reset the Clock if needed.

When the microwave oven is in use, the display shows cooking 
power, quantities, weights and/or prompts. When the microwave 
oven is not in use, the display shows the time of day or Timer 
countdown.

1. Metal Shielded Window
2. Model and Serial Number Plate
3. Cooking Guide Label
4. Microwave Oven Light

(not shown)

5. Control Panel

6. One-Touch Door Open 

Button

7. Removable Turntable 

Support

8. Glass Turntable
9. Door Safety Lock System

1. Turntable
2. Support
3. Shaft

1

2

3

4

5

6

7

8

9

1

2

3

Summary of Contents for 8205986

Page 1: ...e CareGuide For questions about features operation performance parts accessories or service call 1 800 253 1301 or visit our website at www whirlpool com Table of Contents 2 8205986 3828W5A8407 Models MT4110SP MT4110RP ...

Page 2: ...Off Cancel 7 JET START Feature 7 Clock 7 Tones 7 Timer 7 Child Lock 7 Options 7 MICROWAVE OVEN USE 8 Food Characteristics 8 Cooking Guidelines 8 Cookware and Dinnerware 9 Aluminum Foil and Metal 9 Cooking Power 10 Cooking 10 Cooking in Stages 10 Preset Cooking 11 EZ CHOICE Feature 11 Warm Hold 12 MICROWAVE OVEN CARE 12 General Cleaning 12 TROUBLESHOOTING 13 ASSISTANCE OR SERVICE 14 Replacement Par...

Page 3: ... for example closed glass jars are able to explode and should not be heated in the microwave oven Use the microwave oven only for its intended use as described in this manual Do not use corrosive chemicals or vapors in the microwave oven This type of oven is specifically designed to heat cook or dry food It is not designed for industrial or laboratory use As with any appliance close supervision is...

Page 4: ...EN THE CONTAINER IS DISTURBED OR A SPOON OR OTHER UTENSIL IS INSERTED INTO THE LIQUID Do not overheat the liquid Stir the liquid both before and halfway through heating it Do not use straight sided containers with narrow necks After heating allow the container to stand in the microwave oven for a short time before removing the container Use extreme care when inserting a spoon or other utensil into...

Page 5: ...s required A time delay fuse is recommended It is recommended that a separate circuit serving only this appliance be provided WARNING Fire Hazard Do not install the oven next to or over a heat source without a UL approved trim kit Doing so can result in death fire or electrical shock WARNING Electrical Shock Hazard Plug into a grounded 3 prong outlet Failure to follow these instructions can result...

Page 6: ...owave oven PLEASE SET TIME OF DAY scrolls across the display and then a will appear on the display and 1 tone will sound If at any other time the above text scrolls and is followed by a on the display a power failure has occurred Touch OFF CANCEL and reset the Clock if needed When the microwave oven is in use the display shows cooking power quantities weights and or prompts When the microwave oven...

Page 7: ...n Tones may be disabled using the OPTIONS pad See Options section Timer The Timer can be set in minutes and seconds up to 99 minutes 99 seconds and counts down the set time The Timer does not start or stop the microwave oven When the Timer is in use the microwave oven can also operate To see the time count down for 5 seconds when the microwave oven is in use touch TIMER SET OFF To Set 1 Touch TIME...

Page 8: ...ces of food will cook more quickly than larger pieces and uniformly shaped foods cook more evenly than irregularly shaped food Starting Temperature Room temperature foods will heat faster than refrigerated foods and refrigerated foods will heat faster than frozen foods Composition and Density Foods high in fat and sugar will reach a higher temperature and heat faster than other foods Heavy dense f...

Page 9: ...following guidelines Never allow aluminum foil or metal to touch the inside cavity walls ceiling or floor Always use the turntable Never allow contact with another metal object during cooking Do Not Use Metal cookware and bakeware gold silver pewter non approved meat thermometers skewers twist ties foil liners such as sandwich wrappers staples and objects with gold or silver trim or a metallic gla...

Page 10: ...time to cook during the 1st stage 3 Touch COOK POWER 4 Touch the number pad s using the Cooking Power chart to set the cooking power for the 1st stage 5 Repeat steps 1 4 for each additional stages 6 Touch START ENTER Two tones will sound between stages When the cycle ends END will appear in the display 4 end of cycle tones will sound and then reminder tones will sound every minute 7 Touch OFF CANC...

Page 11: ...GUIDE Touch number pads for quantity or size as shown in chart PAD NUMBER QUANTITY INSTRUCTIONS POPCORN 1 1 75 oz 50 g 2 3 0 oz 85 g 3 3 5 oz 99 g Pop only commercially packaged microwave popcorn Pop only one bag at a time If using microwave popcorn popper follow manufacturer s instructions PIZZA refrigerated 1 3 5 oz 142 g slices Place on paper towel BEVERAGE 1 or 2 8 oz 250 mL cups Do not cover ...

Page 12: ...setting a manual cooking cycle before touching START ENTER or during cooking MICROWAVE OVEN CARE GeneralCleaning IMPORTANT Before cleaning make sure all controls are off and the oven is cool Always follow label instructions on cleaning products Soap water and a soft cloth or sponge are suggested first unless otherwise noted OVEN CAVITY Do not use soap filled scouring pads abrasive cleaners steel w...

Page 13: ... turntable support Replace turntable Place 1 cup 250 mL of water on the turntable then restart oven If it still is not working call for service See Assistance or Service section Do not operate the oven without turntable and turntable support working properly Turntable rotates in both directions This is normal and depends on motor rotation at beginning of cycle Display shows messages Is the display...

Page 14: ...800 253 1301 Our consultants provide assistance with Features and specifications on our full line of appliances Installation information Use and maintenance procedures Accessory and repair parts sales Specialized customer assistance Spanish speaking hearing impaired limited vision etc Referrals to local dealers repair parts distributors and service companies Whirlpool designated service technician...

Page 15: ...15 Notes ...
Page 16: ...PROVIDED HEREIN IMPLIED WARRANTIES INCLUDING WARRANTIES OF MERCHANTABILITY OR FITNESS FOR A PARTICULAR PURPOSE ARE LIMITED TO ONE YEAR OR THE SHORTEST PERIOD ALLOWED BY LAW WHIRLPOOL SHALL NOT BE LIABLE FOR INCIDENTAL OR CONSEQUENTIAL DAMAGES SOME STATES AND PROVINCES DO NOT ALLOW THE EXCLUSION OR LIMITATION OF INCIDENTAL OR CONSEQUENTIAL DAMAGES OR LIMITATIONS ON THE DURATION OF IMPLIED WARRANTIE...

Reviews: