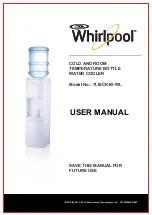
USER MANUAL
7LIECK-W-WL © 2013 Electrotemp Technologies Inc. PN: 5M000223XW
SAVE THIS MANUAL FOR
FUTURE USE
COLD AND ROOM
TEMPERATURE BOTTLE
WATER COOLER
Model No.: 7LIECK-W-WL
Page 1: ...USER MANUAL 7LIECK W WL 2013 Electrotemp Technologies Inc PN 5M000223XW SAVE THIS MANUAL FOR FUTURE USE COLD AND ROOM TEMPERATURE BOTTLE WATER COOLER Model No 7LIECK W WL ...
Page 2: ...rd DANGER or WARNING These words mean You can be killed or seriously injured if you don t immediately the follow instructions You can be killed or seriously injured if you don t follow the instructions All safety instructions will inform you what the potential hazard is how to reduce the chance of injury and what can happen if the instructions are not followed When operating this dispenser please ...
Page 3: ...on or problem please contact 1 855 5WHIRL5 for assistance Electrical Shock Hazard Plug into a grounded and properly wired 3 prong outlet Do not remove the ground prong Do not use an adapter Do not use an extension cord Failure to follow these instructions can result in death fire or electrical shock WARNING A 120 volt 60 Hz AC only 15 amp fused electrical supply is required A time delay fuse or ci...
Page 4: ... FUTURE USE Please register your dispenser immediately at www electrotemp com Product Cold and Room Temperature Bottled Water Cooler Model Number 7LIECK W WL Serial ID Number Date of Purchase For future support please record your serial number located on the label at the back of the dispenser and purchase date Staple your receipt to the manual You will need this information to obtain warranty serv...
Page 5: ...p Tray Cooling Thermostat Power Cord Carry Handle PARTS FEATURES 1 2 4 6 5 3 1 2 3 4 5 6 7 8 9 25 4 Ibs 11 5 Kg 91 3 H 27 5 W 28 6 D cm 35 9 H 10 8 W 11 3 D inch 1 5 Amp R 134A 100 Watts 3 C 10 C 37 4 F 50 F 9 7 8 The wall mount strap and the collar for plain capped bottles are not shown Model 7LIECK W WL Page 5 IMPORTANT Do NOT Return Dispenser To Store If you have a question or problem please co...
Page 6: ...3 Place the cooler in an upright position Unpack the drip tray and insert it into the dispenser 4 Properly dispose of all the packaging Model 7LIECK W WL Page 6 IMPORTANT Do NOT Return Dispenser To Store If you have a question or problem please contact 1 855 5WHIRL5 for assistance ...
Page 7: ...old bleach 4 Let sit for 30 minutes 5 Remove the cleaning mixture from the reservoirs by dispensing the mixture from both taps into a pitcher 6 Wipe the inside of the reservoir with a soft cloth 7 Fill the reservoir with 1 gallon tap water 8 Remove the water from the reservoir by dispensing it from both taps into a pitcher 9 Replace all parts 10 Complete the installation and follow the operation i...
Page 8: ...ectly into the sheet rock using a Philips screwdriver DO NOT drill a hole into the sheet rock first when using this anchor Secure the strap by installing a screw through the washer then the eyelet into the strap and into the wall mounted anchor see Illustration B Position the cooler in place Clip the strap onto the back of the cooler to either the right or left side see Illustration C Adjust the l...
Page 9: ... The probe will push the plug out of the way when you place the bottle into the receptacle 1 Remove the bottle receptacle 1 by turning it counterclockwise and pulling it up 2 Remove the collar 2 from the foam packa ging or bag in the front of the dispenser 3 Align the tabs 4 Turn clockwise to secure Model 7LIECK W WL Page 9 IMPORTANT Do NOT Return Dispenser To Store If you have a question or probl...
Page 10: ...e tamper seal from the bottle cap Do NOT remove the plastic cap 2 Clean the bottle cap and neck using a soft cloth and warm soapy water then rinse afterwards 3 Lift the bottle and insert onto the probe Apply slight pressure until the plug inside the cap pushes in and the bottle is seated Water will begin to flow into the reservoirs causing air bubbles to form in the bottle 4 Plug the cord into a p...
Page 11: ... shapes in the drip plate help align the flow of water This unit dispenses water at a fast rate To avoid splashes hold the cup as close to the tap as possible 2 Press the cold water control downward to start dispensing water 3 Release the cold water control once the desired fill level is achieved Replacing an Empty Bottle Notice Replace the bottle as soon as you notice that it is empty 1 Lift the ...
Page 12: ... Lines Perform Every 3 months or whenever an off taste occurs Time Required 15 minutes Note Best to do prior to loading a fresh bottle 1 Unplug the power cord from the wall outlet 2 Remove the water bottle 3 Remove the bottle receptacle by turning it counterclockwise and pulling it up Store it in a safe place 4 Remove the plastic baffle from inside reservoir Clean it using warm soapy water rinse t...
Page 13: ...tle of water after cleaning the bottle cap and neck area 13 Repeat rinsing cycle if chlorine taste persist 14 Plug the power cord into a grounded wall outlet Electrical shock Hazard Plug into a grounded 3 prong outlet Do not remove the ground prong Do not use an adapter Do not use an extension cord Failure to follow these instructions can result in death fire or electrical shock WARNING Model 7LIE...
Page 14: ...all and that air is free to flow on all 4 sides of the dispenser Make sure that the tank is not overfilled Dispense water until bubbles appear in the bottle Adjust the thermostat by turning it clockwise Adjust in a single increment of 30 degrees of a circle the equivalent of 1 hour on a standard analog clock face Wait 1 hour for the result If unsatisfactory adjust another 30 degrees clockwise wait...
Page 15: ...utine maintenance on the dispenser as set out in the User s Manual In addition the Limited Warranty does not cover damages to the finish such as scratches dents discoloration or rust after purchase The Limited Warranty is in lieu of all other express warranties Vendor disclaims all warranties for products that are purchased from seller other than authorized retailers or distributors AFTER THE PERI...
Page 16: ... TM 2013 Whirlpool All rights reserved Manufactured under license by Electrotemp Technologies Inc Mississauga ON Warranty provided by manufacturer ...
Page 17: ...名称 说明书7LIECK W WL English 图号 5M000223XW 技术要求 1 尺寸 143 210mm 2 单色印刷 3 产品符合RoHS要求 4 批量生产前一定要样品确认 不得擅自更改图纸 设计 工程审核 业务审核 品质审核 批准 ...