background image

5

INSTALLATION INSTRUCTIONS

Unpack Range

1. Remove shipping materials, tape and film from range.

2. Remove oven racks and parts package from inside oven.

3. Do not remove the shipping base at this time.

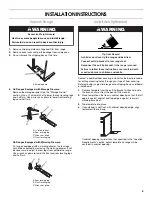
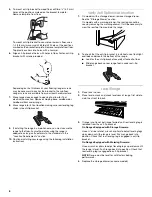
4. On Ranges Equipped with Storage Drawers:

Remove the storage drawer. See the “Storage Drawer” 
section. Use a ¼" drive ratchet to lower the rear leveling legs 
one-half turn. Use a wrench or pliers to lower front leveling 
legs one-half turn.

On Ranges Equipped with Warming Drawers:

On ranges equipped with a warming drawer, the rear legs 
cannot be accessed by removing the warming drawer. It will 
be necessary to adjust the rear legs from outside the range. 
Use wrench or pliers to lower the front and rear leveling legs 
one-half turn.

Install Anti-Tip Bracket

Contact a qualified floor covering installer for the best procedure 
for drilling mounting holes through your type of floor covering.

Before moving range, slide range onto shipping base, cardboard 
or hardboard.

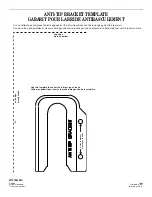
1. Remove template from the anti-tip bracket kit (found inside 

the oven cavity) or from the back of this manual.

2. Place template on the floor in cabinet opening so that the left 

edge is against cabinet and top edge is against rear wall, 
molding or cabinet.

3. Tape template into place.

4. If countertop is not flush with cabinet opening edge, align 

template with overhang.

If cabinet opening is wider than that specified in the “Location 
Requirements” section, adjust template so range will be 
centered in cabinet opening.

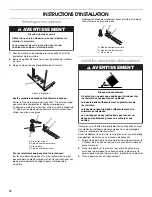
A. Shipping base

A. ¼" drive ratchet
B. Rear leveling leg

C. Wrench or pliers
D. Front leveling leg

A. Rear leveling leg
B. Front leveling leg

C. Wrench or pliers

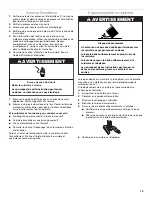
WARNING

Excessive Weight Hazard

Use two or more people to move and install range.

Failure to do so can result in back or other injury.

A

A

B

C

D

A

B

C

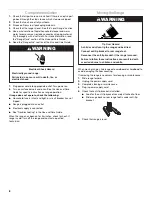
WARNING

Tip Over Hazard

A child or adult can tip the range and be killed.

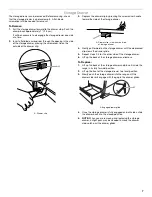
Connect anti-tip bracket to rear range foot.

Reconnect the anti-tip bracket, if the range is moved.

Failure to follow these instructions can result in death 
or serious burns to children and adults.

Summary of Contents for 0W10196159

Page 1: ...ing the Range 8 ANTI TIP BRACKET TEMPLATE 16 SÉCURITÉ DE LA CUISINIÈRE 9 EXIGENCES D INSTALLATION 10 Outillage et pièces 10 Exigences d emplacement 10 Spécifications électriques 11 INSTRUCTIONS D INSTALLATION 12 Déballage de la cuisinière 12 Installation de la bride antibasculement 12 Vérification de l emplacement de la bride antibasculement 13 Mise à niveau de la cuisinière 13 Tiroir de Remisage ...

Page 2: ...in this manual and on your appliance Always read and obey all safety messages This is the safety alert symbol This symbol alerts you to potential hazards that can kill or hurt you and others All safety messages will follow the safety alert symbol and either the word DANGER or WARNING These words mean follow instructions instructions DANGER WARNING WARNING Tip Over Hazard A child or adult can tip t...

Page 3: ...a minimum of 5 12 7 cm beyond the bottom of the cabinets Cabinet opening dimensions that are shown must be used Given dimensions are minimum clearances The floor anti tip bracket must be installed To install the anti tip bracket shipped with the range see Install Anti Tip Bracket section Grounded electrical supply is required See Electrical Requirements section IMPORTANT To avoid damage to your ca...

Page 4: ... conformance with CSA Standard C22 1 Canadian Electrical Code Part 1 latest edition and all local codes and ordinances A copy of the above code standards can be obtained from Canadian Standards Association 178 Rexdale Blvd Toronto ON M9W 1R3 CANADA Check with a qualified electrical installer if you are not sure the range is properly grounded The NEC calculated load is less than the total connected...

Page 5: ...ipping base cardboard or hardboard 1 Remove template from the anti tip bracket kit found inside the oven cavity or from the back of this manual 2 Place template on the floor in cabinet opening so that the left edge is against cabinet and top edge is against rear wall molding or cabinet 3 Tape template into place 4 If countertop is not flush with cabinet opening edge align template with overhang If...

Page 6: ...the following installation instructions VerifyAnti TipBracketLocation 1 On models with a storage drawer remove storage drawer See the Storage Drawer section On models with a warming drawer the rear leg cannot be seen by removing the warming drawer It will be necessary to view the rear foot from outside the range 2 To check that the anti tip bracket is installed use a flashlight and look underneath...

Page 7: ...rd on the storage drawer until the depressed clip clears the drawer glide 5 Repeat steps 2 4 for the other side of the storage drawer 6 Lift up the back of the storage drawer and remove To Replace 1 Lift up the back of the storage drawer and place it inside the range in its fully forward position 2 Lift up the front of the storage drawer to a level position 3 Slowly push the storage drawer into th...

Page 8: ...utlet Electrical supply is connected See Troubleshooting in the Use and Care Guide When the range has been on for 5 minutes check for heat If range is cold turn off the range and contact a qualified technician MovingtheRange When moving range slide range onto cardboard or hardboard to avoid damaging the floor covering If removing the range is necessary for cleaning or maintenance 1 Slide range for...

Page 9: ...surez vous de toujours lire tous les messages de sécurité et de vous y conformer AVERTISSEMENT DANGER Voici le symbole d alerte de sécurité Ce symbole d alerte de sécurité vous signale les dangers potentiels de décès et de blessures graves à vous et à d autres Tous les messages de sécurité suivront le symbole d alerte de sécurité et le mot DANGER ou AVERTISSEMENT Ces mots signifient Risque de basc...

Page 10: ... du bas des placards Respecter les dimensions indiquées pour la cavité d installation entre les placards Ces dimensions constituent les valeurs minimales des dégagements de séparation La bride antibasculement de plancher doit être installée Pour l installation de la bride antibasculement expédiée avec la cuisinière voir la section Installation de la bride antibasculement Une source d électricité a...

Page 11: ...iptions de la plus récente édition des normes CSA C22 1 partie 1 Code canadien de l électricité et de tout code ou règlement local en vigueur On peut obtenir un exemplaire des normes ci dessus auprès de Canadian Standards Association 178 Rexdale Blvd Toronto ON M9W 1R3 CANADA En cas de doute quant à la qualité de la liaison à la terre de la cuisinière consulter un électricien qualifié La charge ca...

Page 12: ... le revêtement de sol existant Avant de déplacer la cuisinière la faire glisser sur son emballage d expédition du carton ou un panneau de fibres dur 1 Enlever le gabarit de la trousse de la bride antibasculement à l intérieur de la cavité du four ou de la couverture arrière du présent manuel 2 Placer le gabarit sur le sol dans l ouverture du placard de sorte que le bord gauche se trouve contre le ...

Page 13: ... bride antibasculement 9 En cas d installation de la cuisinière dans une résidence mobile il est impératif de fixer la cuisinière au sol Toute méthode de fixation de la cuisinière est adéquate dans la mesure où elle satisfait aux normes indiquées dans la section Exigences d emplacement 10 Poursuivre l installation de la cuisinière en utilisant les instructions d installation suivantes Vérification...

Page 14: ... du tiroir 3 Enfoncer l attache de tiroir en appuyant le manche du tournevis vers le côté du tiroir de remisage 4 Tirer doucement le tiroir de remisage vers l avant jusqu à ce que l attache préalablement enfoncée libère la glissière de tiroir 5 Répéter les étapes 2 4 pour l autre côté du tiroir de remisage 6 Soulever l arrière du tiroir de remisage et le retirer Remise en place 1 Soulever l arrièr...

Page 15: ...nsulter la section Dépannage dans le Guide d utilisation et d entretien Après 5 minutes de fonctionnement de la cuisinière vérifier l échauffement Si elle est froide éteindre la cuisinière et contacter un technicien qualifié Déplacementdelacuisinière Lorsqu on déplace la cuisinière la faire glisser sur une planche de carton ou en matériau dur pour éviter d endommager le revêtement du sol Si le dép...

Page 16: ...et placer le bord gauche contre le côté gauche du placard et le bord supérieur contre la paroi arrière Left edge Bord gauche Top edge Bord supérieur Use this template to anchor the left rear leg of range Utiliser ce gabarit pour ancrer le pied arrière gauche de la cuisinière Trous dans la bride Holes in bracket W10196159C 2009 All rights reserved Tous droits réservés 10 09 Printed in U S A Imprimé...

Reviews: