background image


Model A  User Manual 


Page 37 of 40 


 Charging the battery 

7.2


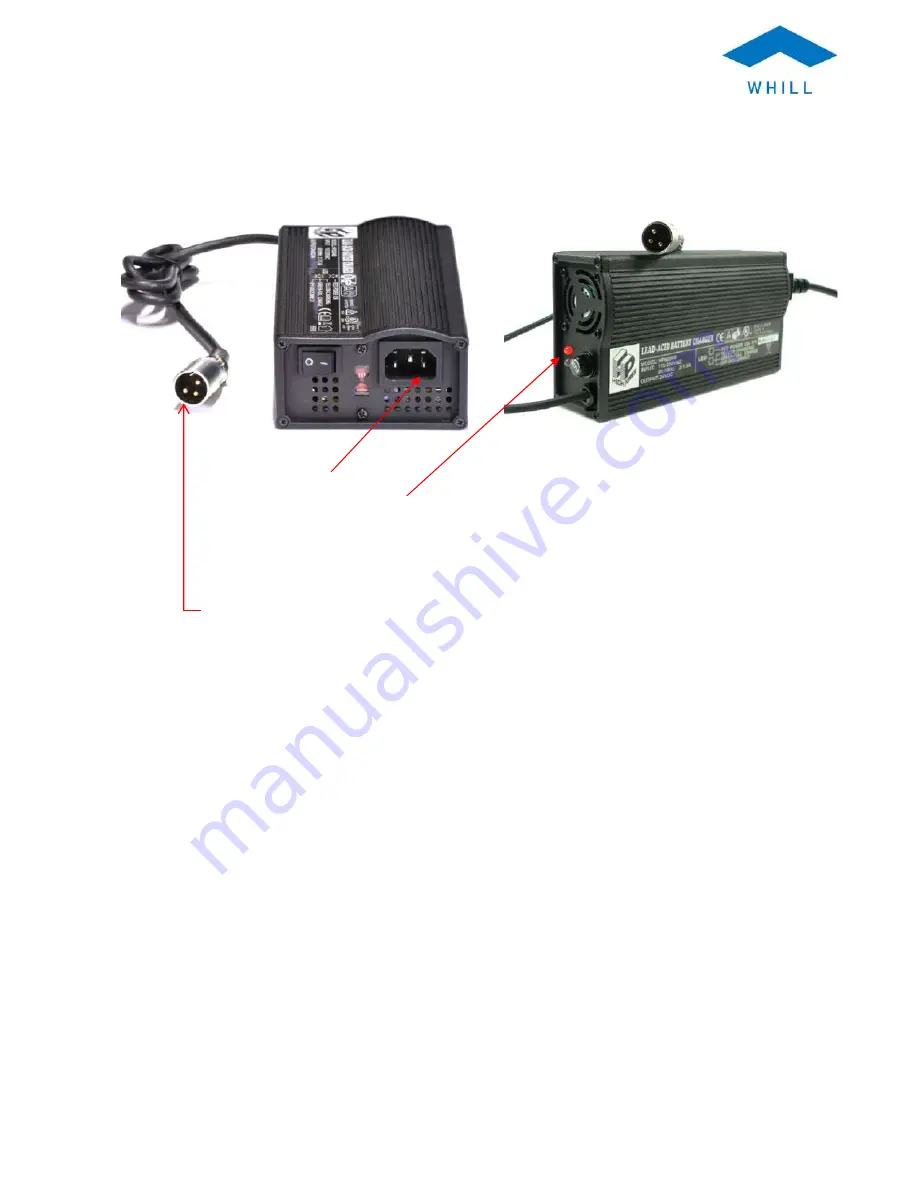
Figure 34.  Battery charger images and design


 AC receptacle 

 Charging status indicator 

Green: fully charged (floating charge) 
Orange: charging 
Red: power on 
Flashing Red: safe mode (unplug AC cable for 5 sec to reset) 
Off: disconnected 
 

DC plug  


AC cable: not pictured, plugs into AC receptacle (1) 


Please charge the Model A by following the steps below: 


Ensure the Model A is safely parked indoors in a well-ventilated room and has both its brakes 
engaged. 


Turn off the power. 


Connect the AC cable to the battery charger’s AC receptacle. 


Connect the round DC plug to the charger port above the right motor brake knob on the 
Model A (seen in Figure 1). 


Connect the AC cable directly into a wall outlet with proper grounding earth. 


The charging status indicator should go from red to orange. When it becomes a steady green 
light, charging is complete. Unplug the DC plug and AC cables. 


Depending on the battery’s condition, it may take 8 - 9 hours to fully charge.  
 
Note:  


If the status indicator is blinking red, it is in safe mode. To reset, unplug the charger from the 
wall outlet for 5 seconds and re-plug it. 


 If the Model A is turned on during charging, you will see an error code and will not be able 
to operate the Model A.  In this case, turn off the Model A and unplug the charger before 
turning on the power. 


Summary of Contents for Model A

Page 1: ...Model A User Manual ...

Page 2: ...ositions 9 3 2 Cushions 10 3 3 Specifications 10 3 4 4 Operation 11 Safety Check 11 4 1 Moving into and out of Model A 12 4 2 Lap Belt 14 4 3 Power Switch 15 4 4 Turning the Model A On 15 4 5 Turning Model A off 16 4 5 1 Checking the Battery Charge Level 16 4 6 Full battery charge 17 4 6 1 Partial battery charge 17 4 6 2 Low battery indication 17 4 6 3 Error Codes 18 4 7 Seat Mode 19 4 8 Speed Con...

Page 3: ...8 5 4 Remote Control 29 5 5 Seat Slide 29 5 6 Speed Setting 30 5 7 Priority Setting 30 5 8 Enable Automatic Key 31 5 9 Log Out 31 5 10 6 Brake Release Levers 32 How to release the electromagnetic brakes 32 6 1 How to engage the electromagnetic brake s 34 6 2 7 Battery and Charging 34 Charger specifications for WHILL Model A 35 7 1 Charging the battery 37 7 2 Battery service or replacement 38 7 3 8...

Page 4: ...understand important features of Model A in detail At WHILL we care about your safety and experience Please carefully read and follow all the instructions in this manual CAUTION 1 3 The WHILL Model A is intended for personal transportation and is not a wheelchair Anyone who is restricted to a sitting position should not use this product The WHILL Model A is not considered a medical device and has ...

Page 5: ... us if you notice any inaccuracies or omissions in this manual 2 Safety Warnings 2 1 WARNING Model A Operation Do not operate the Model A without reading this user manual Please pay close attention to all safety information and warnings Contact customer support if you need clarification on sections that are unclear Failure to read and understand how to safely operate the Model A may result in dama...

Page 6: ...Model A when moving Brake lock release Only disengage the brake locks put the Model A in freewheel mode for emergency and short term use To prevent unintended movement the Model A must be powered off whenever the brake locks are being engaged or disengaged Do not use the Model A on a slope when the brake locks are disengaged in freewheel mode Because the Model A has no brakes in this mode controll...

Page 7: ...components or modifying the powered Model A may make it more susceptible to EMI o Report all incidents of unintended movement or brake release to the powered Model A manufacturer and note whether there is a source of EMI nearby Section 6 of this user manual contains more information on EMI and how it can affect the Model A To properly understand EMI please read Section 6 CAUTION Cautions 2 2 Be su...

Page 8: ...Model A User Manual Page 8 of 40 3 Product Model A Components 3 1 Figure 1 Model A Components Back cover removed by hand to expose circuit breaker Circuit Breaker ...

Page 9: ...fferent positions Figure 2 Arm Down Position Arm Up Seat Back Position Arm Up Seat Forward Position To drive the Model A the arms must be locked in the down position Creates space to free your arms Allows you to get closer to the edge of a table Figure 2 Model A Seat and Arm Positions Mode Switch Power Switch Battery Indicator ...

Page 10: ...und Clearance 3 5 89mm Chair Weight 250 lb 114kg Maximum Speed 5 5 MPH 8 9 km h Speed Settings High Mid Low Speed Braking System Electromagnetic Brake Turning Radius 28 711mm Maximum Obstacle Height 3 75mm Incline Capability 10 degrees Driving Range full battery charge 10 6 12 miles 19 3 17 0 km Maximum Weight Capacity 220lb 100kg Arm Angle down position 45 50 56 62 degrees Seat Angle 4 positions ...

Page 11: ...vice Contact your dealer or WHILL for service Safety Check 4 1 INFORMATION Practice and get to know the feel of your Model A and its capabilities Perform the safety checks listed below before each use to ensure your Model A operates smoothly and safely Perform the following inspections before turning on the chair Ensure the charger is unplugged from the Model A and that the battery charger is safe...

Page 12: ...INFORMATION Moving into or out of your Model A requires agility awareness and caution Practice safe loading and unloading techniques and ask for assistance if you cannot safely accomplish them on your own The Model A has been designed to make it easy to move into and out of the chair The figures below demonstrate features that may make moving into and out of the chair easier Figure 3 Chair in the ...

Page 13: ...de seat forward using directional controller and seat slide mode Figure 6 Lift rotate control arms up and backward Figure 7 Sit down in the chair Pivot the footplate up out of the way if desired Figure 8 Lower the control arms to the down position ...

Page 14: ...e 9 If footplate was pivoted up return it to the horizontal position Figure 10 Slide the seat backward using the directional controller seat slide mode Lap Belt 4 3 WARNING For your safety always fasten the lap belt when you are in the chair ...

Page 15: ...g the Model A On 4 5 To turn on the Model A pull back and release the Power Switch once The battery indicator blue light s should turn on for a second and the logo light should turn on and stay on Around the power switch are multiple lights that indicate the amount of charge left in the battery To understand the battery charge indicators see section entitled Checking the Battery Charge Level on th...

Page 16: ...as expected refer to the Battery Charge section of this manual or contact WHILL customer support for help Checking the Battery Charge Level 4 6 The battery charge is designed to last approximately 12 miles depending on conditions such as tires road driving conditions temperature humidity payload and inclines For more details see section entitled Battery Maintenance There are 5 lights indicating th...

Page 17: ...dication 4 6 3 A low battery level less than 37 is indicated by one remaining blue light If the one blue battery light changes to red this means the unit is on reserve battery charge less than 20 and you should charge the unit immediately Figure 17 Lights demonstrating low and reserve battery charge levels Low battery level Flashing Reserve battery level If the unit stops due to a dead battery and...

Page 18: ...sly or alternatively flashing indicate an error code Error Codes 4 7 Alternating flashing blue and red Simultaneous flashing Figure 18 Model A is charging Figure 19 Directional controller is moved during powering on procedure Figure 20 One or both motor brake levers are released freewheel mode ...

Page 19: ...ler Ensure the mode switch is on the seat mode setting and move the directional controller to slide your seat forwards and backwards This functionality can be used to facilitate getting into and out of the unit or to bring you closer to the edge of a table Figure 21 Directional controller arm is not fully locked e g in the up position Figure 22 Seat mode demonstration ...

Page 20: ... will be flashing Speed Control 4 9 The maximum operating speeds are controlled by the speed switch Moving the directional controller will accelerate the Model A from a standstill to a maximum given speed for each switch setting Please see below for these limits Speed Switch 4 9 1 There are 3 settings for the speed switch which controls overall speed of the unit Fast 5 5 MPH 8 9 KPH Medium 3 5 MPH...

Page 21: ...e the Model A move more slowly When beginning to drive the Model A always set the speed switch to slow the setting closest to you and apply just enough pressure on the directional controller for the unit to begin moving Directional Controller 4 10 The directional controller is the Model A s steering control WHILL offers two models of directional controllers Figure 25 and Figure 26 Figure 25 Mouse ...

Page 22: ...oller in forward and backward direction Push the directional controller away from you to drive forward Pull it towards you to drive in reverse Figure 28 Diagonal movement to turn Model A to the right Move the directional controller diagonally right to begin a right hand turn ...

Page 23: ...at you encounter any issues while driving CAUTION Check around you for loose clothing or other material that may snag on the product before moving the seat backwards Be sure to gather any objects up and move them out of the way before moving the seat backward Driving checklist for the Model A 4 11 1 Make sure the unit is turned on Make sure the controller arm is in the lowered locked position Make...

Page 24: ...12 The Model A is designed with four wheel drive and should provide traction and stability in many conditions However it is important to be aware of the limitations of the unit WARNING Do not operate the Model A on any streets roads or highways Before crossing the street make sure that any and all drivers see you To prevent injury and or damage do not use the Model A in heavy snow or icy condition...

Page 25: ...stability and balance of the Model A Always exercise caution when shifting your weight or balance in the Model A When in doubt ask for help when reaching for inaccessible objects In addition to the warnings and caution above to ensure a smooth and safe ride Always approach curbs thresholds and gradients straight on Always approach obstacles curbs and gradients at low speed Stopping and Parking 4 1...

Page 26: ...ust speed settings all from a simple interface on your iPhone To use the remote feature go to the App Store on your iPhone search for the WHILL App select the App and press install Once installed touch open to launch the App Follow the directions below Set Up 5 1 Follow the steps below to turn on Bluetooth 1 Click on Settings icon 2 Click on Bluetooth 3 Turn on Bluetooth Slide circle to the right ...

Page 27: ...ILL App 2 Click gear icon at bottom right 3 Fill in device ID and Password ID 7 digit numerical portion of product serial number Password 00000000 Please change after first log in The Device ID 7 digit numerical portion of serial number is located on the rear of the product just below the seat above the back cover ...

Page 28: ...The App may be used to stop the Model A in emergencies 1 Open WHILL App 2 Tap Connect button 3 You will see the app portal page Note Please make sure you have internet access only needed for the first connection 1 Swipe from left to right to stop the product 2 Tap to release the emergency stop ...

Page 29: ...mote control 2 Drag the blue circle in the direction you want to go Example Drag the circle toward the front bar and the product will move forward 1 Click on seat slide 2 Tap Forward or Backward to slide the seat Example Touch and hold the forward area and the seat will move forward ...

Page 30: ...er by sliding the circle forward or backward then tap the back arrow 4 Save changes by tapping Save in the upper right corner 2 Choose high mid low or remote from the top tab Then click on any parameter you want to change 1 Click gear icon at bottom right 2 Turn Priority Setting on or off by moving button left or right ...

Page 31: ...ailable Log Out 5 10 OFF Product is only operable from the App Joystick controller will be disabled ON Product is operable from both the joystick and the App 1 Click gear icon at bottom right 2 Tap Log out 1 Double click home button on the iPhone 2 Slide the App image off the screen OR ...

Page 32: ...isengaged Do not use the Model A on a slope when the brake locks are disengaged in freewheel mode Because the Model A has no brakes in this mode controlling or stopping the Model A will be difficult and could result in serious injury Best practice when releasing the brakes Keep in mind that the Model A will be difficult to control in freewheel mode Be strongly aware of the environment around you e...

Page 33: ...ctromagnetic brake levers Figure 32 Right hand side brake release Figure 33 Left hand side brake release Right hand side break release Release turn counter clock wise Lock turn clock wise Left hand side break release Release turn clock wise Lock turn counter clock wise ...

Page 34: ...ut the battery level indicators With a full battery charge you should be able to drive about 10 6 12 miles under ideal conditions Factors that will affect the driving range include curves terrain driving habits payload and temperature To get the maximum range or distance per charge WHILL recommends the following Always fully charge the batteries before a trip Reduce baggage weight as much as possi...

Page 35: ...ead acid batteries They do not require maintenance Charger specifications for WHILL Model A 7 1 Table 2 Charger specifications for Model A Manufacturer High Power Model HP0180WB 24V 6A Output Current DC 6 0A 0 3A Pre Charge Current 0 6A 0 3A Constant Current Fast Charge 21V 28V 1V 6A Short Circuit Protection YES Protection Against Over Voltage Stop charge when output voltage is over Vmax 1 05 Prot...

Page 36: ...6 of 40 Charging Orange Full Charge Green Protection Red LED flash Operating Temperature 0 40 Operating Humidity 20 85 Storage Temperature 20 70 Used Below The Altitude 2000m Dimensions 183mm L x 100mm W x 58mm H Weight 0 81 kg ...

Page 37: ... receptacle Connect the round DC plug to the charger port above the right motor brake knob on the Model A seen in Figure 1 Connect the AC cable directly into a wall outlet with proper grounding earth The charging status indicator should go from red to orange When it becomes a steady green light charging is complete Unplug the DC plug and AC cables Depending on the battery s condition it may take 8...

Page 38: ... communication devices such as cellular phones while the Model A is turned ON o Be aware of nearby transmitters such as radio or TV stations and try to avoid coming close to them o If unintended movement or brake release occurs turn the powered chair OFF as soon as it is safe o Be aware that adding accessories or components or modifying the powered chair may make it more susceptible to EMI o Repor...

Page 39: ... and you turn on the Model A If this occurs please use the brake release levers to engage lock the brakes Other errors codes are for use by service and you should call customer support if they appear Whenever you turn on the Model A all the battery indicator lights should illuminate enabling you to see if they are all operational 10 Maintenance WARNING The Model A contains no user serviceable part...

Page 40: ......

Reviews: