


v
v
5
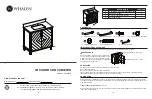
ASSEMBLY INSTRUCTIONS
v
7
8
9
6
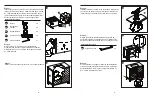
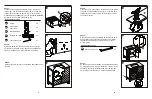
Step 7:
To mount the backsplash (C) to the wall, apply a thin bead
of silicone compound (not included) to the unpolished
back side and bottom of the backsplash (C). Position
backsplash (C) as shown onto vanity top (A) and against
the wall. Clean any excess silicone compound before
allowing to dry.
Silicone
Step 8:
Note: The adjustable shelf is pre-installed for shipping.
If the shelf position is not to your liking, you will need to
reposition the shelf by following the steps below:
a.
Look under the shelf, and locate the wood screws
holding the shelf to the shelf supports.
b.
Remove the wood screws from each shelf support with a
Phillips screwdriver (not included).
c.
Remove the adjustable shelf from the vanity (B).
d.
Remove the shelf supports from the vanity (B) and
re-position them in the desired location. Make sure you
place the shelf supports in the same level so the shelf is
not tilted.
e. Place the adjustable shelf back onto the shelf supports.
f.
Using the Phillips screwdriver, reinstall the wood screws
through the shelf supports and into the shelf.
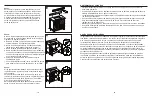
Step 9:
If the door preassembled to vanity base (B) require
adjustment, follow the below options as needed:
To adjust door up or down, loosen screws (a), adjust door
and tighten screws.
To adjust door left and right, turn screw (b) in or out.
To adjust door in and out, loosen screw (c), adjust door
and retighten screw.
CARE AND MAINTENANCE
ONE-YEAR LIMITED WARRANTY
This product is warranted to the original purchaser. If there is a failure in this unit due to defects
in materials or workmanship, the manufacturer will repair or replace this item at our discretion
without charge. Warranty is void if product has been assembled incorrectly, misused, abused by
overloading, altered in any way or damaged due to accident. This warranty is not transferable and
does not cover chipping, flaking, scratches, rust, dents, or other damages to the surfaces of this
product. Responsibility of the manufacturer is limited to repair or replacement of this product. The
manufacturer is not responsible for consequential, incidental, or other damages or losses resulting
from product failure.
This warranty is in lieu of all other expressed warranties. Some states do not allow the exclusion or
limitation of incidental or consequential damages, so the above limitation may not apply to you. This
warranty gives you specific legal rights and you may have other rights which vary from state to state.
•
Dust the vanity regularly with a soft, non-lint producing cloth or household dusting product.
•
You can clean the vanity with a gentle, non-abrasive household cleaner. Make sure to dry the
wood immediately with a soft cloth or towel.
•
The engineered stone top can be cleaned using standard engineered stone cleaning agents (sold
separately).
•
Tips for using touch-up pen (AA): For scratches, stroke in direction of scratch; for worn areas,
stroke in direction of wood grain. Rub excess colorant promptly with a soft cloth.
•
Keep product away from direct sunlight as it may damage the finish.
•
Be sure to immediately clean red wine or coke stains within 30 minutes or the top will stain.
UP
C
A
B
B