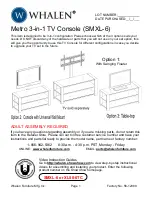
Whalen SMXL-6 Assembly Manual Download Page 12

Model # SMXL-6 

Please call for replacement parts or assistance: 

1-866-942-5362 (valid only in USA)


Whalen Furniture Mfg. Inc.  


         Page 12 


Factory No. 56-12089 


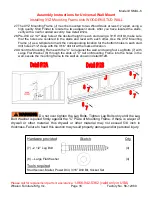
Mounting Monitor Bracket to a television with a flat back 


Note: For televisions with a curved back or recessed back proceed directly to step #19.


16. Determine the correct diameter of the bolt your TV requires by hand threading them into the 

threaded  insert  on  the  back  of  the TV.  If  you  encounter  any  resistance,  stop  immediately.  If 
you are unable to find the correct bolt consult a local hardware store. 

17. Once you have determined the correct  diameter Bolt, follow the appropriate Diagram below, 

thread the Short Bolt through the appropriate Lock Washer, Flat Washer, the Monitor Bracket 
(K), and into the upper threaded inserts of TV. As shown in detail #8A. 

Note: Lean the TV up 

against a wall or other solid surface when attaching with the Monitor Brackets (K). DO NOT 
place the TV face down on the glass this may cause permanent damage.


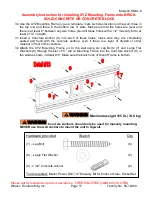
18. Proceed to insert the long Bolt through the appropriate Lock Washer, the Flat Washer, the slot 

of  Monitor  Bracket  (K),  a  second  Flat  Washer  (M4/M5  Diameter  Bolts  only),  appropriate 
Spacer,  and  into  the  bottom  threaded  inserts  of  TV.  As  shown  in  detail  #8.  Make  sure  the 
Monitor  Brackets  (K)  are  centered  and  level  with  each  other.  Tighten  the  bolts  securing  the 
Monitor Brackets to the TV. 
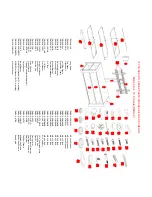


Parts provided   

Qty.   

Tools required    


– Monitor Bracket 

 (2)    

Phillips Screwdriver 

TV Mounting Kit  


Summary of Contents for SMXL-6

Page 1: ...any questions regarding assembly or if you are missing parts do not return this item to the Retailer Store Please call our toll free customer service number and have your instructions and parts list r...

Page 2: ...t on a sturdy level and protective surface 6 Please wait until all steps are completed before tightening bolts 7 Make sure all bolts are tightly fastened before the unit is used IMPORTANT INFORMATION...

Page 3: ...Please read completely through the instructions and verify that all parts listed are present before beginning assembly A Top Shelf Frame 1 B Middle Shelf Frame 1 C Bottom Shelf Frame 1 D Long Spine 1...

Page 4: ...g Bolt 6 pcs 8 Large Flat Washer 6 pcs 9 1 3 4 Concrete Anchor 6 pcs Open Wrench Allen Wrench Touch up Pen Tipping Restraint Hardware Kit 1 1 2 1 Inside Plastic Bag TV Mounting Kit M4 x 12 Bolt 4 M4 x...

Page 5: ...d confirm that you have all the hardware and required parts listed 2 Choose the option suits your needs Locate Long Spine D or Short Spine D1 on a level and protective surface with 2 round holes facin...

Page 6: ...h the metal bracket on the back of shelf frame into the threaded inserts on side frame See detail 2 DO NOT tighten the bolts Note For the end metal brackets on the back of shelf frame must use only Bo...

Page 7: ...ench provided 9 In case of uneven floor Floor Levelers are provided at the bottom of Left Right Side Frame E F Simply tilt the unit back and raise or lower floor leveler by hand to correct tilting as...

Page 8: ...properly centered and the black side of glass is down Push each glass all the way back against the Spine Also be sure to press down evenly and firmly each glass onto the Suction Cups to make sure the...

Page 9: ...low the instructions printed on the plastic bag in order to mount the Tipping Restraint Hardware Kit to the Spine properly As shown in detail 5 NOTE YOU MUST USE THIS TIPPING RESTRAINT TO ATTACH THIS...

Page 10: ...2 with Washers 5 6 Make sure the swivel bolt head is up See detail 6 Note The Spine can provide 4 height options for your TV set Refer to your TV size adjust the Swiveling Bracket at your desired heig...

Page 11: ...Mounting Frame is bottom Align and attach by threading four 3 4 Bolts 2 with Flat Washers 6 through the metal plate on XYZ Mounting Frame and the Swiveling Bracket at the other side of Swiveling Brack...

Page 12: ...iate Diagram below thread the Short Bolt through the appropriate Lock Washer Flat Washer the Monitor Bracket K and into the upper threaded inserts of TV As shown in detail 8A Note Lean the TV up again...

Page 13: ...er any resistance stop immediately If you are unable to find the correct bolt consult a local hardware store 20 Once you have determined the correct diameter Bolt follow the appropriate Diagram below...

Page 14: ...attached onto the back of television ask for assistance to lift the television up to the XYZ Mounting Frame J Place the hooks on Monitor Brackets over the Mounting Frame then lower them onto the bars...

Page 15: ...mount the Tipping Restraint Hardware Kit to the Spine properly As shown in detail 11 Note You must install the Tipping Restraint Hardware with the unit in use to prevent any accidents or damage to the...

Page 16: ...a template to mark the corresponding location for the bottom holes in each stud drill holes 2 1 2 deep with the 3 16 drill bit at the marked location 29 Orient the Mounting Frame with the C rail agai...

Page 17: ...crete Anchor 9 into each of these holes make sure they are completely seated and flush with the concrete surface even if there is a layer of drywall or other material in front of the concrete 32 Attac...

Page 18: ...J Place the hooks on Monitor Brackets over the Mounting Frame then lower them onto the bars of Mounting Frame Proceed to center the television 34 Insert the Safety Bar L into the bottom holes on the...

Page 19: ...ten them if necessary Further advice about wood furniture care It is best to keep your furniture in a climate controlled environment Extreme temperature and humidity changes can cause fading warping s...

Page 20: ...16 Bolt SMXL 6 11 1 1 4B 1 1 4 Bolt SMXL 6 35 M8x40B M8 x 40 Bolt SMXL 6 12 FW Flat Washer SMXL 6 36 2 1 2LB 2 1 2 Lag Bolt SMXL 6 13 LFW Large Flat Washer SMXL 6 37 1 3 4CA 1 3 4 Concrete Anchor SMX...

Reviews: