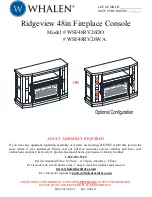
Whalen 6415124 Manual Download Page 4

Parts and Hardware List 


Please read completely through the instructions and verify that all listed parts and hardware are present 
before beginning assembly.


 (2) Cam Bolt                                    (3) M8 x 30 mm Wood Dowel                     (4) M3.5 x 12mm Screw   

(Qty. 22+1 extra)                                            (Qty. 24+1 extra)                                    (Qty. 24+1 extra) 


 (5) M3.5 x 15mm Washer Head Screw                  (6) M4 x 30 mm Screw                       (7) M3.5 x 15mm Pan Head Screw 

         (Qty. 34+1 extra)                                     Qty. 8+1 extra)                                      (Qty. 8+1 extra)


    (8) M4 x 50mm Screw                                   (9) Mending Plate                                             (10) Stopper 

    (Qty. 4+1 extra)                                                (Qty. 2)                                                           (Qty. 2) 


(11) L-shaped Metal Bracket                                   (12) Handle                                  (13) 5/32’’ x 22mm Bolt 

              (Qty. 2)                                                      (Qty. 2)                                             (Qty. 4+1 extra) 


(14) Shelf Support                                         (15) Acrylic Stopper                                          (16) Cam Cover 
(Qty. 16+1 extra)                                                     (Qty. 1)                                                    (Qty. 12+1 extra) 


               Glue                                                         Touch-up Pen                       Tipping Restraint Hardware Kit (Qty. 2) 

      (Qty. 1)                                                          (Qty. 1)                                      

(Included in plastic bag)


Tools required 

(not included)

: Phillips screwdriver, stud finder, pencil, tape measure, power drill and 1/8 in 

drill bit. 

Summary of Contents for 6415124

Page 1: ...are missing DO NOT return this item to the store where it was purchased Please call our toll free customer service number and have your instructions and parts list ready to provide the model name par...

Page 2: ...t goes into the pre drilled hole at the end of the panel with the Cam Lock 2 Insert the Cam Lock into the pre drilled large hole in the panel Make sure the arrow on the Cam Lock is pointed towards the...

Page 3: ...Partition Panel Qty 1 F Right Partition Panel Qty 1 G Upper Crossbar Qty 1 H Middle Crossbar Qty 1 I Middle Left Stile Qty 1 J Middle Right Stile Qty 1 K Firebox Support Qty 1 L Left Adjustable Shelf...

Page 4: ...x15mmPanHeadScrew Qty 34 1 extra Qty 8 1 extra Qty 8 1 extra 8 M4 x 50mm Screw 9 Mending Plate 10 Stopper Qty 4 1 extra Qty 2 Qty 2 11 L shaped Metal Bracket 12 Handle 13 5 32 x 22mm Bolt Qty 2 Qty 2...

Page 5: ...the Top Panel A Base C Partition Panels E and F and Middle Crossbar H with a Phillips screwdriver NOTE Screw in cam bolts must be screwed down flush 3 Insert fourteen Wood Dowels 3 into the inner hole...

Page 6: ...m Locks 1 Refer to page 2 on Cam Lock system operation supplement 5 Align and attach the Middle Left Stile I to the Left Partition Panel E and fasten them into place with four 30 mm Screws 6 6 Repeat...

Page 7: ...ructions 7 Align and attach the Stoppers 10 to the Partition Panels E and F with four 12 mm Screws 4 8 Attach the Fixed Shelf B beween the Partition Panels E and F by engaging four Cam Locks 1 E F 10...

Page 8: ...to the Base C and fasten them in place with four 50 mm Screws 8 Fully tighten the screws with a Phillips screwdriver 10 Glue the Wood Dowels 3 into the inner holes of Side Panels D and Upper Crossbar...

Page 9: ...d Wood Dowels 3 on the Base C Firmly press them together and fasten it in place by engaging two Cam Locks 1 12 Repeat the same procedure to attach the other Side Panel D at the other end 13 Align and...

Page 10: ...ing eight Cam Locks 1 15 Ask for assistance to flip the unit around at its front edge as shown 16 With the pilot holes as a guide fasten the Middle Crossbar H to the Middle Left and Right Stiles I and...

Page 11: ...lign and attach the Side Back Panels O and Q to the mantel frame with the provided 15mm Washer Head Screws 5 NOTE We recommend attaching back panel with washer head screws at the corners first 20 Ask...

Page 12: ...h the hinge arms c Press lightly on the end of both hinge arms to engage the catch d To remove the hinge arms from the mounting plates press gently in the release lever on the back of hinge arms 23 Re...

Page 13: ...the opening DO NOT drag the insert across the Base C as it may scratch the unit 28 Use the pilot hole as a guide fasten two L shaped Metal Brackets 11 onto the Firebox Support K with four 15mm Pan Hea...

Page 14: ...ve the paper backing from the Acrylic Stopper 15 then properly align the acrylic stopper into the cut out on the acrylic stopper template on the Top Panel A Press down on the acrylic stopper to help a...

Page 15: ...nterchange with the Door Glass Insert R depending on your configuration 32 To change the configuration loosen the screws on the inside of Doors N and rotate the clips to remove the door insert panel R...

Page 16: ...st install the tipping restraint hardware with the unit to prevent the unit from tipping causing any accidents or damage The tipping restraints are intended only as a deterrent they are not a substitu...

Page 17: ...on the furnishing may encourage a child to climb on the furnishing and as a result may tip over onto the child NEVER allow children to climb or play with the TV or furnishing supporting the TV NEVER...

Page 18: ...4 30 p m PST Monday to Friday www whalenfurniture com MAXIMUM RECOMMENDE D WEIGHT LO ADS THIS UNIT IS NOT INTENDED FOR USE WITH CRT TVS USE ONLY WITH FLAT PANEL TVS AND AUDIO VIDEO EQUIPMENT MEETING...

Reviews: