background image

CHAPTER 4 – Specifications & Software 

45 


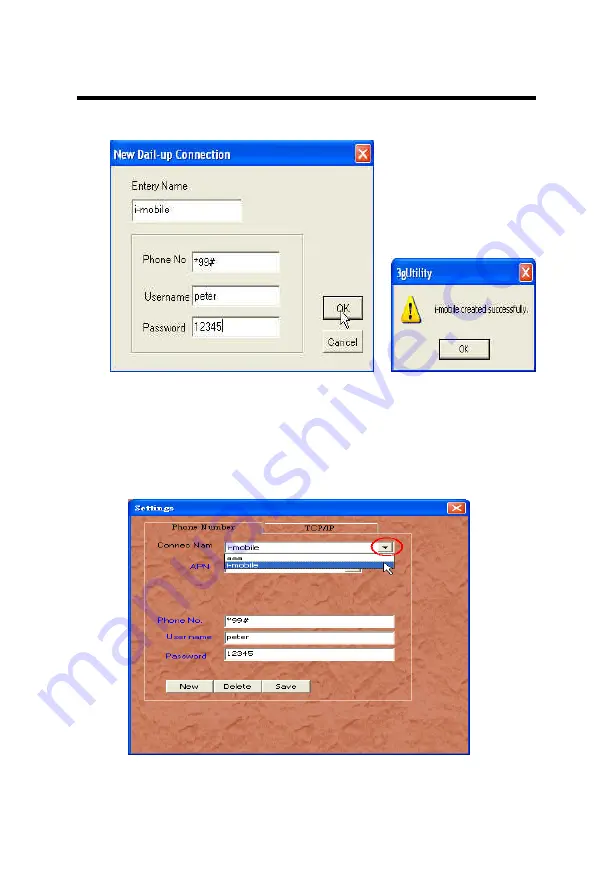
2. Fill in the blanks with the new connection data and click <OK>. 


z


To Select an Existing Connection for Connecting or Editing 

1. Select <Setting> in Main Dialog,  

2. Select the target connection 

3. Click the top right X button to return main dialog. 


Summary of Contents for PMG102

Page 1: ...User s Manual PMG102 WETIF Industrie EDV Telefon DE 49 8142 448976 0 Senserstra e 3 Telefon AT 43 664 28 68 223 D 82140 Olching info wetif com www wetif com...

Page 2: ...s the right to revise or make changes to this publication without notice or obligation of the manufacturer to notify any person of such revision or changes Software Licenses The software included with...

Page 3: ...progress The ideal range for safe operation of the computer is from 100 240V AC 1 AC Power Cord 2 AC Adapter 3 DC Direct Current Cord Warning Using the AC adapter to power other devices can damage the...

Page 4: ...ie Ersatz nur durch denselben oder einem vom Hersteller empfohlenem hnlichen Typ Entsorgung gebrauchter Batterien nach Angaben des Herstellers 4 Swedish Explosionsfara vid felaktigt batteribyte Anv nd...

Page 5: ...which to receiver is connected Consult the dealer or an experienced radio TV technician for help Use of shielded cord is required to comply with Class B limits in Subpart B of Part 15 of the FCC rules...

Page 6: ...and Other Procedures with the Stylus Pen 11 For Optimal Performance from the Stylus Pen 12 The CMOS Camera 12 CHAPTER 2 13 SYSTEM OVERVIEW 13 Front View of the Computer 14 Right Side View of the Compu...

Page 7: ...ging the Video Resolution of an External Display 28 CHAPTER 4 29 SPECIFICATIONS SOFTWARE 29 Specifications and Standard Features 30 Software 33 Using The Bluetooth Utility BlueSoleil TM 33 Enabling Bl...

Page 8: ......

Page 9: ...and secure solution for managing all of your technology and mission critical data Scale the computer and streamline the costs of day to day business operations and multimedia demands Discover the com...

Page 10: ...rt Panel Application enhancing user s ability to view data outdoors and under moving conditions Complete Connectivity from Anywhere The computer s built in Bluetooth Class 2 Full Module and IEEE 802 1...

Page 11: ...adiator heat register or in a built in cabinet unless adequate ventilation is provided 6 The computer should only be operated using the specified power indicated on the Warning Label located on the ba...

Page 12: ...er does not operate normally when the operating instructions are followed Adjust only those controls that are specified in the Operating Instructions or improper adjustment may require calibration aga...

Page 13: ...P PT TE ER R 1 1 G Ge et tt ti in ng g S St ta ar rt te ed d Chapter Preview Unpacking and setting up the Product Packing list Power Supply Using the Battery Using the AC Adapter The Back Stand The St...

Page 14: ...he contents preserving the integrity of the box as you may need it and all of the packing materials for future shipping 2 Inspect the contents for damage If you find any irregularities or anything app...

Page 15: ...g immediately In the future you should not have to access the battery pack unless you wish to replace it with a fresh one Note 1 The Battery LED lights green when charging and will turn off when the b...

Page 16: ...The Instructions Manual 8 securely into place...

Page 17: ...ttery bay The battery will release from the computer and allow you to remove it 3 Carefully lift the battery out Caring for the Battery Do not heat tamper or place the battery in water or near a fire...

Page 18: ...use the AC adapter that comes provided with this product or a compatible option from the manufacturer Other adapters may cause damage to the computer and will not be covered under the warranty Grasp...

Page 19: ...tand 1 Unfold the back stand refer to fig 2 2 Place the computer on a flat and stable surface carefully leaning it onto the stand ensuring that the back stand is securely in place Detaching the Back S...

Page 20: ...ck on an external mouse Tap the item or menu with the tip of the stylus pen To double click an item on the screen as you normally double click an external mouse Tap the item twice with the tip of the...

Page 21: ...stylus pen in the same way that you would hold a pen or pencil when writing on paper Hold the computer securely when mobile and using the stylus pen Lift and tap the stylus pen quickly between double...

Page 22: ...ontains six illustrations highlighting each external component and its respective functions Chapter Preview Front view of the Computer Right side view of the Computer Left side view of the Computer To...

Page 23: ...ttom right on the desktop Data can also be entered via a USB keyboard plugged into the USB port on the left side of the computer The computer s USB ports support most USB keyboards and pointing device...

Page 24: ...on Description in Bios Utility 1 Delete Launch CMOS Setup Utility 2 Y Yes Confirmation 3 N No Confirmation 4 PgDn Change Value 5 PgUp Change Value 6 Esc Exit Return 7 Enter Selection Confirmation 8 Mo...

Page 25: ...Keyboard 5 Scroll Page Up 1 6 Scroll Page Down 1 Rotate Key to Next Level 2 Warm Start Ctrl Alt Delete 3 Invokes Volume Control Utility 4 Invokes Window Media Player 5 Enables Disables Wireless Funct...

Page 26: ...o launch the Configuration Dialog to set parameters 5 Internal Dual Speakers The computer s built in dual speakers support audio applications for all media software Volume and equalizer control can be...

Page 27: ...rview 19 Right Side View of the Computer 11 PCMCIA Slot Use only type II PCMCIA cards 12 External Hard Drive Slot 2 5 SATA Hard Disk Drive 13 Network Jack RJ45 Interfaces with an Ethernet 10 100 Base...

Page 28: ...the power cord you must first verify that the external power voltage is appropriate for your geographical area 23 VGA Out Port Connects a VGA display monitor to the computer 24 Stylus Pen A stylus pe...

Page 29: ...al Microphone Jack For recording or voice control functions an additional microphone plugs in here Bottom View of the Computer 41 Battery Charger Port The external battery charger holder is an optiona...

Page 30: ...mera optional The build in 1 3M pixels CMOS camera module supports auto reverse function Images can be captured and disseminated instantaneously Images will reverse automatically as soon as the camera...

Page 31: ...e ec ct ti in ng g M Ma ai in nt ta ai in ni in ng g Chapter Preview Caring for your Computer Setting The System BIOS Utility Connecting to a Local Area Network Adjusting the Resolutions for the Compu...

Page 32: ...and storing the computer in locations exposed to extreme temperature fluctuations likely condensation or direct sunlight Keep the device away from moisture such as exposure to liquids or precipitation...

Page 33: ...er from the computer before unplugging it from the electrical outlet Caring for the Touch Screen Display Never spray liquids of any kind directly onto the display screen or allow excess liquid to drip...

Page 34: ...stem settings may cause the computer to become unstable or compromise its performance Initiating and Navigating the Setup Utility Press button 1 on the front panel of the computer or the Delete key on...

Page 35: ...the following message for 3 seconds during each system startup 2 Press the second left down button to restore system data 3 The system will prompt the following message for user s confirmation 4 Pres...

Page 36: ...that the existing LAN supports Ethernet 10Base T 10Mbps or 100 Base TX 100Mbps connections 2 Plug the LAN cable not supplied into the built in Network Jack LAN Port The cable must have an RJ 45 conne...

Page 37: ...g the Video Resolution of an External Display 1 Plug the VGA cord into the VGA output port Plug the other end of the cord into the external CRT Display or Projector 2 Use one of the following two opti...

Page 38: ...C CH HA AP PT TE ER R 4 4 S Sp pe ec ci if fi ic ca at ti io on ns s S So of ft tw wa ar re e Chapter Preview Specifications and Standard Features Software...

Page 39: ...dows XP Professional Edition System BIOS AWARD BIOS Memory 512 MB DDR II DRAM 200 pin 533 MHz Two Memory Slots on Board Options Max up to 2 GB Display 10 2 inch TFT 1024x600 262k colors RGB 16 bits LC...

Page 40: ...800 1900MHz GPS optional Support 20 channel GPS CMOS Camera optional 1 3M Pixels CMOS Camera Module Multimedia Internal microphone and dual speakers AC 97 Audio On board Sound 16Bit Stereo Full Duplex...

Page 41: ...ter Pin PCMCIA Socket or DVB T Module Switchable optional LED Status Indicators HDD LED Orange Flashing Disk Accessing Battery LED Green Off Battery Available Solid Battery Charging Power LED Blue Sol...

Page 42: ...ew Menu My Bluetooth Menu My Services Menu Tools Menu Help Menu z File Menu Hide Hide the BlueSoleil Window Connections are still maintained Always on Top Keeps the BlueSoleil Window on top Exit Exit...

Page 43: ...th service Properties Configure the properties for the local Bluetooth service z Tools Menu My Bluetooth Shortcuts Select a shortcut to connect or delete Find Device Search for a device by Device Name...

Page 44: ...reconnect in the instance of connection loss except however the unplugged HID My Bluetooth Device Recommended for advanced users only z Help Menu Contents and Index F1 Access BlueSoleil Help Online Ab...

Page 45: ...Bluetooth devices Step 3 BlueSoliel will display all available devices on the screen Right click the corresponding remote device icon and select Pair Device from the menu Make sure the Bluetooth Setti...

Page 46: ...select Connect and then Bluetooth Human Interface Device Service from the menu Be sure the Bluetooth Setting Button on the Device is active if not retry Step 6 BlueSoliel will display the link betwee...

Page 47: ...ct the icon in the Windows system tray or Start Menu All Programs Hot Key Smart Panel Utilities Hot Key Smart Panel Utilities to launch the program The following will appear Rotates the screen 90o cou...

Page 48: ...n X appears Follow the same steps to finish the other three red X calibration Note Make sure to calibrate the screen before your first screen rotation z The First Installation The following panel will...

Page 49: ...art Menu All Programs Hot Key Smart Panel Utilities Hot Key Smart Panel Utilities to launch the program The following Primary Panel will appear Switches to nxet level functions The following Secondary...

Page 50: ...age Up Scroll Page Down z Secondary Level Functions Switches to next level functions System Warm Reboot Ctrl Alt Delete Invokes Volume Control Utility Windows Media Player Enables Disables Wireless Fu...

Page 51: ...cation Virtual Key Use top down menu to select a simulating function Application Use Brow to select an executable application Parameters Specify the parameters for the above application Description De...

Page 52: ...e a Phone Connection Double click the desktop icon or select Start Menu All Programs 3G Utility 3G Utility to launch the program The following Main Dialog will appear z To Create a New Connection 1 Se...

Page 53: ...Fill in the blanks with the new connection data and click OK z To Select an Existing Connection for Connecting or Editing 1 Select Setting in Main Dialog 2 Select the target connection 3 Click the to...

Page 54: ...l 46 z To Edit an Existing Connection 1 Select an existing connection 2 Edit the connection information 3 Select Save to confirm the update z To Connect an Existing Connection 1 Select the target conn...

Page 55: ...nect A Twin PC icon is displayed in the Windows system tray when the system is connected z To Disconnect the Connection Click Disconnect This may take a few seconds and the Disconnect button turns int...

Page 56: ...ake a Phone Call Double click the desktop icon or select Start Menu All Programs GoodPhone GoodPhone to launch the program The following Main Dialog will appear z Make a Phone Call Press the phone num...

Page 57: ...d press OK or Cancel to return Main Dialog z Set Up the Ring of Incoming Phone Call Open the file C Program File GoodPhone GoodPhone ini and amend the field Other C xxxx yyyy mp3 C Program File GoodPh...

Page 58: ......

Page 59: ...Troubleshooting WETIF Industrie EDV Telefon DE 49 8142 448976 0 Senserstra e 3 Telefon AT 43 664 28 68 223 D 82140 Olching info wetif com www wetif com...

Page 60: ...ery power T 7 Power management T 8 Projectors T 9 The projector does not display an image T 9 The projector image is cut off T 9 The computer screen turns off T 9 Resetting the projector T 9 USB T 10...

Page 61: ...en by the operating system 2 Verify that both Bluetooth profiles match one another The Bluetooth devices have to share the same profile to communicate Consult the Bluetooth device manual to find the p...

Page 62: ...4 Once installed make sure that Obtain an IP address automatically and Obtain DNS server address automatically are checked if using DHCP To verify this highlight the TCP IP protocol and select Propert...

Page 63: ...es 32 time 1ms TTL 128 Ping statistics for 127 0 0 1 Packets Sent 4 Received 4 Lost 0 0 loss Approximate round trip times in milli seconds Minimum 0ms Maximum 0ms Average 0ms 5 Install the latest Serv...

Page 64: ...od device if available 4 Remove all surge protectors cable extensions switch boxes etc and use direct connections to power and phone lines 5 Apply critical Microsoft Windows updates and patches 6 Scan...

Page 65: ...tation or port replicator 6 Remove all devices and then test for system power with minimal devices attached Disconnect the AC adapter Remove the battery pack Remove any externally or internally instal...

Page 66: ...pyware software s latest definitions 6 Verify the driver and firmware versions are the latest for attached hardware This can be verified at the manufacturer s Web site if available 7 Remove any attach...

Page 67: ...display the projector has an optimal resolution with which it works best Consult the projector s documentation to find the optimal resolution and set the computer s display properties accordingly The...

Page 68: ...USB device and the drivers and then reinstalling the USB device and the latest drivers 4 Verify the USB device works on another machine if available 5 Verify another USB device if available works on t...

Page 69: ...all the time dots or pixels is characteristic of thin film transistor TFT liquid crystal display LCD technology due to manufacturing process for such technology irrespective of manufacturer If your LC...

Page 70: ...ct unprotected computers that are logged on the Internet within a half hour All computers have ports that are used to communicate with their own peripherals and with the outside world Hackers can seiz...

Page 71: ...sical structures such as load bearing walls or metal partitions 4 Check the SSID the wireless network name and security settings 5 Verify the hardware compatibility with the Access Point Often vendors...

Page 72: ...rt select Programs select Accessories and then click Command Prompt 8 2 Type the command ping 127 0 0 1 This will send a message to the internal network stack on the machine You should see a response...

Reviews: