background image


14 

Operation 

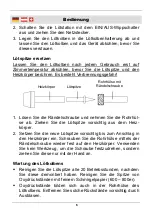
Heating Element 

Soldering Tip 

Retainer with 

knurled Nut


1.  Unscrew the knurled nut barrel assembly. Take the tip slowly 

out of the heater. 

2.  Insert a new or cleaned tip as far as it will go into the heater. 

Screw  the  knurled  nut  barrel  assembly  to  the  heater.  Do  not 
use a tool to tighten the knurled nut, only screw by hand. 

Maintaining the Soldering Iron 

  Dismount  and  clean  the  tip  every  twenty  hours  of  use.  If  an 

oxide  film  is  formed  on  the  tip,  it  can  be  cleaned  by  lightly 
rubbing with fine 600 

– 800 grit emery cloth. 

  An  oxide  film  can  also  be  formed  inside  the  iron  retainer. 

Remove any loose stains by carefully blowing out. 

  After thoroughly cleaning the tip, apply some solder and keep 

the  soldering  tip  tinned  for  a  long  service  life.  To  remove 
surplus  solder,  heat  up  and  wipe  the  tip  with  a  wet  soldering 
sponge in the tray (4). 

  If the soldering tip becomes hard to wet, use solder and flux to 

reactivate it. Wrap some solder with included flux around the 
cold tip and heat the tip until the solder melts. 

  Change  corroded  or  burnt  soldering  tips  in  time  to  keep  the 

unit  in  good  working  order.  Replacement  tips  can  be  pur-
chased under the blow mentioned article numbers. 

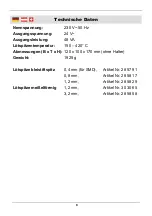
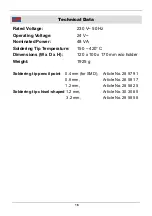
Soldering tip pencil point 0.4 mm (for SMD), 

Article No. 28 57 91 


0.8 mm, 


Article No. 28 58 17 


1.2 mm, 


Article No. 28 58 25 

Summary of Contents for 28 57 67

Page 1: ...Temperaturgeregelte Elektronik L tstation Artikel Nr 28 57 67 Temperature controlled Soldering Station Article No 28 57 67 Bedienungsanleitung Instruction Manual...

Page 2: ...Please read the safety instructions These instructions will make it easier for you to handle the unit appropriately and help prevent misunderstandings and possible damage or injury Diese Elektronik L...

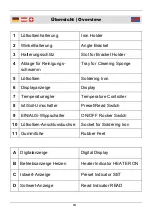
Page 3: ...III bersicht Overview A B D C 8 7 2 1 4 3 5 8 9 10 7 6 11...

Page 4: ...yanzeige Display 7 Temperaturregler Temperature Controller 8 Ist Soll Umschalter Preset Read Switch 9 EIN AUS Wippschalter ON OFF Rocker Switch 10 L tkolben Anschlussbuchse Socket for Soldering Iron 1...

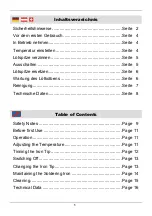
Page 5: ...Maintaining the Soldering Iron Page 14 Cleaning Page 15 Technical Data Page 16 Sicherheitshinweise Seite 2 Vor dem ersten Gebrauch Seite 4 In Betrieb nehmen Seite 4 Temperatur einstellen Seite 4 L tsp...

Page 6: ...nstigen zu beauf sichtigenden Personen benutzen Stellen Sie das Ger t w hrend des Betriebes auf einer ebenen und stabilen Fl che auf Benutzen Sie das Ger t nicht im Freien Ber hren Sie keine hei en Te...

Page 7: ...icht ber scharfe Ecken und Kanten oder hei e Oberfl chen Tauchen Sie das Ger t niemals in Fl ssigkeiten Verwenden Sie das Ger t nicht zur Erhitzung von Fl ssigkeiten oder Kunststoffen Zerlegen Sie das...

Page 8: ...g 2 um 180 Die L tkolbenhalterung kann bis zu 45 nach oben gekippt werden Stellen Sie die Halterung auf die gew nschte Position ein und ziehen Sie die Schraube fest an 3 Stecken Sie den L tkolbensteck...

Page 9: ...r Elektronik L tdraht mit Kolo phoniumseele Verwenden Sie je nach L taufgabe die richtige L tspitzentemperatur damit Sie einerseits kalte L tstellen vermeiden und andererseits zu hohe L tstellentemper...

Page 10: ...R ndelschraube und nehmen Sie die Rohrh l se ab Ziehen Sie die L tspitze vorsichtig aus dem Heiz k rper 2 Setzen Sie die neue L tspitze vorsichtig bis zum Anschlag in den Heizk rper ein Schrauben Sie...

Page 11: ...erbrauchte oder verbrannte L tspitzen rechtzeitig aus damit das Ger t den vollen Leistungsumfang beh lt Ersatzspitzen k nnen Sie unter den unten genannten Artikelnummern bestellen L tspitze bleistifts...

Page 12: ...L tspitzentemperatur 150 420 C Abmessungen B x T x H 120 x 100 x 170 mm ohne Halter Gewicht 1925 g L tspitze bleistiftspitz 0 4 mm f r SMD Artikel Nr 28 57 91 0 8 mm Artikel Nr 28 58 17 1 2 mm Artikel...

Page 13: ...unit on a level solid surface during operation Do not use the unit outdoors Do not touch any hot surfaces The soldering tip becomes very hot during operation Be very careful when using the soldering...

Page 14: ...over hot surfaces Do not immerse the unit in liquids of any kind Do not use the unit to heat plastic or liquids Do not disassemble the unit and do not try to repair it yourself It does not contain pa...

Page 15: ...plug of the iron into the suitable socket 10 at the left side of the station 4 Turn the temperature controller 7 to the light in direction to MIN and insert the power plug into a wall socket 5 Switch...

Page 16: ...tin plated Apply some solder to the tip of the iron Adjust the temperature controller to approx 220 C and let some solder melt on and flow around the tip By reaching the melting point of the solder th...

Page 17: ...t the usual temperatures for different soldering tasks Task Recommended Soldering Temperature Melting Point 215 C depending on the used solder Standard Soldering 270 300 C Industrial use 320 380 C Des...

Page 18: ...also be formed inside the iron retainer Remove any loose stains by carefully blowing out After thoroughly cleaning the tip apply some solder and keep the soldering tip tinned for a long service life T...

Page 19: ...g Always pull the power plug before cleaning and allow the unit to cool down completely Use only a brush or a slightly moistened cloth for cleaning the housing Do not immerse the unit into water Do no...

Page 20: ...ring Tip Temperature 150 420 C Dimensions W x D x H 120 x 100 x 170 mm w o holder Weight 1925 g Soldering tip pencil point 0 4 mm for SMD Article No 28 57 91 0 8 mm Article No 28 58 17 1 2 mm Article...

Page 21: ...ents which are defined in the European Directives and their amendments 2011 65 EU 2011 65 EU Beschr nkung der Verwendung bestimmter gef hrlicher Stoffe in Elektro und Elektronikger ten RoHS Restrictio...

Page 22: ...nternet www westfalia net Kundenbetreuung Customer Services Werter Kunde bitte helfen Sie mit Abfall zu vermeiden Sollten Sie sich einmal von diesem Artikel trennen wollen so bedenken Sie bitte dass v...

Reviews: