background image


Using

Intended Use 

The intended use of this device is the dehumidification of the air in closed rooms. 
A different use than stated is not allowed. 

Start-up and Operation 

1. Place the dehumidifier on a stable, level surface. Only use the retractable 

handle (2) to carry the unit. 

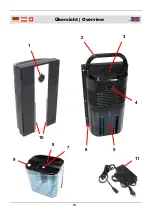
2. Connect the included power supply (11) to the power socket (6) and to a 

mains outlet. 

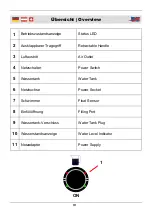
3.  Use the power switch (4) to switch on the device (setting 

I

). 

4.  The green status LEDs (1) shine. You can hear the fan and you can feel the 

air coming out of the air outlet (3) on the top side of the unit. The device 
dehumidifies the air. 

5. The water level indicator (10) shows the current water level of the water  

tank (5). It is monitored by a float sensor (7) inside the tank. If the water tank is 
full, the red status LEDs (1) shine and the device turns off automatically.  

6.  Use the power switch to switch off the device (setting 

o

). Then pull the power 

cord from the mains outlet. 

7.  Remove and empty the tank, as described below, and replace it in the device. 
8.  Connect the power cord to the mains outlet and switch on the dehumidifier 

again. 

Emptying the Water Tank 

1.  Before emptying the water tank, make sure that the unit has been switched off 

and that the power cord has been unplugged from the outlet. 

2.  Grab the recess at the backside of the water tank and carefully pull out the 

water tank. 

3.  Do not carry the air dehumidifier when the tank is full. 
4.  Remove the rubber water tank plug (9) and dispose of the condensed water 

and rinse out the tank with fresh drinking water if necessary. 

5.  Close the water tank plug again. 
6.  Grab the water tank by the recess at the backside of the tank and insert it 

again into the backside of the dehumidifier. Do not tilt the tank and do not 
apply force when inserting the tank.  

7. When you have switched off the unit and do not intend to use it for an 

extended period of time, remove the tank and empty it. 

Summary of Contents for 18 10 57

Page 1: ...Westfalia Bedienungsanleitung Nr 108822...

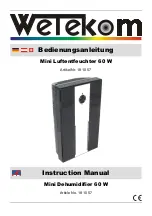
Page 2: ...Mini Luftentfeuchter 60 W Artikel Nr 18 10 57 Mini Dehumidifier 60 W Article No 18 10 57 Bedienungsanleitung Instruction Manual...

Page 3: ...lly and keep it for future reference Bedienungsanleitungen enthalten wichtige Hinweise f r den Umgang mit Ihrem neuen Ger t Sie erm glichen Ihnen alle Funktionen zu nutzen und sie helfen Ihnen Missver...

Page 4: ...III bersicht Overview 1 2 4 5 6 11 7 8 9 3 10...

Page 5: ...ftaustritt Air Outlet 4 Netzschalter Power Switch 5 Wassertank Water Tank 6 Netzbuchse Power Socket 7 Schwimmer Float Sensor 8 Einf ll ffnung Filling Port 9 Wassertank Verschluss Water Tank Plug 10 Wa...

Page 6: ...Tank Page 6 Cleaning and Storing Page 7 Technical Data Page 7 Sicherheitshinweise Seite 2 Bestimmungsgem er Gebrauch Seite 3 Inbetriebnahme und Benutzung Seite 3 Entleeren des Wassertanks Seite 3 Rei...

Page 7: ...e Fl che mit einem Abstand von mind 15 cm von W nden entfernt um eine gute Luftzirkulation zu gew hrleisten Vergewissern Sie sich dass die Nennspannung auf dem Typenschild mit der vorhandenen Netzspan...

Page 8: ...tandsanzeige 1 und das Ger t schaltet sich aus 6 Schalten Sie das Ger t ber den Netzschalter aus Stellung o und ziehen Sie das Netzkabel aus der Steckdose 7 Entnehmen und entleeren Sie den Wassertank...

Page 9: ...anzen wie z B Scheuermilch oder andere Mittel f r die Reinigung Das k nnte die Oberfl che angreifen Wenn Sie das Ger t abschalten und l ngere Zeit nicht benutzen nehmen Sie den Wassertank vom Ger t ab...

Page 10: ...h a distance of at least 15 cm to walls in order to guarantee proper air circulation Please make sure the mains voltage available in your area corresponds to the operating voltage stated on the type l...

Page 11: ...o switch off the device setting o Then pull the power cord from the mains outlet 7 Remove and empty the tank as described below and replace it in the device 8 Connect the power cord to the mains outle...

Page 12: ...y may damage the surface When you have switched off the unit and do not intend to use it for an extended period of time remove the water tank and empty it Store the unit in a dry place that is protect...

Page 13: ...8 Notizen Notes...

Page 14: ...A2 EN 61000 3 3 2008 Hagen den 26 April 2010 Thomas Klingbeil Qualit tsbeauftragter We the Westfalia Werkzeugcompany Werkzeugstra e 1 D 58093 Hagen declare by our own responsibility that the product M...

Page 15: ...h Internet www westfalia net Kundenbetreuung Customer Services Werter Kunde bitte helfen Sie mit Abfall zu vermeiden Sollten Sie sich einmal von diesem Artikel trennen wollen so bedenken Sie bitte das...

Reviews: