WET Style FRAME LINEA Series Installation Manual Download Page 5

- FRAME LINEA CABINET INSTALL GUIDE - 

(2018-05-07) 


5/14 

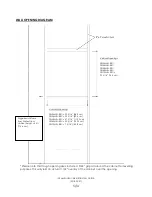
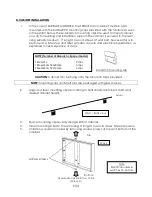
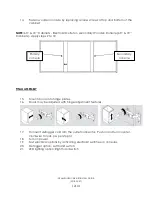
WALL OPENING DIAGRAM 


* Please note that rough opening sizes include a 5/32” gap all around the cabinet for levelling 
purposes. This will yield an actual 11/32” overlay of the cabinet over the opening


Horizontal opening 
 
FRL24MEL-REC = 23 3/16” (58.9 cm) 
FRL36MEL-REC = 35 3/16” (89.4 cm) 
FRL48MEL-REC = 47 3/16’’ (119.9 cm) 
FRL60MEL-REC = 59 3/16” (150.3 cm) 
FRL72MEL-REC = 7 3/16” (180.8 cm) 

Vertical Openings 
 
FRL24MEL-REC, 
FRL36MEL-REC, 
FRL48MEL-REC, 
FRL60MEL-REC, 
FRL72MEL-REC =  
29 5/16” (74.5 cm) 


Suggested distance 
from finished floor 
Cabinet height = 45 ½’’ 
(115.6 cm) 


Summary of Contents for FRAME LINEA Series

Page 1: ...received has passed quality control and was in excellent condition upon leaving the WETSTYLE facility We recommend that you carefully inspect the product prior to its installation If there are any de...

Page 2: ...ant Safety Instructions must be kept for future use TOOLS AND EQUIPMENT Drill and bits Measuring tape Protective paper Pencil Level Protective eyeglasses Wood screw 8 5 8 and 1 long Wood screw 10 3 an...

Page 3: ...e cabinet 1 4 The distance between studs should not be more than 16 1 5 Metal studs should be reinforced vertically by 2 x 4 wooden studs This is applicable for both Frame Cabinet and Vanities 1 6 Met...

Page 4: ...x 6 wooden studs at the position of the wall opening for your corresponding cabinet model See CHART for Rough Wall Openings below 7 Do not apply the product to the wall surface until all braces and m...

Page 5: ...d an actual 11 32 overlay of the cabinet over the opening Horizontal opening FRL24MEL REC 23 3 16 58 9 cm FRL36MEL REC 35 3 16 89 4 cm FRL48MEL REC 47 3 16 119 9 cm FRL60MEL REC 59 3 16 150 3 cm FRL72...

Page 6: ...INEA CABINET INSTALL GUIDE 2018 05 07 6 14 9 Once cabinet is positioned within wall opening secure fixture with 4x 1 long No 8 wood screws through pre holes provided with top and bottom hinge mounting...

Page 7: ...ently remove packaged glass shelves wooden shelves and hardware bag from within cabinet 3 If your unit has the defogger option you must disconnect the Defogger Connectors prior to removing the cabinet...

Page 8: ...binet CAUTION Requires 110 VAC 15 Amp circuit CAUTION Proper bonding must be supplied to the mirrored cabinet as to equalize ground potential and eliminate static discharge between components Please b...

Page 9: ...paration as explained in next sequence of steps Monarch mounting clip CAUTION Cabinet is to be hung onto the Monarch Clips provided NOTE Mounting clips and shelf pins are packaged with glass shelves 2...

Page 10: ...inet Be aware that there are wiring connections inside Installation should be cautious and gentle at this stage 7 Feed electrical wire through access holes located in the center and back of cabinet 8...

Page 11: ...Secure electrical wire with cable connector 11 Bond the entire electrical system at the indicated location with supplied hardware depicted at step 11 12 Make connections with WAGO terminal blocks inse...

Page 12: ...teps 9 to 18 FINAL ASSEMBLY 15 Mount doors onto hinge plates 16 Doors may be adjusted with hinge adjustment features 17 Connect defogger cord into the outlet connector Push in and turn counter clockwi...

Page 13: ...within adjustable shelf pins and secure into place on upper 3 sets of holes CAUTION Maximum load 30 LBS NOTE Be sure to turn the defogger off when not in use When the defogger is on the center area of...

Page 14: ...he product directly from WETSTYLE or from an authorized retailer This warranty is valid for the original owner only This warranty does not apply to cases in which a product was incorrectly installed o...

Reviews: