
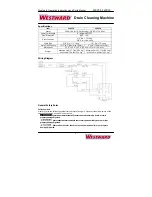


12
Westward Operating Instructions and Parts Manual
22XP38, 22XP39
Drain Cleaning Machine
Operation
with
Cable
Feeder
(Optional)
1.
Begin
by
pulling
the
cable
from
the
drum
and
sliding
it
at
least
one
foot
into
the
drain
,
so
that
the
end
of
the
cable
will
not
come
out
of
the
drain
and
whip
around
when
the
machine
is
started.
2.
Tighten
the
knob
on
the
top
of
the
Cable
Feeder
until
the
Cable
Feeder
roller
touches
the
cable.
Then
make
one
more
turn
on
the
knob.
Do
not
over
tighten
since
this
could
cause
excess
cable
wear.
The
Cable
Feeder
is
designed
for
use
with
1/2"
and
3/8"
cables
only.
3.
The
Cable
Feeder
Lever
controls
the
feeding
rate
and
feeding
direction
of
the
cable.
Hold
the
lever
up
to
the
F
position
(the
letter
F
is
marked
on
the
Feed
Actuator,
meaning
Feeding
Forward
)
to
pull
the
cable
out
of
the
drum
and
feed
it
forward
into
the
drain.
The
stronger
the
lever
is
pushed
up
to
the
F
side,
the
faster
the
cable
will
feed.
Hold
the
lever
down
to
R
position
(the
letter
R
is
marked
on
the
Feed
Actuator,
meaning
Retracting
Back
)
to
retract
the
cable
from
the
drain
and
feed
it
back
into
the
drum.
When
the
lever
is
held
in
the
Middle
Position
,
the
cable
will
neither
go
forward
or
backward,
but
rotate
with
the
drum.
4.
Set
the
Rotation
Switch
(see
figure
in
Page
5)
at
the
F
position.
Grab
the
guide
tube
or
cable
with
a
gloved
hand,
and
place
your
other
hand
on
the
Cable
Feeder
Lever
,
which
should
be
in
the
Middle
Position
.
Press
the
Foot
Switch
to
start
the
machine.
5.
Feed
the
cable
into
the
drain
line
by
holding
the
Cable
Feeder
Lever
up
to
F
side
with
a
firm,
even
pressure.
When
the
resistance
is
met,
adjust
the
feeding
rate
by
adjusting
the
force
on
the
Cable
Feeder
Lever
.
Do
not
force
the
cable
–
let
the
cutter
do
the
work.
Large
force
will
not
get
the
job
done
any
faster
and
the
cable
might
become
damaged.
6.
Do
not
leave
too
much
slack
on
the
cable.
It
will
cause
whipping.
If
the
cable
starts
to
bend
or
build
up
too
much
twist,
relieve
the
twist
by
turning
the
Drum
in
the
reverse
direction
by
hand.
Push
any
excess
cable
back
into
the
drum
and
then
continue.
You
MUST
turn
the
Rotation
Switch
to
OFF
and
take
your
feet
away
from
the
Foot
Switch.
Failing
to
do
this
may
cause
accidental
starting
and
injury.
7.
If
you
have
trouble
getting
around
a
tight
bend,
try
to
run
the
machine
instantly
in
REV
rotation
while
applying
steady
pressure.
Do
not
do
this
for
more
than
a
few
seconds
at
a
time
since
this
could
cause
cable
tangling
in
the
drum
or
kinking.
8.
If
you
still
cannot
pass
the
bend,
the
cable
size
is
probably
too
large.
Change
it
to
a
3/8”
diameter
cable.
9.
When
the
cable
reaches
the
stoppage,
put
the
Cable
Feeder
Lever
in
Middle
Position
first.
Then
push
the
cable
forward
by
hand
with
a
mild
force.
Do
not
use
the
Cable
Feeder
.
Let
the
cutter
chew
the
stoppage
as
it
goes.
This
slow
forward
movement
will
reduce
stress
on
the
cable
while
doing
a
more
thorough
cleaning
job.
A
back
and
forth
action
often
works
best.
Hint:
It’s
often
helpful
to
have
a
small
stream
of
water
running
in
the
line
to
wash
the
cuttings
away
while
the
machine
is
in
operation.
10.
Be
careful
not
to
let
the
cutter
get
caught
in
the
stoppage
as
you
work
through
it.
This
can
cause
cable
kinking
and
breaking.
When
you
feel
the
cable
start
twisting
in
your
hands,
stop
the
machine
and
pull
the
cable
back
a
little
to
free
the
cutter
from
the
obstruction.
Then
repeat
the
slow
forward
motion.
Remember,
no
cutting
takes
place
when
the
blade
stops
turning.
11.
After
the
line
is
opened,
retrieve
the
cable
from
the
drain
and
return
it
to
the
drum
with
the
Rotation
Switch
being
set
to
FOR
position
while
the
Cable
Feeder
Lever
being
held
down
at
R
Side.
This
is
important
to
prevent
the
cable
from
tangling
in
the
drum
or
in
the
line.