background image

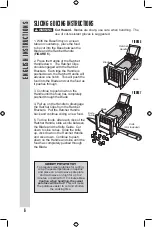
1. Insert the Blade, Blade Tab end first up 

through the slot in the bottom of the Base.  

The front of the Blade will face outwards 

(

FIGURE 1

).  The Blade will click into 

place.
2. Slide the Knife Guide Tab into the path 

underneath the Base until it clicks securely 

into place (

FIGURE 2

). 

3. With the Pusher Tabs pointing upward, 

and the Pusher Nubs facing outward, place 

the Pusher flat onto the face of the Ratchet 

Handle and slide upward into place.  The 

slots on the Pusher will align with the slots 

on the Ratchet Handle.  The Pusher will 

click into place (

FIGURE 3

).

4. Place the Ratchet Handle/Pusher  

assembly onto the end of the Base 

(

FIGURE 4

).

5. Pull the Ratchet Handle forward slightly 

and push down on the Handle.  (This will 

allow the Ratchet Clips to latch into the 

Ratchet Brackets.) (

FIGURE 5 & 5A

).

6. To change the Blade, pull up on the 

Handle to release the Ratchet Handle from 

the Base.  Remove the Ratchet Handle.
7. From the underside of the Base, gently 

pull down on the Knife Guide Tab  and pull 

the Knife Guide off of the Base.
8. Push the Blade Tab down to release the 

Blade from the Base.
9. Push the Pusher Tabs down to release 

the Pusher from the Ratchet Handle.
10. Replace the Blade and the Pusher 

following instructions 1-3 on this page.

ASSEMBLY & CHANGING THE BLADE

Back of Blade

Front of Blade

Blade Tab

Knife Guide

Tab

Base

FIGURE 1

FIGURE 2

Pusher Tabs

FIGURE 3

Ratchet Handle

Pusher

Nubs

FIGURE 4

Ratchet

Handle

Base

FIGURE 5A

FIGURE 5

Ratchet

Brackets

Ratchet

Clips

Front of

Blade

Handle

5

ENGLISH INSTRUCTIONS

Cut Hazard.  

Blades are sharp, use care when handling.  The 

use of cut-resistant gloves is suggested.

w

 WARNING

Summary of Contents for 36-3301-W

Page 1: ...FRENCH FRY CUTTER 36 3301 W DUE TO CONSTANT FACTORY IMPROVEMENTS THE PRODUCT PICTURED MIGHT DIFFER SLIGHTLY FROM THE PRODUCT IN THIS BOX...

Page 2: ...ES INSTRUCCIONES DE LIMPIEZA LISTA DE COMPONENTES C MO ENSAMBLAR Y CAMBIAR LA NAVAJA INSTRUCCIONES PARA REBANAR Y PICAR INFORMACI N DE GARANT A WESTON PR CAUTIONS IMPORTANTES INSTRUCTIONS DE NETTOYAGE...

Page 3: ...R DAMAGED PARTS Before using the appliance check that all parts are operating properly and perform the intended functions Check for alignment of moving parts binding of moving parts mounting and any o...

Page 4: ...ATE N A 6 3 8 0 95 CM BLADE 49 HOLE 36 3303 7 PUSH PLATE N A If any components of this unit are broken the unit does not operate properly or you need a replacement instruction manual visit us on the w...

Page 5: ...s will allow the Ratchet Clips to latch into the Ratchet Brackets FIGURE 5 5A 6 To change the Blade pull up on the Handle to release the Ratchet Handle from the Base Remove the Ratchet Handle 7 From t...

Page 6: ...oods after each click of the Ratchet Handle slide a knife between the Blade and the Knife Guide Cut down to slice cubes Slide the knife up click down on the Ratchet Handle and slice down Continue to p...

Page 7: ......

Page 8: ...ber RMA Number Weston Brands LLC will refuse all returns that do not contain this number DO NOT RETURN THE UNIT WITHOUT PROPER AUTHORIZATION FROM WESTON BRANDS LLC LIMITATIONS The warranty is void if...

Page 9: ...CORTADOR DE PAPASFRITAS 36 3301 W DEBIDO A CONSTANTES MEJORAS EN LA F BRICA EL PRODUCTO QUE SE MUESTRA PUEDE SER LIGERAMENTE DIFERENTE DEL PRODUCTO EN ESTA CAJA...

Page 10: ...s Este aparato no es adecuado para cortar art culos duros 8 NO USE el aparato bajo los efectos de drogas o alcohol LEA Y ENTIENDA COMPLETAMENTE TODAS LAS INSTRUCCIONES Y ADVERTENCIAS ANTES DE UTILIZAR...

Page 11: ...5 AGUJEROS 36 3302 5 PLACA DE EMPUJAR N A 6 NAVAJA DE 0 95 CM 3 8 49 AGUJEROS 36 3303 7 PLACA DE EMPUJAR N A Si cualquier componente de esta unidad est roto si no funciona debidamente o si necesita un...

Page 12: ...rinquete FIGURAS 5 Y 5A 6 Para cambiar la navaja jale el mango hacia arriba para soltar el mango del trinquete de la base Quite el mango del trinquete 7 Por debajo de la base jale suavemente hacia aba...

Page 13: ...o entre la hoja y la gu a del cuchillo Presione hacia abajo para cortar los cubitos Deslice el cuchillo hacia arriba haga clic hacia abajo con el mango del trinquete y rebane hacia abajo Contin e empu...

Page 14: ...torizaci n de Devoluci n de la Mercader a N mero RMA Weston Brands LLC rechazar todo env o que no contenga este n mero NO DEVUELVA LA UNIDAD SIN LA AUTORIZACI N DE WESTON BRANDS LLC LIMITACIONES La ga...

Page 15: ...COUPE FRITES 36 3301 W PARCE QUE NOS PRODUITS B N FICIENT DE PERFECTIONNEMENTS CONSTANTS APPORT S EN USINE LES ILLUSTRATIONS PR SENTES PEUVENT TRE L G REMENT DIFF RENTES DU PRODUIT RE U...

Page 16: ...t ce qui ne serait pas un produit alimentaire L appareil n a pas t con u pour couper des articles durs 8 NE PAS utiliser l appareil sous l effet d alcool et de drogue CONSERVER CES DIRECTIVES PR CAUTI...

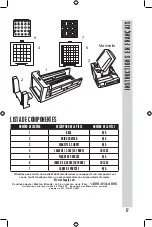
Page 17: ...PLAQUE DE POUSS E N A 6 LAME DE 0 95 CM 49 TROUS 36 3303 7 LAQUE DE POUSS E N A N h sitez pas visiter notre site Web WestonProduct com support si un composant est cass l outil fonctionne mal ou pour...

Page 18: ...permet aux clips du cliquet de s enclencher dans les supports du cliquet FIGURE 5 ET 5A 6 Pour changer la lame tirer sur la manivelle ce qui rel che la manette cliquet de la base Retirer la manette c...

Page 19: ...sengager les clips du cliquet des supports du cliquet Tirer la manette cliquet vers l arri re et continuer de couper d autres aliments 5 Pour couper des aliments en cubes apr s chaque clic de la mane...

Page 20: ...sera tous les retours qui ne contiennent pas ce num ro NE PAS RENVOYER CET APPAREIL SANS L AUTORISATION CORRECTE DE Weston Brands LLC LIMITATIONS La garantie est annul e si le produit est utilis pour...

Page 21: ......

Page 22: ......

Page 23: ......

Page 24: ...di au vendredi CustomerService WestonSupply com Num ro de t l phone du service client le pour les r sidents des U 1 216 901 6801 Num ro de t l phone l ext rieur des U 001 216 901 6801 Weston Brands LL...

Reviews: