background image

9

OPERATING INSTRUCTIONS

Using the automatic warm-up function

All cooking zones are equipped with an automatic warm 
up function When setting a heat setting using 

, when 

starting from 

, the cooking zone switches to full power 

for a certain amount of time and then automatically 
switches back to the heat setting set.

CONTROL PANEL

DISPLAY

PILOT LIGHT

Switch on (only when starting at 

)

Touch 

 to 

 (after 5 seconds)

Switch off

Touch 

 to   / 

 to 

Not used

Touch 

 to 

 to 

TIPS & INFORMATION

 IMPORTANT

If during the automatic warm up   a higher heat setting  
is selected, e.g. from   to  , the automatic warm up  
is adjusted.

HEAT SETTING

LENGTH OF THE AUTOMATIC WARM UP (MIN:SEC)

0:30

1:00

1:40

4:50

6:30

10:10

2:00

3:30

4:30

---

The child safety device

The child safety device prevents unintentional use of the 
appliance.

Switching on the child safety device:

• 

 Start the hob with  

. Do not set the heat 

settings. 

• 

 Touch 

 for 4 seconds. The symbol 

 comes on. 

• 

The child safety device is switched on.

Switching off the child safety device:

• 

 Start the hob with  

. Do not set the heat 

settings. Touch 

 for 4 seconds. The symbol 


comes on.

• 

Stop the hob with  

.

• 

The child safety device is switched off.

TIPS & INFORMATION

 IMPORTANT

The child safety device can only be switched on and off, 
if no heat setting is set.

Overriding the child safety device:

The child safety device can be switched off in this 
way for a single cooking session; it remains activated 
afterwards.

• 

Start the hob with  

. The symbol 

 comes on. 

• 

 Touch 

 for 4 seconds. The symbol 

 comes on. 

Until the appliance is next switched off, it can used as 
normal. After switching off the appliance, the child safety 
device is active again. 

TIPS & INFORMATION

 IMPORTANT

After overriding the child safety device, a heat setting 
or a function must be set within approx. 10 seconds, 
otherwise the appliance automatically switches itself off.

Summary of Contents for WHC644BA

Page 1: ...USER MANUAL CERAMIC COOKTOPS WHC644BA WHC744BA WHC944BA WHC934BA ...

Page 2: ...and other working environments Farm houses By clients in hotels motels and other residential type environments Bed and breakfast type environments Please ensure you read the instruction manual fully before you call for service or a full service fee could be applicable Record model and serial number here Record model and serial number here Model number Serial number PNC CONGRATULATIONS Important sa...

Page 3: ...o not use an external timer or a separated remote control system to operate the appliance Only use the appliance for domestic cooking tasks Do not use the appliance as a work or a storage surface Do not put or keep very flammable liquids and materials or fusible objects made of plastic or aluminium on or near the appliance Other than the connection point in the terminal block do not let the electr...

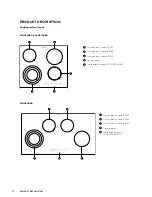
Page 4: ...1 Single cooking zone 1200W 2 Single cooking zone 1800W 3 Single cooking zone 1200W 4 Control panel 5 Triple cooking zone 2300 1600 800W 1 Single cooking zone 1200W 2 Single cooking zone 1200W 3 Single cooking zone 1800W 4 Control panel 5 Triple cooking zone 2300 1600 800W 1 2 3 4 5 1 2 3 4 5 ...

Page 5: ...5 PRODUCT DESCRIPTION WHC934BA 1 Triple cooking zone 2300 1600 800W 2 Single cooking zone 1200W 3 Single cooking zone 1800W 4 Control panel 1 2 3 4 ...

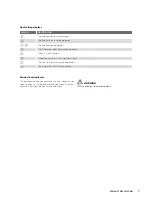
Page 6: ...pliance 2 Sets all operating zones to a keep warm setting 3 A heat setting display It shows the heat setting 4 It selects the cooking zone 5 Cooking zones indicators of timer It shows for which zone you set the time 6 The timer display It shows the time in minutes 7 It increases or decreases the heat setting 8 It increases or decreases the time 9 It activates the outer rings on the triple zone ele...

Page 7: ...tion operates There is a malfunction A cooking zone is still hot residual heat The Lock Child Safety device operates The Automatic Switch Off operates Residual heat indicator The induction cooking zones make the heat necessary for cooking directly in the bottom of the cookware The glass ceramic is hot from the heat of the cookware WARNING WARNING Risk of burns from residual heat ...

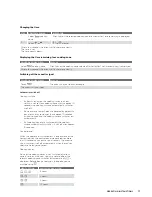
Page 8: ...matched to the size of the cookware TRIPLE COOKING ZONE SENSOR PANEL POWER INDICATOR To switch on the middle ring Touch for 1 2 seconds One power indicator is lit To switch on the outside ring Touch for 1 2 seconds Two power indicators are lit To switch off the outside ring Touch for 1 2 seconds The second power indicator goes out To switch off the middle ring Touch for 1 2 seconds The first power...

Page 9: ...ild safety device Start the hob with Do not set the heat settings Touch for 4 seconds The symbol comes on The child safety device is switched on Switching off the child safety device Start the hob with Do not set the heat settings Touch for 4 seconds The symbol comes on Stop the hob with The child safety device is switched off TIPS INFORMATION IMPORTANT The child safety device can only be switched...

Page 10: ... applicable TIPS INFORMATION IMPORTANT If a cooking zone is switched off the timer function set is also switched off TIPS INFORMATION IMPORTANT If the pilot light is flashing more slowly the heat setting can be set or modified TIPS INFORMATION IMPORTANT If other timer functions are set after a few seconds the shortest remaining time of all the timer functions is displayed and the corresponding pil...

Page 11: ...set for a cooking zone within approx 10 seconds the cooking surface automatically switches itself off If one or more sensor fields are covered by objects a pan cloths etc for longer than approx 10 seconds a signal sounds and the cooking surface switches off automatically If all cooking zones are switched off the cooking surface automatically switches it self off after approx 10 seconds Control pan...

Page 12: ...or copper bottoms can leave discolourations on the glass ceramic surface which are difficult or impossible to remove ENVIRONMENTAL TIPS ENVIRONMENT Energy saving Always place cookware on the cooking zone before it is switched on Switch cooking zones off before the end of the cooking time to take advantage of residual heat If possible always place lids on the pans Bottom of pans and cooking zones s...

Page 13: ... glass ceramic or stainless steel1 Fat splashes Yes Cleaner for glass ceramic or stainless steel1 Shiny metallic discolouration Yes Cleaner for glass ceramic or stainless steel1 1 Scrapers and cleaners for glass ceramic and stainless steel can be purchased in specialised shops 1 Place a scraper on the glass ceramic surface at an angle 2 Remove residues by sliding the blade over the surface 3 Wipe ...

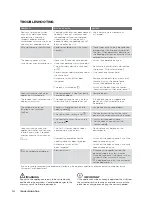
Page 14: ...cloths etc that are lying on the control panel Switch the appliance on again The lock is switched on Switch off the lock See the section Locking unlocking the control panel Acoustic signal sounds when appliance is switched off The control panel is wholly or partly covered by objects Remove objects The residual heat indicator is not displaying anything The cooking zone was only on for a short time ...

Page 15: ...ce or the shop where you purchased the product Packaging material The packaging materials are friendly to the environment and can be recycled The plastic components are identified by marking PE PS etc Discard the packaging materials as household waste at the waste disposal facilities in your municipality MODEL WHC644BA WHC744BA WHC944BA WHC934BA PNC 949 163 175 949 163 174 949 163 173 949 163 176 ...

Page 16: ...check the power rating of the appliance and ensure that the wire is suitably sized in accordance with local wiring rules to suit the appliance power rating The rating plate is located on the lower casing of the hob Means for disconnection must be incorporated in the fixed wiring in accordance with local wiring rules The hob is to be connected to the mains using a device that allows the appliance t...

Page 17: ...NING WARNING Surface temperatures of base exceed 95 C under bench access must be restricted by use of non combustible barrier on installation WHC644BA WHC744BA 560 1 600 R5 490 1 WHC944BA 880 1 R5 490 1 600 min 50mm min 500mm ...

Page 18: ...18 ASSEMBLY WHC934BA 825 1 R5 360 1 min 25mm min 20mm 600 min 25mm ASSEMBLY CONTINUED ...

Page 19: ... or incorrect power supply v incomplete or improper installation vi incorrect improper or inappropriate operation vii insect or vermin infestation viii failure to comply with any additional instructions supplied with the Appliance b the Appliance is modified without authority from Electrolux in writing c the Appliance s serial number or warranty seal has been removed or defaced d the Appliance was...

Page 20: ...r phone or email our customer care team or visit our website TOP SERVICE Top Service encompasses the after sales service provided by The Electrolux Group to consumers including delivery home service and spare parts Westinghouse We are part of the Electrolux family Share more of our thinking at www electrolux com and WESTINGHOUSE are trademarks of Westinghouse Electric Corporation Used under licens...

Reviews: