background image

      7

En


-   

      8

En


-   

PREPARATION

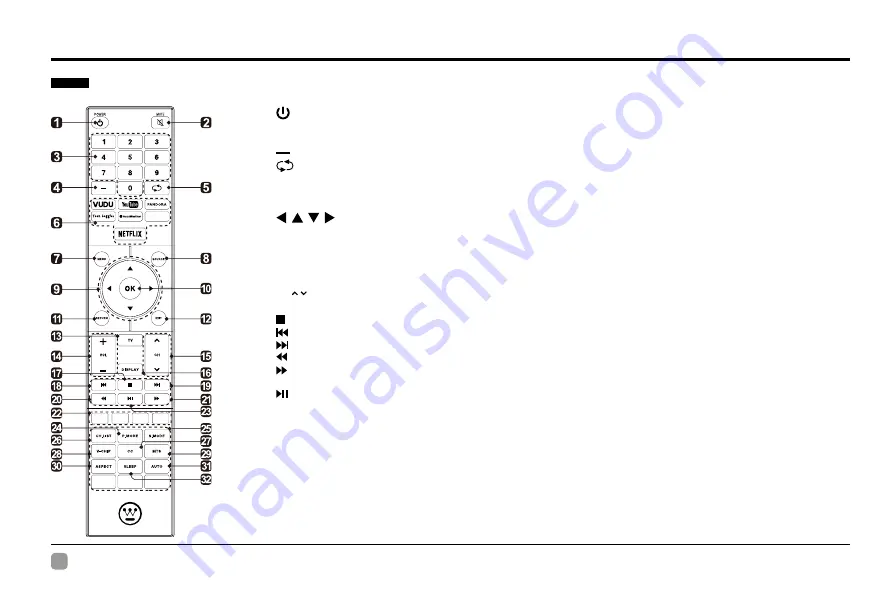
 Remote Control

1. 

:

 Switch the TV between On and Standby mode.

2.  MUTE:

 Mute and restore TV sound.

3.  0~9:

 Select a program.(ATV/DTV mode)

4. 

:

 Enter multiple program channel number such as 2-1.

5. 

Return to the previous viewing channel.

6.  APP:

 Press to select the desired APP.

7.  MENU: 

Display the main menu.

8.  SOURCE:

 Select among the different input signal sources:TV/HDMI1/HDMI2/HDMI3/USB/VGA/AV/Component.

9. 

:

 Allows you to navigate the on screen display menus and adjust the system settings to your preference.

10.  OK:

 Confirm the selection.

11.  RETURN:

 Return to previous menu.

12.  EXIT:

 Exit the on screen display menu.

13.  TV:

 Press to turn to TV mode.

14.  VOL+/-:

 Adjust the volume.

15.  CH  /   :

 Select the channel.

16.  DISPLAY:

 Display the present screen information such as the current channel and input source. 

17.  :

 Stop the playback. 

18. 

:

 Skip to the beginning of the previous chapter/track/photo. 

19. 

:

 Skip to the beginning of the next chapter/track/photo.

20.  :

 Reverse playback rapidly. 

21.  :

 Advance playback rapidly. 

22.  COLOR BUTTONS:

 Press to access directly to the corresponding function in APP service.

23. 

:

 Start playback or pause.

24.  P.MODE:

 Select picture mode: dynamic/movie/user/standard.

25.  S.MODE:

 Select sound mode: standard/music/movie/user.

26.  CH.LIST:

 Display program list.

27.  CC:

 Closed Caption selection: ON/OFF/CC On Mute.

28.  V-CHIP:

 Set up parental control.

29.  MTS:

 Switch among different audio channels: STEREO/MONO/SAP.

30.  ASPECT: 

Select the aspect ratio settings:standard/wide/wide zoom/zoom.

31.  AUTO:

 Press to adjust the picture automatically in VGA source.

32.  SLEEP:

 Set the TV sleep timer: OFF/5/10…/180/240 min.

Summary of Contents for WE75NC421

Page 1: ...USER S MANUAL MANUEL DE L UTILISATEUR MANUAL DEL USUARIO WE75NC4210...

Page 2: ...www westinghouseelectronics com Westinghouse Electronics LLC Diamond Bar CA SE UM 7501 1501...

Page 3: ...ecting External Devices Customizing TV Settings Initial Setup Navigating the Setup Settings Apps Media ViewingPhotos PlayingMotionJPG Source Setup System Channel Support Lock Picture Network Auto Upgr...

Page 4: ...this apparatus to rain or moisture The apparatus should not be exposed to dripping or splashing Objects filled with liquids such as vases should not be placed on apparatus WARNING The batteries shall...

Page 5: ...ve batteries from the remote control when the remote is not use for long period or when the batteries are exhausted Do not break open or throw exhausted batteries into a fire Physical Safety Do not bl...

Page 6: ...4 En PREPARATION What s Included Quick Connect Guide Quick Connect Guide User Manual User Manual Remote Control with Batteries Warranty Card Warranty Card TV Set TV Stand Eight Screws...

Page 7: ...gnal sources 3 MENU Display the main menu 4 CH Press to select a channel 5 VOL Press to adjust the volume 6 POWER Indicator Illuminate blue when the TV is turned on Illuminate red when the TV is in st...

Page 8: ...VGA Input Connect to a computer or other devices with a VGA interface 7 PC AUDIO Input Connect to a computer audio output 8 DTV TV Input Connect to the antenna 75 VHF UHF socket with the RF coaxial c...

Page 9: ...g Base to the main unit using the 4 provided screws 3 Fix the Right Connecting Base to the main unit using the 4 provided pcs provided screws 1 Lay the TV face down on a flat cushioned surface to avoi...

Page 10: ...nnel 16 DISPLAY Display the present screen information such as the current channel and input source 17 Stop the playback 18 Skip to the beginning of the previous chapter track photo 19 Skip to the beg...

Page 11: ...9 En CONNECTING EXTERNAL DEVICES...

Page 12: ...Apps Media Setup Source TV HDMI1 HDMI2 Component AV Follow this guide to help setup your UHDTV for scanning channels or accessing your external devices for Antenna Set top Box Blu ray DVD Games and ot...

Page 13: ...press buttons to navigate and select the available menu CUSTOMIZING TV SETTINGS Channel Support Audio Network Channel Support System Lock Audio Support Lock Channel Picture System Lock Picture Suppor...

Page 14: ...r favorite artists songs genres or composers and Pandora will do the rest It s easy to create personalized stations that play only music you ll love Toon Goggles A subscription video on demand platfor...

Page 15: ...en will pop up Press OK button when appears on the top left press to display the photo Media NOTE Portable storage devices USB disk or Hard disk should be inserted Press the MENU button on the main un...

Page 16: ...creen will pop up Press OK button when appears on the top left press to display the video Playing Motion JPG Note File format supported Motion JPG Source Press the MENU button on the main unit or on t...

Page 17: ...select the following setting options and then press buttons to adjust each option s setting Menu Language Select menu language English Fran ais or Espa ol The default on screen menu language is Englis...

Page 18: ...n Off the dynamic luminance control Time Sleep Timer Select a period of time after which the TV automatically switches to standby mode Off 5 10 180 240 min Alternative You may press the SLEEP button r...

Page 19: ...how Hide Show Hide the selected channel Channel Number Display the current channel number Channel Label Display the current channel label Signal Information Display the information of current signal P...

Page 20: ...ssword Re enter new password for confirmation Lock System Select to turn On Off system lock The following options USA Canada RRT Setting and RRT Reset will only be accessible when you turn the system...

Page 21: ...te in the picture For User mode Contrast Adjust the difference between light and dark levels in the pictures For User mode Color Control the color intensity For User mode Sharpness Adjust the level of...

Page 22: ...work through searching the available Wifi IP Address Display the current IP information Network Type Select two types of network Wireless Network or Wired Network Network Upgrade Upgrade the TV softwa...

Page 23: ...emember not to cut off the power Manual Upgrade After the TV connects to network users can detect whether there is a new version through network manual option Auto Upgrade After the TV connects to net...

Page 24: ...elative volume of the speaker in a multiple speaker system SPDIF Mode Select the digital audio output mode between RAW PCM Surround Sound Turn On Off to provide an enhanced listening experience Auto V...

Page 25: ...u and submenus examples below Things to Consider before Setting up Parental Control Determine which rating you consider acceptable to the viewer For example if you choose TV PG more restrictive rating...

Page 26: ...ed to Older Children Considered suitable for children over 7 may contain fantasy violence scenes TV G General Audience Considered suitable for all audience children may watch unattended TV PG Parental...

Page 27: ...that the batteries are installed with the correct polarity to to Install new batteries Power is suddenly turned off Check the power of the TV The power supply maybe interrupted Check if the sleep tim...

Page 28: ...Select the SET Password setting in the LOCK menu then enter the following master password 8899 The master password clears your previous password and allows you to enter a new password There is a probl...

Page 29: ...Do not place your TV in direct sunlight or near a heat source SPECIFICATION Panel Size 74 5 inch diagonally Display Type LED Panel Technology TFT Panel 60 Hz Vs 120 Hz 120 Hz Display Resolution 3840...

Page 30: ......

Page 31: ...ternative contact information YouTube You can browse the following website for more help https productforums google com forum categories youtube smart tvs VUDU You can call the following telephone for...

Reviews: