background image

8

En


PREPARATION

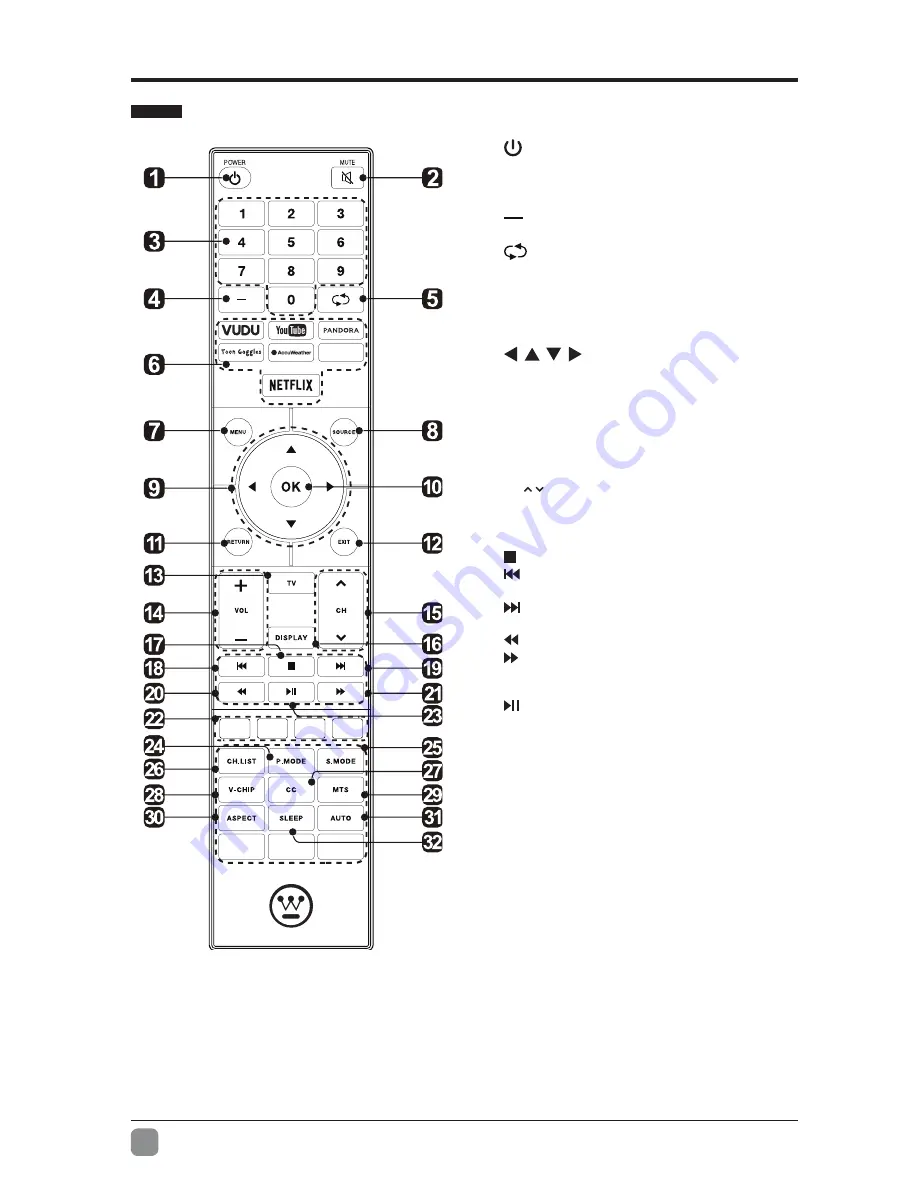
 Remote Control

1. 

:

 Switch the TV between On and Standby 

mode.

2.  MUTE:

 Mute and restore TV sound.

3.  0~9:

 Select a program.(ATV/DTV mode)

4. 

:

 Enter multiple program channel number 

such as 2-1.

5. 

Return to the previous viewing channel.

6.  APP:

 Press to select the desired APP.

7.  MENU: 

Display the main menu.

8.  SOURCE:

 Select among the different input 

signal sources:TV/HDMI1/HDMI2/HDMI3/USB/

VGA/AV/Component.

9. 

:

 Allows you to navigate the on 

screen display menus and adjust the system 

settings to your preference.

10.  OK:

 Confirm the selection.

11.  RETURN:

 Return to previous menu.

12.  EXIT:

 Exit the on screen display menu.

13.  TV:

 Press to turn to TV mode.

14.  VOL+/-:

 Adjust the volume.

15.  CH  /   :

 Select the channel.

16.  DISPLAY:

 Display the present screen 

information such as the current channel and 

input source. 

17.  :

 Stop the playback. 

18. 

:

 Skip to the beginning of the previous 

chapter/track/photo. 

19. 

:

 Skip to the beginning of the next chapter/

track/photo.

20.  :

 Reverse playback rapidly. 

21.  :

 Advance playback rapidly. 

22.  COLOR BUTTONS:

 Press to access directly to 

the corresponding function in APP service.

23. 

:

 Start playback or pause.

24.  P.MODE:

 Select picture mode: dynamic/movie/

user/standard.

25.  S.MODE:

 Select sound mode: standard/music/

movie/user.

26.  CH.LIST:

 Display program list.

27.  CC:

 Closed Caption selection: ON/OFF/CC On 

Mute.

28.  V-CHIP:

 Set up parental control.

29.  MTS:

 Switch among different audio channels: 

STEREO/MONO/SAP.

30.  A S P E C T:  

S e l e c t   t h e   a s p e c t   r a t i o 

settings:standard/wide/wide zoom/zoom.

31.  AUTO:

 Press to adjust the picture automatically 

in VGA source.

32.  S L E E P :

  S e t   t h e   T V   s l e e p   t i m e r : 

OFF/5/10…/180/240 min.

Summary of Contents for WD50UK4550

Page 1: ...USER S MANUAL MANUEL DE L UTILISATEUR MANUAL DEL USUARIO WD50UK4550 ...

Page 2: ......

Page 3: ...Control Connecting External Devices Customizing TV Settings Initial Setup Navigating the Setup Settings Apps Media ViewingPhotos PlayingMusic Source Setup System Channel Support Lock Picture Network Audio Parental Control Troubleshooting Maintaining Specification OTT APP Service 2 3 4 4 5 6 7 7 8 9 10 10 11 12 13 13 14 15 15 16 18 18 19 20 21 22 23 25 26 27 28 PlayingMovie 14 ...

Page 4: ... placed on apparatus WARNING The batteries shall not be exposed to excessive heat such as sunshine or the like WARNING The mains plug is used as disconnect device the disconnect device shall remain readily operable WARNING To reduce the risk of electric shock do not remove cover or back as there are no user serviceable parts inside Refer servicing to personnel Unplug this apparatus during lightnin...

Page 5: ...Failure to insert batteries in the correct polarity as indicated in the battery compartment may shorten the life of the batteries or cause batteries to leak Do not mix old and new batteries Do not mix Alkaline Standard Carbon Zinc or Rechargeable Nickel Cadmium or Nickel Metal Hydride batteries Batteries should be recycled or disposed of as per state and local guidelines Do not attempt to recharge...

Page 6: ...4 En PREPARATION What s Included Quick Connect Guide Quick Connect Guide User Manual User Manual Remote Control with Batteries Warranty Card Warranty Card TV Set TV Stand Six Screws M4x25 ...

Page 7: ...among different input signal sources 3 MENU Display the main menu 4 CH Press to select a channel 5 VOL Press to adjust the volume 6 POWER Indicator Illuminate blue when the TV is turned on Illuminate red when the TV is in standby mode 7 IR Infrared Receiver Receive IR signals from the remote control ...

Page 8: ...evices with a VGA interface 7 PC AUDIO Input Connect to a computer audio output 8 DTV TV Input Connect to the antenna 75Ω VHF UHF socket with the RF coaxial cable 9 Headphone Socket Connect to the Headphones 10 AUDIO Input Connect to the AUDIO L R output sockets on external audio devices 11 COMPOSITE COMPONENT IN Connect to AV devices with composite component Y Pb Pr video and audio output sockets...

Page 9: ...ews holding the stand assembly and remove them 3 3 Attach the wall mount bracket to the TV using the mounting holes on the back of the TV Mount this TV according to the instructions included in the wall mount bracket Lay the TV face down on a flat cushioned surface to avoid damaging or scratching Fix the Left Connecting Base to the main unit using the 3 provided screws Fix the Right Connecting Bas...

Page 10: ...splay the present screen information such as the current channel and input source 17 Stop the playback 18 Skip to the beginning of the previous chapter track photo 19 Skip to the beginning of the next chapter track photo 20 Reverse playback rapidly 21 Advance playback rapidly 22 COLOR BUTTONS Press to access directly to the corresponding function in APP service 23 Start playback or pause 24 P MODE...

Page 11: ...9 En CONNECTING EXTERNAL DEVICES ...

Page 12: ...vices OK Next OK Next OK Next OK Next Hawaii Alaska OK Next OK Next OK Next Click here to return to Scanning Channel Program Click here to connect a Game Blu ray DVD or other players Scanning Channel Program RF CH 51 Found 0 MENU Skip EXIT Quit DTV Check your antenna or cable connections andtry again Apps Media Setup Source TV HDMI1 HDMI2 Component AV Home Mode Energy Saving is the default as ship...

Page 13: ...elect Setup menu and then press buttons to navigate and select the available menu Channel Support Audio Network Channel Support System Lock Audio Support Lock Channel Picture System Lock Picture Support Network Channel Picture Network Lock Audio Support Network Audio Picture System Lock Audio System Network Channel Picture ...

Page 14: ...s genres or composers and Pandora will do the rest It s easy to create personalized stations that play only music you ll love Toon Goggles A subscription video on demand platform that offers animated fun and educational cartoons engaging games and songs from all over the world and in many different languages to children AccuWeather Displays the current weather conditions and the temperature anywhe...

Page 15: ...he desired option Viewing Photos NOTE Portable storage devices USB disk or Hard disk should be inserted After entering Media press buttons to select Photos and then select the disk type to enter Then use buttons to navigate in the picture folder to select the desired photo then a subscreen will pop up Press OK button when appears on the top left press to display the photo ...

Page 16: ... then a subscreen will pop up Press OK button when appears on the top left press to display the video Playing Music After entering Media press buttons to select Music and then select the disk type to enter Then use buttons to navigate in the music folder to select the desired music then a subscreen will pop up Press OK button when appears on the top left press to display the music music music 1 mp...

Reviews: