background image

Setup

Lock

12

6

Time

Picture

Audio

Channel

Air/Cable

Auto


Scan

Favorite

Show

/

Hide

Channel


No

.

Channel


Label

TV


Signal

Air

5

0

-

3

KOCE

-

Lb

Go od

Select

Move

Exit

MEN U

Setup

Lock

12

6

Time

Picture

Audio

Channel

Cable


System

Start


to


Scan

Auto

Select

Move

Exit

MEN U

Setup

Channel

Select

Move

Exit

MENU

Picture

Audio

12

6

Lock

Time

RF


CH

:

Found


:

7

4

CHANNEL Menu

CHANNEL Menu

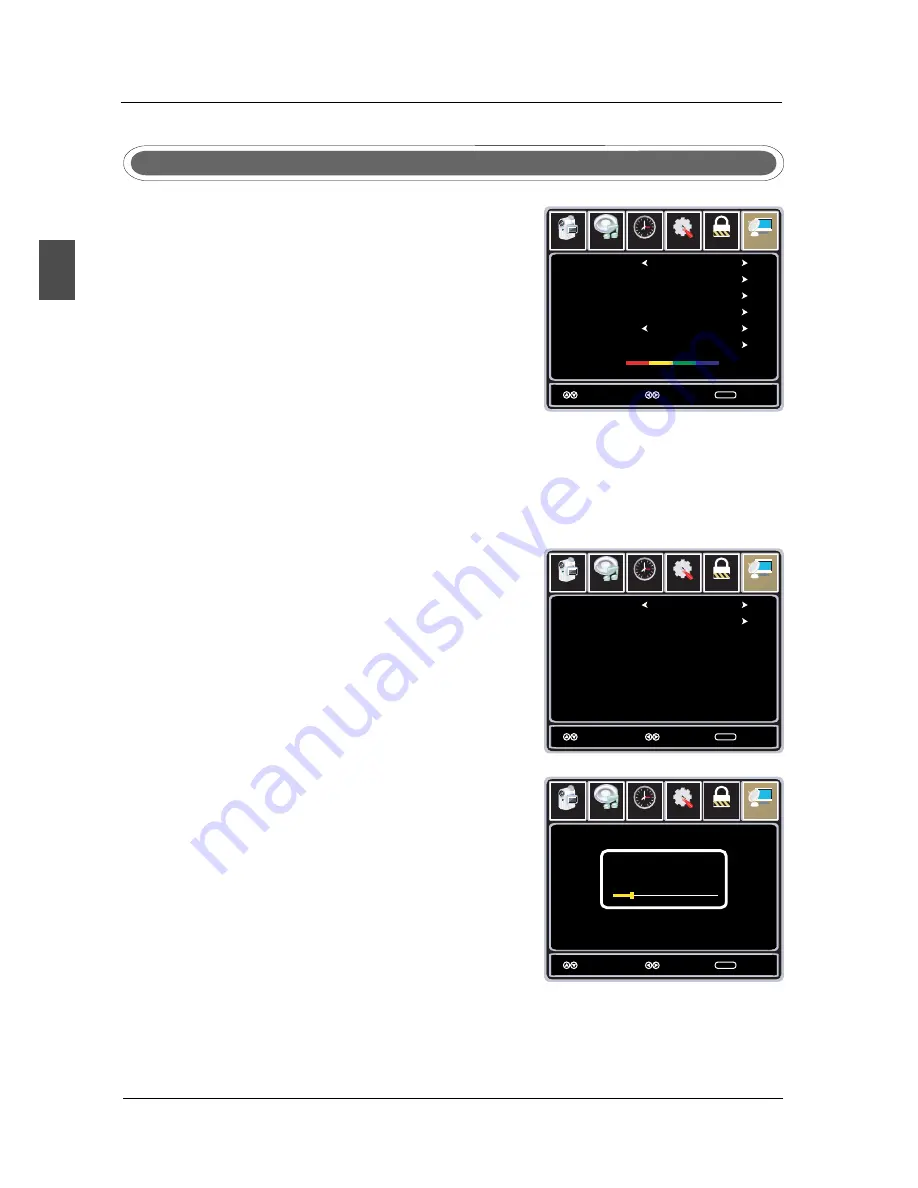
Select TV source.

1. Press the MENU button on the remote control to display 

the Main menu, and use the LEFT and RIGHT buttons to 

select the CHANNEL.

2. Use the UP and DOWN buttons to highlight an individual 

CHANNEL option, use the LEFT and RIGHT buttons to 

change the setting, and press the MENU button to exit.

The CHANNEL menu includes the following options :

Air/Cable

Allows you to select antenna between Air and Cable.

Use Down button to highlight the “Auto Scan” item, then 

press RIGHT button to enter into the following menu.

The receivable channels will be stored automatically.

When searching channels, press MENU to stop.

If you select “Air”as input signal in Antenna item, you can 

press RIGHT button to search the channels automatically.

If you select “Cable”as input signal in Antenna item, allows 

you to select Cable System among: Auto, STD, IRC and HRC.

Use DOWN button to highlight the “Start to Scan”, then press 

RIGHT button to search the channels automatically.The receivable channels will be stored 

automatically. When searching channels, press MENU to stop.

24

E

n

g

lis

h

MENU OPERATION 

Summary of Contents for VR-3250DF

Page 1: ......

Page 2: ......

Page 3: ...mode Remote control setup 14 13 17 18 24 22 20 19 19 TABLE OF CONTENTS English 4 1 6 7 8 5 9 11 10 I M P O R TA N T INFORMATION SPECIFICATIONS 2 HOW TO INSTALL THE STAND 3 PREFACE TROUBLESHOOTING SAFETY PRECAUTIONS FRONT BACK CONNECTIONS OF LCD TV REMOTE CONTROL TV INSTALLATION CONTENTS MENU OPERATION 7 8 Operating the Menu PICTURE Menu AUDIO Menu TIME Menu SETUP Menu LOCK Menu CHANNEL Menu SETUP ...

Page 4: ...hat contained in the operating instructions unless you are qualified to do so Refer to service manual for servicing instructions Important Safety Instructions Note 1 Read these instructions 2 Keep these instructions 3 Heed all warnings 4 Follow all instructions 5 Do not use near water 6 Clean only with dry cloth 7 Do not block any ventilation openings Install in accordance with the manufacturer s ...

Page 5: ...vice personnel Servicing is required when the apparatus has been damaged in any way such as power supply cord or plug is damaged liquid has been spilled or objects have fallen into the apparatus the apparatus has been exposed to rain or moisture does not operate normally or has been dropped 15 Apparatus shall not be exposed to dripping or splashing and that no objects filled with liquids suchas va...

Page 6: ...HOW TO INSTALL THE STAND English 4 Screw holes Base cover Limit 1 Attach the base cover to the fixed ring base Screws image 1 image 2 image 3 2 Screw the base cover to fixed ring base Front ...

Page 7: ...el TV 4 SAFETY PRECAUTIONS Power cord and cables must be properly routed and protected to prevent people from stepping on them and causing the TV to fall Minimum distances 10cm 20cm 10cm 5cm Put the TV on a stable surface Do not place any material on the TV Do not block or cover the ventilation openings on the TV If you have a wall mount check that it is steady Do not use the TV with fixtures othe...

Page 8: ...the TV Only clean the TV with a soft and dry cloth In case of troubleshooting do not use spare parts other than those suggested by the manufacturer Using inadequate spare parts can lead to electric shocks short circuits fire or other incidents Unplug the TV during lightning storms or when unused for long periods of time English SAFETY PRECAUTIONS ...

Page 9: ...7 5 CONTENTS Remote Control 1 5V 1 5V AAA Batteries LCD TV SET Power Cable USER S MANUAL English CONTENTS Quick Connect Guide Quick Connect Guide Warranty Card Warranty Card ...

Page 10: ...H VOL VOL VOL VOL POWER POWER 1 2 3 4 5 6 7 English FRONT BACK CONNECTIONS OF LCD TV 3 4 8 10 7 6 1 Press POWER button to turn the TV on or off 1 AC IN Main power input 2 USB Service USB port for Factory Use Only 3 HDMI1 HDMI2 Connect to the HDMI output jack of a DVD player 4 VGA PC Connect to the VGA RGB output jack of a PC 5 PC AUDIO Connect to the Audio output jack of a PC 6 COMPONENT Connect t...

Page 11: ...d connection After installation insert the 75 ohm antenna plug into the antenna jack as shown Antenna Connection 75 OHM ANTENNA PLUG POWER PLUG OF ANTENNA AMPLIFIER OUTDOOR ANTENNA AMPLIFIER VHF ANTENNA UHF ANTENNA INDOOR ANTENNA AMPLIFIER Connect the power cord correctly as shown Press the POWER switch of your LCD TV to switch on the LCD TV The power indicator on the front panel lights up in red ...

Page 12: ... red Audio left is white and Audio right in red Select component input source using the SOURCE button on the remote control Connect the VIDEO and AUDIO output jack of the DVD or VCR to the VIDEO jacks on the set using the RCA cable Match the jack colors Video is yellow Audio left is white and Audio right is red Select the AV input source using the SOURCE button on the remote control AV Connection ...

Page 13: ... the AUDIO output of VGA PC The PC to the PC AUDIO jack on the set Select the RGB input source with using SOURCE button on the remote control VGA Cable Audio Cable AUDIO RGB PC OUTPUT TV Back English TV INSTALL TION A Service port For factory uses only TV Back USB Cable Service Port Function ...

Page 14: ... HDMI plug which replaces the HDMI connection allows transfer of all audio video control signals through one cable only These signals are transferred in digital DVD Back TV Back HDMI Cable English TV INSTALL TION A AC IN ...

Page 15: ... 0 9 to directly change the TV channel DISPLAY Press to display the source and channel s information EXIT Exit the main TV menu to the screen MENU Brings up the main TV menu to the screen ASPECT Press to select Aspect Ratio THUMBSTICK OK Allows you to navigate the on screen menus and adjust the system settings to your preference VOL VOL Press to increase decrease the sound level CH CH Press to sca...

Page 16: ...tly with compartment markings 3 Replace the battery cover To prevent battery leakage which may result in bodily injury or damage to the remote 1 Install all batteries correctly and as marked on the remote control 2 Do not mix batteries OLD and NEW or CARBON and ALKALINE etc Remove batteries when the remote is not used for a long period of time English REMOTE CONTROL ...

Page 17: ...untain UTC 7 Enter Confirm Go Back Central UTC 6 Eastern UTC 5 Select Power Up Mode Choose this setting for optimal performance under every day use Enter Confirm Go Back Home Use Retall Use Select Setup Wizard Please follow the Setup Wizard to scan and store channels You can perform the scan later if you choose to skip Enter Confirm Go Back ENTER Skip Select Channel Scan Please choose what type of...

Page 18: ...ble Box that provide High Definition quality signals we recommend you call your cable provider ask for an upgrade i Exit Setup Proceed Skip Go Back Select Enter Confirm No Cable Channels Found Note Channel 3 can t be fou d Please check if the RF cable is plugged in and check the settings of the Cable Box Press the Proceed again to re scan n Exit Setup Proceed Skip Go Back Select Enter Confirm Erro...

Page 19: ...U Allows you to customize the audio options and effects select TV source for example Setup Lock 12 6 Time Picture Audio Channel Air Cable Auto Scan Favorite Show Hide Channel No Channel Label DTV Signal Air 50 3 MBC DTV Good LOCK MENU Allows you to set up a variety of lock options Select TV source for example CHANNEL MENU Allows you to search channels and set up a variety of channel options Operat...

Page 20: ...menu option PICTURE Menu PICTURE Menu Select TV source for example 1 Press the MENU button on the remote control to display the Main menu and use the LEFT and RIGHT buttons to select the PICTURE 2 Use the UP and DOWN buttons to highlight an individual PICTURE option use the LEFT and RIGHT buttons to change the setting and press the MENU to exit the menu The PICTURE menu includes the following opti...

Page 21: ...e following options Sound Mode Allows you to select among Standard Music Movie Personal User and Sports Bass Controls the relative intensity of lower pitched sounds Treble Controls the relative intensity of higher pitched sounds Balance To adjust the balance of the left and right sound track or turn off the volume of the left and right sound track Surround Use the LEFT and RIGHT buttons to select ...

Page 22: ... LEFT and RIGHT buttons to change the setting and press the MENU button to exit The SETUP menu includes the following options Menu Language Allows you to select menu language among English Français and Español Transparency Allows you turn on or off the transparency function Zoom Mode Allows you to select the zoom mode among Normal Cinema Wide and Zoom Noise Reduction Allows you to select the noise...

Page 23: ...into the following menu Use UP and DOWN buttons to highlight the desired item and use LEFT and RIGHT buttons to select DLC Dynamic luminance control ON or OFF Restore Default Restores all settings to factory settings Lock 12 6 Time Channel Mode Font Style Font Size Font Edge Style Font Edge Color FG Color BG Color FG Opacit y BG Opacit y Exit MEN U Picture Setup Audio Custo m Defau lt Defau lt Def...

Page 24: ...button to select the Change Password item then press RIGHT button to enter into the following menu Input the new 4 digital password and input it again to confirm System Lock Allows you to turn on or off the system lock If you turn off the system lock then the following items US Canada RRT Setting and Reset RRT will unable to use Setup Lock 12 6 Time Picture i Audio Channel Enter New Password Confi...

Page 25: ...opriate for all ages PG Parental Guidance Suggested May contain material not suited for younger viewers PG 13 Contains content that may not be appropriate for viewers under the age of 13 R Restricted Contains adult content no one under 17 admitted without parent NC 17 No one 17 and under admitted X Adults only Canada Eng Use LEFT and RIGHT buttons to select among E C C8 G PG 14 and 18 Canada Fre U...

Page 26: ...change the setting and press the MENU button to exit The CHANNEL menu includes the following options Air Cable Allows you to select antenna between Air and Cable Use Down button to highlight the Auto Scan item then press RIGHT button to enter into the following menu The receivable channels will be stored automatically When searching channels press MENU to stop If you select Air as input signal in ...

Page 27: ...ide item then press RIGHT button to enter into the following menu Use UP and DOWN button to highlight the desired item then press OK button to show or hide the highlighted channel Channel No Display the number of current channel Channel Label Display the lable of current channel TV Signal Display the quality of current TV signal Setup Lock 12 6 Time Picture Audio Channel Select Exit MEN U Channel ...

Page 28: ...from a lighting signal from car motor neon light and other electrical devices or appliances May be the result of an electrical wave disturb from other TV Computer and Game machine or Radio The cables of the antenna are not correctly plugged in Please check the batteries order and alignment Check that the IR of the remote control is not hidden by something Even if the display image is correct the n...

Page 29: ...N YPbPr IN HDMI IN VGA PC IN SCART OUT AC110 240V 50 60Hz SCART IN Power Consumption Power Supply 140W USB IPOD COAXIAL OUT VGA PC AUDIO IN Inc Stand LxWxHmm Exc Sand LxWxHmm DVD Weight Dimensions Net Kgs Gross Kgs This manual is only for your reference any change to the design and specification will not be advised COMMON INTERFACE DVD Video Output Format YES YES YES YES YES YES 9 3 12 782x232x555...

Page 30: ......

Reviews: