Westinghouse VM-42F140S User Manual Download Page 12


9

English 

Es

paño

Françai

s


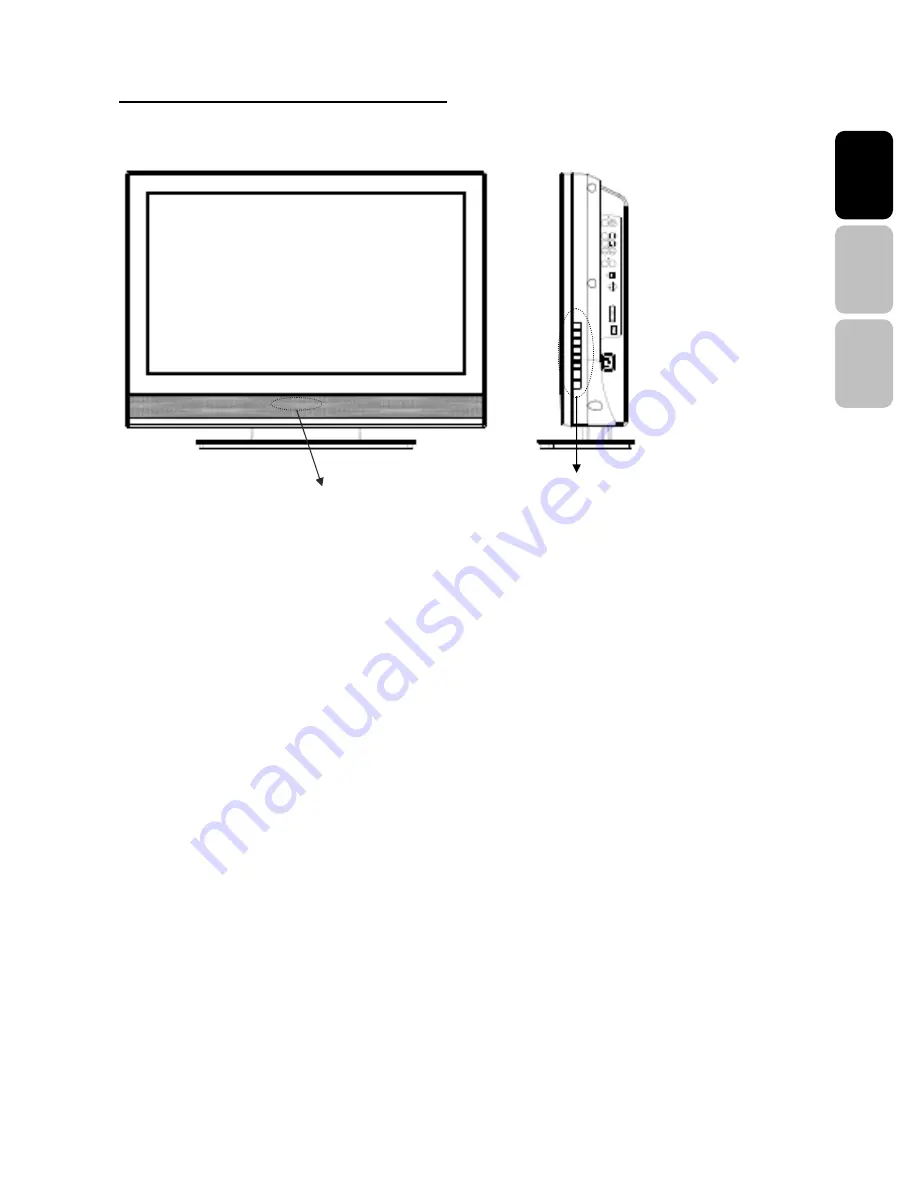
2.3 Controls and Ports of the Panel 
 

A

A

.

.


F

F

r

r

o

o

n

n

t

t


P

P

a

a

n

n

e

e

l

l


V

V

i

i

e

e

w

w

s

s


FUNCTION KEYS 
 

1. 

MENU

: Displays the main menu. When OSD is appeared, press the button to select or 

access the sub-menu. 

2. 

VOLUME (+


/


-)

: Increases/decreases the volume or use as the left/right arrow button for 

menu. 

3. 

CHANNEL (+


/


-)

: Changes the Source or use as the up/down arrow button for menu. 

4. 

SOURCE

: Selects the input source (Video, S-Video, YPbPr1, YPbPr2, PC, DVI, HDMI1, 

HDMI2, HDMI3) 

5. 

POWER

: Turns the LCD-MONITOR on or off. 

6. 

REMOTE SENSOR WINDOW

: Aim the remote control towards this spot on the 

MONITOR. 

7. 

POWER INDICATOR


: WHITE LIGHT  

    Power On 


ORANGE LIGHT   

  Power Sleep 

OFF LIGHT     

    Power Off 


NOTE 1: 

These buttons control the basic features of your MONITOR, including the on-screen menu. To use 

advanced features, you must use the remote control

NOTE 2: 

The picture of LCD MONITOR display is for reference only.


Function Keys 

Remote sensor window & Power indicator 

Summary of Contents for VM-42F140S

Page 1: ...USER S MANUAL MANUEL DE L UTILISATEUR MANUAL DEL USUARIO VM 42F140S VM 47F140S 1080p Monitor Moniteur 1080p...

Page 2: ...NERAL INFORMATION 4 2 1 Overview 4 2 2 Feature 7 2 3 Controls and Ports of the Monitor 9 2 4 Accessories 12 2 5 Remote Control 13 3 INSTALLATION FUNCTION ADJUSTMENT 15 3 1 Installation 15 3 2 How to a...

Page 3: ......

Page 4: ...erns PIP windows or letterbox images on the screen for prolonged periods of time as this may result in permanent damage to the LCD panel This type of damage is not covered under warranty The following...

Page 5: ...ug has two blades with one wider than the other A grounding type plug has two blades and a third grounding prong The wide blade or the third prong are provided for your safety If the provided plug doe...

Page 6: ...r all servicing to qualified service personnel Servicing is required when the apparatus has been damaged in any way such as power supply cord or plug is damaged liquid has been spilled or objects have...

Page 7: ...4 2 GENERAL INFORMATION 2 1 Overview A Front View of the HD Video Monitor Left Channel Speaker IR receiver LED indicator Right Channel Speaker...

Page 8: ...5 English Espa ol Fran ais B Rear View of the HD Video Monitor...

Page 9: ...6 C Side View of the HD Video Monitor Use the function buttons on the right side of the HD Monitor or on the remote control to display the On Screen Display OSD Right Side Function Buttons...

Page 10: ...Format 640 x 480 60Hz 720 x 400 70Hz 800 x 600 60Hz 800 x 600 72Hz 800 x 600 75Hz 1024 x 768 60Hz 1024 x 768 70Hz 1024 x 768 75Hz 1280 x720 60Hz 1280 x 800 60Hz 1280 x 1024 60Hz 1280 x 1024 75Hz 1920...

Page 11: ...ingenious and efficient design you can fit this 47 display in the same space that other brands can only squeeze in a 40 or 42 Amazingly thin for its size it s only 5 0 inches deep without base giving...

Page 12: ...w button for menu 4 SOURCE Selects the input source Video S Video YPbPr1 YPbPr2 PC DVI HDMI1 HDMI2 HDMI3 5 POWER Turns the LCD MONITOR on or off 6 REMOTE SENSOR WINDOW Aim the remote control towards t...

Page 13: ...o device such as HD Digital cable satellite receiver HD Set Top Box Media Center PC or DVD player 4 HDMI2 Video Input Connect to an external video device such as HD Digital cable satellite receiver HD...

Page 14: ...Right Connect an external audio source for component input 12 S Video Composite Video Input 13 Audio Input Left Right Connect an external audio source for S Video Composite input 14 SPDIF Output Opti...

Page 15: ...12 2 4 Accessories User s Manual Remote Control Batteries Power Cord Quick Connect Guide Warranty Card Screw driver Screws x4 base VM 47F140S Quick connect Warranty Card...

Page 16: ...Sleep Press to select a preset time interval for automatic power down 7 C C Not supported 8 Favorite Not supported 9 Channel number keys Select specific input source 10 Enter Execute a command 11 Inp...

Page 17: ...lay the source information 21 YPbPr1 Select YPbPr1 source input 22 MONITOR Not supported 23 PC Select VGA source input 24 HDMI Select HDMI 1 2 or 3 source input 25 YPbPr2 Select YPbPr2 source input 26...

Page 18: ...w and old batteries This may result in cracking or leakage which may pose a fire risk or lead to personal injury Insert batteries according to and markings Inserting the batteries incorrectly may resu...

Page 19: ...urn Power On Press the power button on the right side of the LCD MONITOR or press the power Red button on the remote control z Select input source for the LCD MONITOR using the OSD menu or remote cont...

Page 20: ...sh Espa ol Fran ais 3 2 How to assemble the BASE a Carefully place the TV face down on a soft clean surface b Position the BASE at bottom the TV c Install the four screws underneath the BASE See pictu...

Page 21: ...18 3 3 How to remove the BASE a Carefully place the MONITOR face down on a soft clean surface b Remove the four screws underneath the BASE See picture below c Pull out the BASE from the MONITOR...

Page 22: ...usted either by the remote control or by using the control keys on the right side of the monitor Viewing OSD Menu To display the main menu press the Menu button on the right side of front control keys...

Page 23: ...R Only 0 100 Press arrow key to adjust hue setting 6 COLOR TEMP For Picture Mode set to USER Only WARM NEUTRAL COOL USER Press arrow key to adjust color temperature setting 7 SHARPNESS For Picture Mod...

Page 24: ...only 0 100 Press arrow key to adjust PC clock setting 3 PHASE For PC Analog input only 0 100 Press arrow key to adjust PC phase setting 4 H POSITION For PC Analog input only 0 100 Press arrow key to...

Page 25: ...ass setting 4 TREBLE For EQUALIZER set to USER Only 0 100 For equalizer is selected as user mode only Press arrow key to adjust your favorite treble setting 5 BALANCE 0 100 Press arrow key to adjust b...

Page 26: ...rrow key to adjust your favorite equalizer mode setting 5 TRANSPARENCY 0 100 Press arrow key to adjust transparency function setting 6 POWER SETTING 1 DPMS OFF 5S 10S 20S 2 POWER MODE E SAVING NORMAL...

Page 27: ...i key for about 7 sec to unlock 9 SET ID 0 99 Press arrow key to adjust additional feature function setting 8 AUTO SOURCE ON OFF Press arrow key to adjust auto source function setting 9 SYSTEM INFO P...

Page 28: ...ave reached the end of its life Contact an authorized service center Make sure the video source is plugged into the composite video in port There is no sound Make sure the volume is not set to minimum...

Page 29: ...of its life Contact an authorized service center Remote control does not work Install new batteries Make sure the remote sensor window isn t blocked Make sure the system is in the right mode MONITOR...

Page 30: ...s Check the Sharpness of Picture Settings The picture moves The source signal may be weak The provider may be experiencing difficulties Check input connections The picture is doubled or tripled The so...

Page 31: ...Audio 3 PC Audio Input x 1 Audio 4 DVI Audio L R Input x 1 Audio Input Audio 5 HDMI Audio L R Input x 1 Speaker build in 15W 15W Average RCA Out AUDIO Left Right Output Audio Output Digital Audio Out...

Page 32: ...o 3 PC Audio Input x 1 Audio 4 DVI Audio L R Input x 1 Audio Input Audio 5 HDMI Audio L R Input x 1 Speaker build in 15W 15W Average RCA Out AUDIO Left Right Output Audio Output Digital Audio Out SPDI...

Page 33: ...www wde com Westinghouse Digital Electronics Santa Fe Springs CA SE UM 4208 0701...

Reviews: