background image

© 2015 RVM Australia Pty Ltd. All Rights Reserved

11

TO CLEAN THE STEAM HOLES

Use a cotton wool tip moistened with distilled water to remove any build-up from 
that may have blocked the steam holes. Use caution not to scratch or damage the 
soleplate.

NOTE: 

Never carry or hang the iron for storage by the power cord.

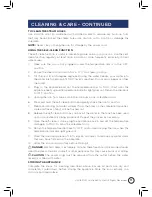
USING THE SELF-CLEAN FUNCTION

The self-clean function is useful in preventing scale build-up in your iron. Use the self-
clean function regularly, at least once a month or more frequently especially in hard 
water areas. 
1. 

Make sure the iron is not plugged in and the temperature dial is in the ‘OFF’ 
position. 

2.  Ensure the steam control switch is in ‘0’ (= No steam) position. 
3.  Tilt the unit to a 45 degree angle and using the water beaker, pour water into 

the water inlet opening until ‘MAX’ level is reached. Do not add vinegar or other 
chemicals. 

4.  Plug in the appliance and set the temperature dial to ‘MAX’. Wait until the 

appliance heats up and temperature indicator light goes out. Return the dial back 
to ‘OFF’ position. 

5.  Unplug the iron from mains. Hold the iron over a sink, soleplate down. 
6.  Press and hold the self-clean button and gently shake the iron to and fro. 
7. 

Steam and boiling hot water will eject from the holes on the soleplate. Impurities, 
scale and flakes (if any) will be flushed out. 

8.  Release the self-clean button as soon as all the water in the tank has been used 

up (no more steam is being produced). Repeat the process as necessary. 

9.  Once the self-clean is done, plug the appliance back in and set the temperature 

dial again to ‘MAX’ to allow the soleplate to dry.

10.  Return the temperature dial back to ‘OFF’ position and unplug the iron when the 

temperature indicator light goes out.

11.  Move the iron over a piece of cloth, e.g., an old towel, to remove any water stains 

that may have formed on the soleplate.

12.  Allow the iron cool down fully before storing it.


DANGER

 Ejected steam is extremely hot and therefore should be avoided. Never 

direct the steam towards yourself or other people as this may cause burns or scalding.


CAUTION

 The power plug must be removed from the outlet before the water 

reservoir is filled with water.

STORING THE APPLIANCE

Complete the steps for cleaning described above. Ensure all parts are dry and 
completely cooled down before storing the appliance. Store the iron vertically in a 
dry, cool and clean place.

CLEANING & CARE - CONTINUED

Summary of Contents for opti-glide WHIR01WB

Page 1: ...2200W 50Hz 60Hz 2200W WHIR01WB 220 240V INSTRUCTION MANUAL...

Page 2: ...Guide 3 Parts and Features 4 5 Iron Operation 5 7 TROUBLESHOOTING 9 10 CLEANING AND CARE 10 11 WARRANTY 12 13 CONTENTS Figures and illustrations in this User Manual are provided for reference only and...

Page 3: ...this may cause burns or scalding 8 WARNING Incorrect operation and improper use may damage the iron or parts thereof and cause severe personal injury 9 WARNING When operating the iron use handle grip...

Page 4: ...be used and rested on its heel stand on an even level and stable preferably heat resistant surface such as an ironing board 26 Never carry or hang the iron for storage by the power cord 27 Do not use...

Page 5: ...e indicator light indicates that the iron is heating up Have the iron stand up on its heel rest on a stable surface Once the indicator light goes out the set temperature has been reached 6 Move the st...

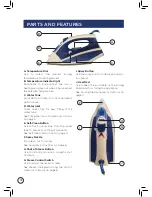
Page 6: ...to flush out residue from the water tank to prevent spotting of garments See Self clean instructions on page 11 F Spray Nozzle Provides a mist of water See Spraying instructions on page 6 G Shot of St...

Page 7: ...her to lower temperature allow the appliance to reach the lower temperature before using it on the garment FILLING THE IRON WITH WATER Make sure the iron is not plugged in and the temperature dial is...

Page 8: ...The shot of steam feature can be used for both dry and steam ironing at high temperatures The shot of steam is particularly efficient in smoothing out stubborn creases on heavy fabrics 1 Fill with di...

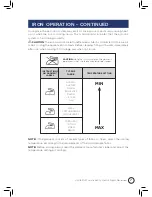
Page 9: ...h water immediately after use when moving it to storage and when not in use NOTE If the garment consists of several types of fabric or fibers select the ironing temperature according to the requiremen...

Page 10: ...8 For more information on Westinghouse small appliances visit www westinghousesmallappliances com au...

Page 11: ...indicator light goes out Pour out the excess water Use caution as the water may be hot Set the steam control switch to the correct position Clean steam holes using cotton tip moistened with distilled...

Page 12: ...CLEANING CARE AFTER EACH USE 1 Remove the plug from the mains socket Ensure that the temperature dial is in OFF and the steam control switch is in 0 position 2 Allow the appliance to cool down approxi...

Page 13: ...e down 6 Press and hold the self clean button and gently shake the iron to and fro 7 Steam and boiling hot water will eject from the holes on the soleplate Impurities scale and flakes if any will be f...

Page 14: ...manufacturing defect is discovered in the Product or the Product fails to perform to the Seller s specifications as a result of some defect in material or workmanship in the Product then the Seller w...

Page 15: ...oods from the seller c Consumer means a Consumer as that term is set out in section 3 of the Australian Consumer Law d Consumer Guarantees means the guarantees under the Australian Consumer Law e Impl...

Page 16: ...TY LTD 11 Tamara Drive Cockburn Central WA 6164 MADE IN CHINA 2015 RVM AUSTRALIA PTY LTD ALL RIGHTS RESERVED WESTINGHOUSE and INNOVATION YOU CAN BE SURE OF are trademarks of Westinghouse Electric Corp...

Reviews: