Westinghouse LVM-37W1 User Manual Download Page 8


English 

6

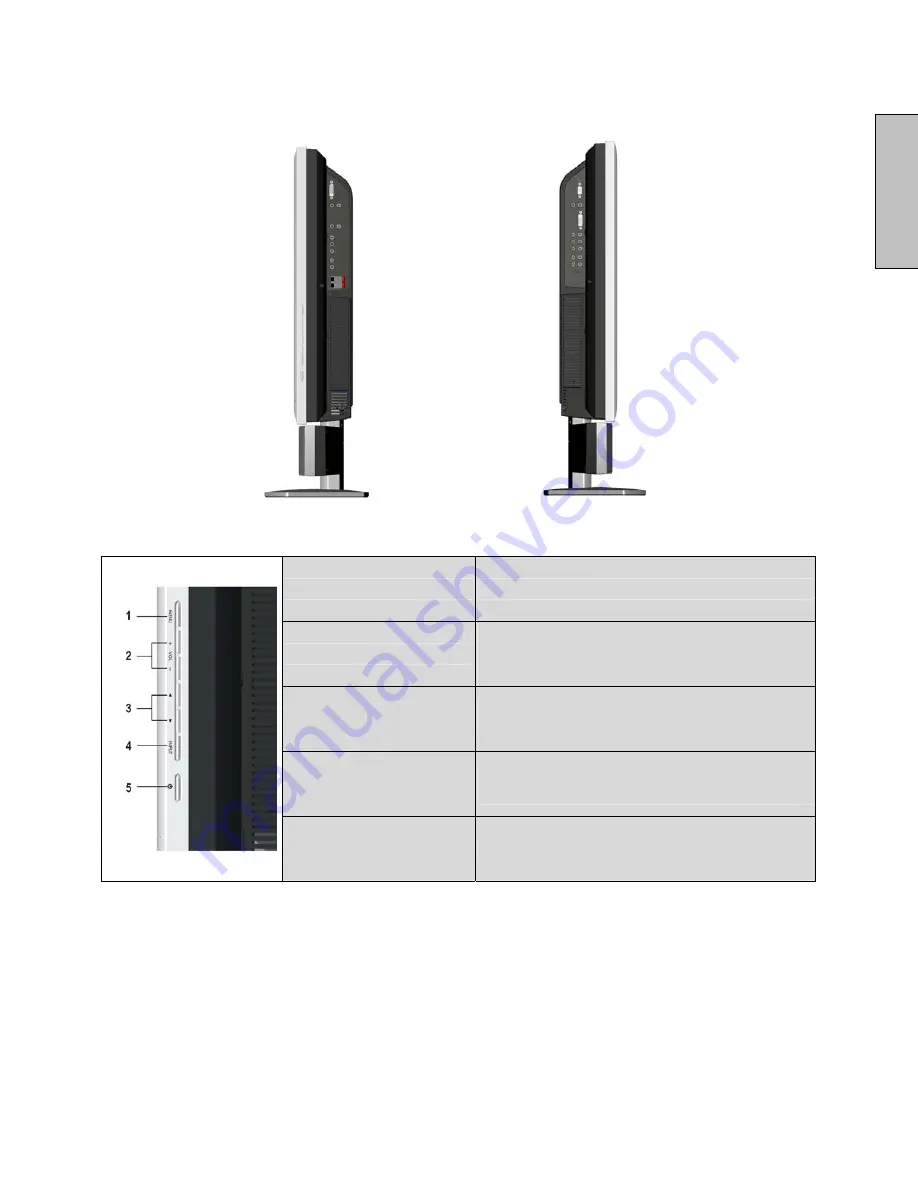
Side View of the HD Video Monitor 


1. Menu 

Turn OSD Menu ON/OFF 

2. / -   

Increase/Decrease sound volume or 
adjust a highlighted control while in the 
OSD Menu. 

3. OSD Selection 

T

/

S

Highlight a control while in the OSD 
Menu. 

4. Input 

Select Active Video Input or choose a 
selection while in the OSD MENU.   

5. Power Button 

Turn Power ON/OFF 


Summary of Contents for LVM-37W1

Page 1: ...37 HD VIDEO MONITOR Model LVM 37w1...

Page 2: ...Functions PICTURE PARAMETERS Brightness Contrast Saturation Hue Color Temp Sharpness Aspect Ratio Backlight Reset 13 PC PARAMETERS Auto Adjust Clock Phase Position 14 AUDIO SETTINGS Volume Bass Treble...

Page 3: ...direct sunlight or high temperatures Avoid exposing the HD Monitor to moisture or high humidity Do not attempt repairs yourself Your warranty does not cover repairs or attempted repairs by anyone not...

Page 4: ...nit SJT 18 AWG 16 AWG 14 AWG 10 Amps 12 Amps 12 Amps SVT 18 AWG 17 AWG 10 Amps 12 Amps FCC Compliance Statement This equipment has been tested and complies with the limits for a Class B digital device...

Page 5: ...free cloth and wipe the screen To clean the case 1 Use a soft dry cloth 2 If it still is not clean apply a small amount of non ammonia non alcohol based mild non abrasive detergent onto a clean soft l...

Page 6: ...TION Package Contents Your product package includes 37 Westinghouse HD Video Monitor Remote Control with batteries Power Cord Quick Connect Guide User s Manual Component Video Cable Green Blue Red Aud...

Page 7: ...page 12 Rear View of the HD Video Monitor To Detach the Speaker from the Video Monitor 1 Turn off the monitor and unplug the power supply 2 Detach red and black speaker wires from the monitor first t...

Page 8: ...FF 2 Volume Increase Decrease sound volume or adjust a highlighted control while in the OSD Menu 3 OSD Selection T S Highlight a control while in the OSD Menu 4 Input Select Active Video Input or choo...

Page 9: ...eft Connect this output to an external audio receiver 7 VGA Audio IN Using the cable provided connect to the Audio out Green from a computer 8 VGA Using a 15 pin VGA cable connect to a computer or oth...

Page 10: ...lect Video Display format STANDARD FILL or ZOOM 7 T S W X OSD MENU control 8 Enter Execute a command 9 MUTE Turn the Sound On Off 10 INFO Display the source and channel information 11 PIP Display sub...

Page 11: ...is may result in cracking or leakage which may pose a fire risk or lead to personal injury Insert batteries according to and markings Inserting the batteries incorrectly may result in cracking or leak...

Page 12: ...able from your PC VGA OUT port to the HD Monitor VGA IN port DVI1 DVI2 CONNECTION Connect a Digital DVI cable from your PC or DVD DVI OUT port to the HD Monitor DVI HDCP port AUDIO CONNECTION Connect...

Page 13: ...n the right side of the HD Monitor or press the Power ON Red button on the remote control 6 Select input source for the HD Monitor using the OSD menu or remote control 7 If connecting to a PC VGA DVI1...

Page 14: ...n menu press the Menu button on the right side of front control keys of the HD Monitor or the MENU key on the remote control Use 3 4 arrow keys to highlight the desired OSD sub menu Main Menu To selec...

Page 15: ...adjustment Saturation Saturation adjustment Hue Hue adjustment Color Temp Color temperature adjustment Color 1 Color 2 Color 3 Sharpness Sharpness adjustment Sharpness cannot be adjusted in PC mode A...

Page 16: ...Auto Adjust Automatically adjust the horizontal phase of the image Clock Clock adjustment Phase Phase adjustment Position Adjust the horizontal and vertical position of the image NOTE The GRAPHIC men...

Page 17: ...GS Function Name Function Volume Volume adjustment Bass Bass adjustment Treble Treble adjustment Balance Balance adjustment Mute Select Audio OFF or ON Speaker Select internal or external speaker Rese...

Page 18: ...Table 1 Swap Swap main screen and sub screen source PIP Position Sub screen display horizontal vertical position adjustment PIP Size Sub screen display size adjustment Small Medium Large Audio From Se...

Page 19: ...u Timeout Set the time to turn off the OSD automatically Language OSD language selection Sleep Timer Set sleep timer to turn off the power automatically Transparency Set OSD transparency level DPMS Se...

Page 20: ...x 400 70 Hz DVI2 Supported 1280 x 1024 60Hz 1280 x 768 60 75Hz 1024 x 768 60 75 Hz 800 x 600 60 75 Hz 640 x 480 60 75 Hz 720 x 400 70 Hz Speaker Output 20W x2 Channels Power Voltage 100 240 VAC 50 60...

Page 21: ...bnormal Colors If any colors red green or blue are missing check the video cable to make sure it is connected securely Loose or broken pins in the cable connector could cause an improper connection Co...

Page 22: ...SE UM 3701 0501...

Reviews: