background image

-10-

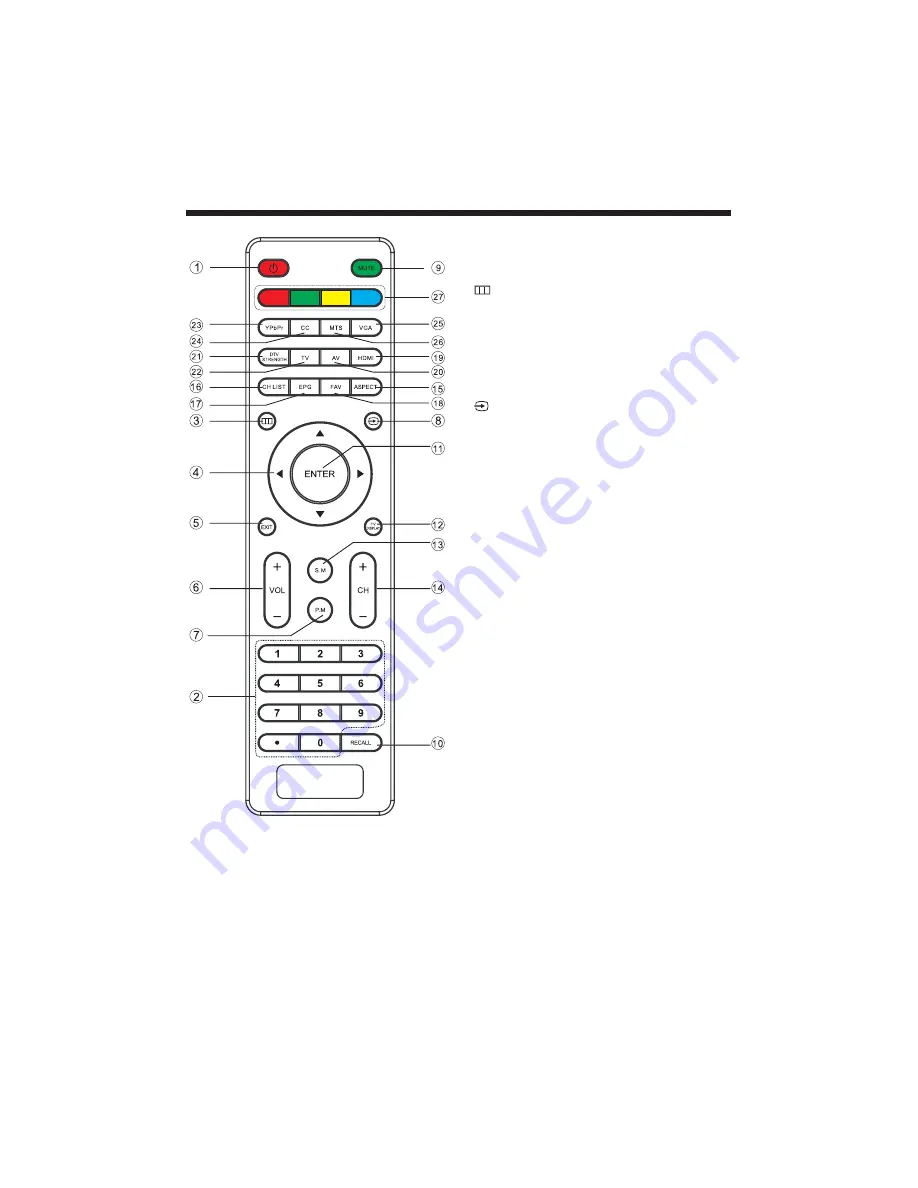
REMOTE CONTROL

1:

To turn the TV on.

2:

For direct access to

.

3:

Displays the main on-screen menu.

4:

To move within the menu.

5:

To exit the menu.

6:

To adjust sound level.

7:   P

To switch picture mode.

8:

Press to display and select the available video sources.

9:

To disable or enable the sound.

10:

To access the previously viewed channel.

11:

Confirms selection.

12:

Displays/removes the program information

13:

To switch sound mode.

14:

To access the next or previous channel.

15:

To change picture aspect .

16:

To display the channel list.

17:

To display all the information of DTV programs.

18:

To access your favorite channels in digital TV mode.

19:

Hot key to go directly to HDMI source.

20:

Hot key to go directly to AV source.

21:

To display the DTV signal strength menu.

22:

Hot key to go directly to TV source.

23:

Hot key to go directly to YPbPr source.

24:

To enable or disable the CC function.

25:

Hot key to go directly to VGA source.

26:

To switch the sound stereo.

27:

Reserved  keys

POWER

NUMBER KEY

CURSOR

EXIT

VOL+/-

.M

MUTE

RECALL

ENTER

TV DISPLAY

S.M

CH+/CH-

ASPECT

CH LIST

EPG

FAV

HDMI

AV

DTV STRENGTH

TV

YPbPr

CC

VGA

MTS

COLOR KEYS

channels

Summary of Contents for LD-3240

Page 1: ......

Page 2: ... 1 Contents Safety and warnings 2 3 Introduction 4 Stand installation guide 5 Installation 6 9 Remote Control 10 Operation 11 14 ...

Page 3: ...ily operable 15 The ventilation should not be impeded by covering the ventilation openings with items such as newspapers table cloth curtains etc 16 No naked flame sources such as lighted candles should be placed on the 17 Attention should be drawn to the environmental aspects of battery disposal 18 The use of in moderate climate 19 The shall not be exposed to dripping or splashing and that no obj...

Page 4: ... should pay special attention to children Serious injury may result if it falls Do not place your television on an unstable cart stand shelf or table Serious injury to an individual and damage to the television may result if it falls or When the television receiver is not used for an extended period of time it is advisable to disconnect the AC power cord from the AC outlet Avoid exposing the telev...

Page 5: ...Built in stereo speaker system Full function Remote Control x 2 Resolution TV System Video Signal System Receiving Channel Horizontal definition TV line 16 9 NTSC Cable 1 135 Air 2 69 ATV DTV x 1 High Definition Multimedia Interface HDMI Input Audio Input x 2 Composite Video Input 350 x 1 YCb Pb Cr Pr 400 Video Input 400 x 1 Input Power Voltage AC 100V 240V 50 60Hz ATSC Digital system and NTSC Ana...

Page 6: ...bottom with the included 3 screws 2 Place the TV with the display side down on a flat surface Use a cloth or the material from the TV packaging to protect the screen 3 Place the base stand neck in the slot on the bottom of the TV and push firmly upwards Attach with the included screw ...

Page 7: ...urn the set back to STANDBY Side panel 30 30 SOURCE MENU CH CH VOL VOL STANDBY 1 2 3 4 5 REAR Connections All the terminals are from left to right POWER SOCKET VIDEO AUDIO INPUT YPbPr INPUT Note AV and YPbPr share one audio channel SIDE Connections All the terminals are from left to right HDMI1 HDMI2 USB VGA HEADPHONE PC AUDIO COAXIAL RF Note 1 When HDMI1 has an input signal coming from a DVI sour...

Page 8: ...ce 75 unbalanced 7 STEPS PC Be sure both the TV and computer are set to Power off 1 Connect VGA and audio cable 2 Connect the power cord 3 Power on the TV switch to PC mode 4 Power on the PC This sequence is very important HDMI1 HDMI2 USB VGA HEADPHONE RF PC AUDIO COAXIAL ...

Page 9: ...C 8 INSTALLATION PRESET MODE AV 1 2 3 4 5 6 7 8 9 10 720 400 640 480 640 480 800 600 800 600 1024 768 1024 768 1024 768 1280 1024 1366 768 70 60 75 60 75 60 70 75 60 75 31 47 31 47 37 50 37 88 46 88 48 36 56 48 60 02 63 98 80 00 RESOLUTION V Freq Hz H Freq KHz ...

Page 10: ...pport these video formats 480i 576i 480p 576p 720p 1080i You can use the input terminals on TV set rear as follows HDMI HDMI1 HDMI2 USB VGA HEADPHONE RF PC AUDIO COAXIAL Yellow video White audio L Red audio R or Pr Y W R W R G B R Blue Pb Green Y B G VIDEO EQUIPMENT with YPbPr W R G B R W R W R TO AUDIO OUTPUTS VIDEO EQUIPMENT TO VIDEO OUTPUTS Y Pb Pr AV AC INPUT 100 240V 50 60Hz L R ...

Page 11: ...nel 15 To change picture aspect 16 To display the channel list 17 To display all the information of DTV programs 18 To access your favorite channels in digital TV mode 19 Hot key to go directly to HDMI source 20 Hot key to go directly to AV source 21 To display the DTV signal strength menu 22 Hot key to go directly to TV source 23 Hot key to go directly to YPbPr source 24 To enable or disable the ...

Page 12: ...m here Press to select press to adjust press MENU to exit Note Restore Default Reset all the settings to default value Note Audio language is available in ATSC TV Programming only Press button to select Advanced Video press button the screen will display as follow Advanced Video 3 1 Parental Controls Press button to select Press button the screen will display as follow Parental Controls Enter the ...

Page 13: ...er children TV G General audience TV PG Parental Guidance suggested TV 14 Parents strongly cautioned TV MA Mature audience only X X X X X X X X X X X X Content 2 MPAA Switching the movie rating control level N A G PG PG 13 R NC 17 X Rating Description Age G General audiences All Ages admitted PG Parental Guidance suggested Some material may not be Suitable for children PG 13 Parents strongly cauti...

Page 14: ...ntain graphic language and portrayals of secretary and nudity 2 Canada French Switching the French rating control level E G 8ANS 13 ANS 16ANS 18ANS Rating Description Age E Exempt programming G General All ages and children contains minimal direct violence but may be integrated into the plot in a humorous or unrealistic manner 8ans General but inadvisable for young children May be viewed by a wide...

Page 15: ...button to edit current channel name 7 DTV signal Display DTV strength signal It can t be selected and adjusted 3 5 VGA Settings When PC Mode is available 1 H Pos Adjust the horizontal position of the screen 2 V Pos Adjust the vertical position of the screen 3 Clock Fine tune the screen width 4 Phase Fine tune the phase of the screen Usually don t adjust this item 5 Auto Auto adjust to fit the scre...

Page 16: ......

Reviews: