background image

SETUP MENUS

31

English

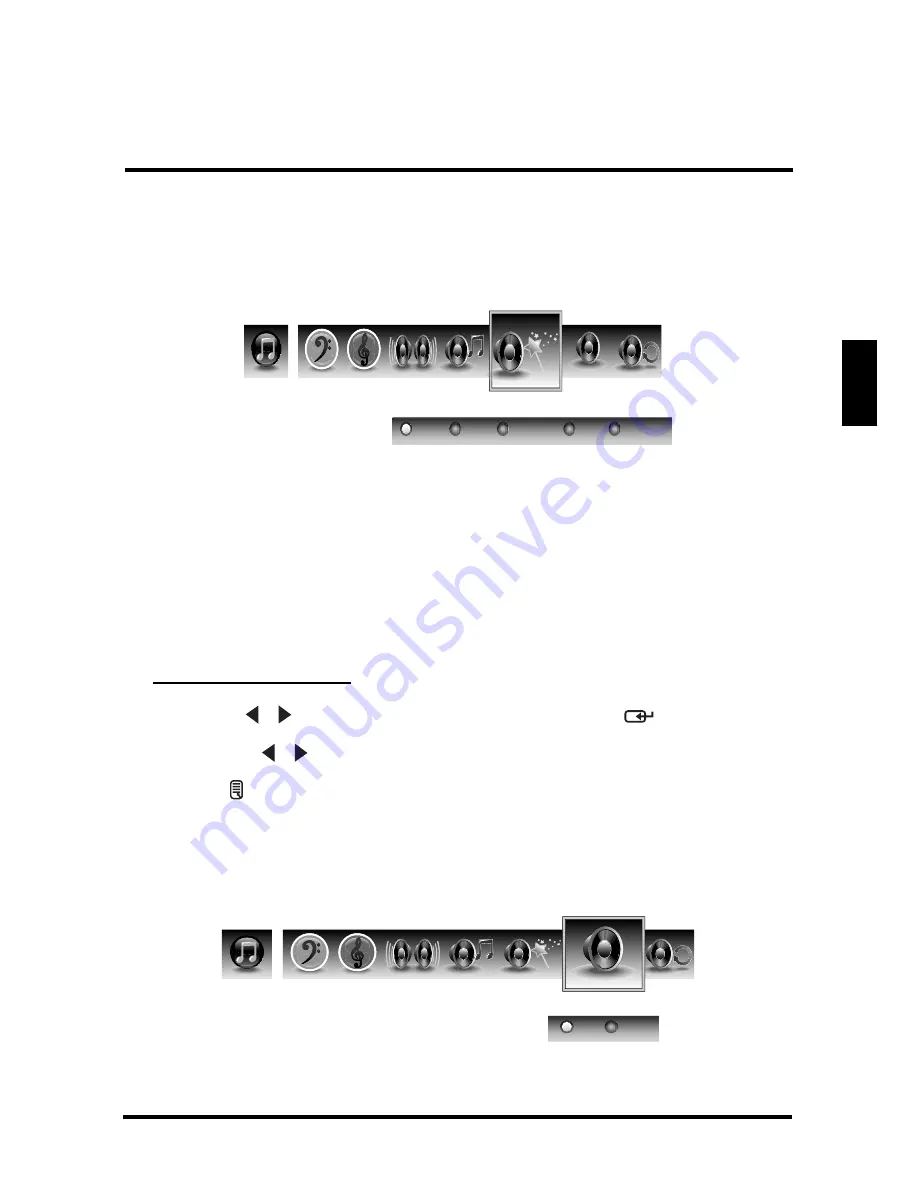
Audio Preset

Use this sub-menu to select one of four preset audio options optimized for different 
sounding conditions.

The following options are available:

Rock

: Sets the equalizer to the Rock mode.

Pop

: Sets the equalizer to the Pop mode.

Classical

: Sets the equalizer to the Classical mode.

Flat

: Sets the equalizer to the Flat mode.

Custom

: Uses the customized settings.

Adjusting Audio Preset

1  

Use the   /   keys to select 

Audio Preset 

and press 

.

2  

Press the   /   keys on the remote control to select the desired option.

3  

Press   to save and exit the screen.

TruSurround HD

Use this sub-menu to toggle the TruSurround HD on and off.

SRS

SRS

Audio Presets

Rock

POP

Classical

Flat

Custom

TruSurround HD

ON

OFF

SRS

SRS

Summary of Contents for LD-268 Series

Page 1: ......

Page 2: ......

Page 3: ...ion 6 Ventilation 6 Safety Lamp Disposal 6 WARNINGS AND PRECAUTIONS 7 ANTENNA INSTALLATION SAFETY 8 Lightning 8 Power lines 8 CLEANING THE LED TV 9 Dolby Digital Notice 9 SRS Trademark Information 9 P...

Page 4: ...ING THE POWER ON AND OFF 21 ADJUSTING THE VOLUME 21 CHANGING CHANNELS 22 SELECTING THE INPUT SOURCE 22 ADJUSTING THE DISPLAY FORMAT 23 ADJUSTING THE LED BACKLIGHT 23 SETUP MENUS 24 SETUP MENU OPERATIO...

Page 5: ...that may be used toward the purchase of one see www dtv2009 gov or call the NTIA at 1 888 DTV 2009 AVISO RELATIVO A LA TRANSICI N A TELEVISI N DIGITAL Este equipo incorpora un sintonizador de televisi...

Page 6: ...he user to the presence of uninsulated dangerous voltage within the product s enclosure that may be of sufficient magnitude to constitute a risk of electric shock The exclamation inside an equilateral...

Page 7: ...e A1 below For the United States and Canada In the United States and Canada the male plug is a NEMA5 15 style Figure A2 UL listed and CSA labeled For LED TVs that are to be placed on a desk or table t...

Page 8: ...ich can be determined by turning the equipment off and on the user is encouraged to try to correct the interference by one or more of the following measures Reorient or relocate the receiving antenna...

Page 9: ...ird prong are provided for your safety If the provided plug does not fit into your outlet consult an electrician for replacement of the obsolete outlet Protect the power cord from being walked on or p...

Page 10: ...essary ventilation To ensure reliable operation of the LED TV and to protect it from overheating these slots and openings must never be blocked or covered Safety Lamp Disposal Lamp s inside this produ...

Page 11: ...ht compartments or in areas where it can be exposed to water or high temperature Ensure that the area around the LED TV is clean and free of moisture Do not place anything on the LED TV that can hinde...

Page 12: ...nnect the antenna or cable system DO NOT disconnect the antenna or the power cord during a heavy storm lightning may strike while you are holding the cable cord causing serious injury Turn off the LED...

Page 13: ...detergent onto a clean soft lint free cloth then wipe the surface Dolby Digital Notice Manufactured under license from Dolby Laboratories Dolby and the double D symbol are registered trademarks of Dol...

Page 14: ...it Remote Control with 2x AAA batteries LED TV Base User Manual Power Cord Warranty Card AC Adapter Screws for Base Favorite MTS ZZZ C C TV Video1 HDMI1 YPbPr1 PC Video2 HDMI2 YPbPr2 ENT D A B C Vol I...

Page 15: ...djusts the volume during playback Selects an item on a menu screen 3 Channel Switches the channel during TV viewing Selects an item on a menu screen 4 INPUT Selects the video input source Executes a c...

Page 16: ...system 4 Audio in Connects to the audio out port of a computer 5 VGA Connects to a computer or other device with a VGA output using a 15 pin VGA cable 6 Audio out Connect to an audio output device 7...

Page 17: ...n menus 13 Enter Executes a command 14 G Displays the Electronic Program Guide EPG It contains the program information for the channel you re watching 15 Info Displays the input source or channel info...

Page 18: ...distance of 10 feet from the LED TV CAUTIONS Only use AAA batteries Do not mix new and old batteries This may result in cracking or leakage which may pose a fire risk or lead to personal injury Insert...

Page 19: ...ox 7 Remove the two bottom carton stabilizers from the LED TV 8 Lay the LED TV on a clear flat and stable surface 9 Align the base to the bottom side of the LED TV and use four M4 x 18 screws to secur...

Page 20: ...the LED TV and all connected devices 2 Disconnect the power cord from the LED TV 3 Disconnect all signal cables from the I O port terminals 4 Remove the M5 x 16 screw securing the base to the desk 5 L...

Page 21: ...y one of these channels is used If a channel is unknown consult your cable TV company For more specific instructions on installing cable TV consult your cable TV company One possible method of utilizi...

Page 22: ...ut Picture can be displayed only when a 640 x 480 480P 720P or 1080i signal is received When you connect to the HDMI terminal with a DVI HDMI conversion cable there is a possibility that the picture m...

Page 23: ...B Antenna cable Cable TV line Antenna Cable system PC Audio amplifier AUDIO OUT AUDIO OUT 3 5 mm stereo mini jack cable RGB cable Audio cable SPDIF cable HDMI HDMI cable DVI HDMI cable DVD player with...

Page 24: ...to turn on the LED TV Select the desired language and select Yes to use the SetupWizard The SetupWizard will guide you on how to set up the LED TV s operational settings IMPORTANT The LED TV is desig...

Page 25: ...crease the volume Mute Press to turn off the sound The mute icon appears on the screen Press again to turn on the sound LED indicator Operation Turns from none to red Turn the power on Turns from red...

Page 26: ...elect a favorite channel press the Favorite button A B C or D corresponding to the preferred channel Saving a channel as a favorite 1 Switch to the channel you want to add as a favorite 2 Press and ho...

Page 27: ...ill change accordingly The available options are Standard Picture is displayed in its original size Fill Picture is displayed to cover the entire screen Overscan Picture is scaled down to fit the disp...

Page 28: ...rol or on the control panel to navigate through the menu screens Action Remote Control Control Panel Displays or closes the menu bar MENU Select and display a primary menu Adjust sub menu options then...

Page 29: ...ness Color temperature Hue and Reset Brightness Use Brightness to adjust the luminance level Adjusting Brightness 1 Use the keys to select Brightness and press 2 Press the keys on the remote control t...

Page 30: ...t view options optimized for different viewing conditions The following options are available Showroom Uses increased color and sharpness for a vibrant picture display Movie Images are displayed as ac...

Page 31: ...of the display Adjusting Sharpness 1 Use the keys to select Sharpness and press 2 Press the keys on the remote control to adjust the sharpness level 3 Press to save and exit the screen Color Temperatu...

Page 32: ...Hue to adjust the balance of the red green and blue colors in the display Adjusting Hue 1 Use the keys to select Hue and press 2 Press the keys on the remote control to adjust the hue level 3 Press t...

Page 33: ...owing options are available Bass Treble Balance TV Speaker Audio Presets and Reset Bass Use Bass to calibrate low pitched sounds Adjusting Bass 1 Use the keys to select Bass and press 2 Press the keys...

Page 34: ...e keys on the remote control to adjust the balance level 3 Press to save and exit the screen TV Speaker Use this sub menu to toggle the LED TV speakers on and off Adjusting TV Speaker 1 Use the keys t...

Page 35: ...lassical Sets the equalizer to the Classical mode Flat Sets the equalizer to the Flat mode Custom Uses the customized settings Adjusting Audio Preset 1 Use the keys to select Audio Preset and press 2...

Page 36: ...rround HD 1 Use the keys to select TruSurround HD and press 2 Press the keys on the remote control to select On or OFF 3 Press to save and exit the screen Reset Select Yes on this sub menu to reset al...

Page 37: ...Matches the incoming resolution exactly to the pixels without any scaling Adjusting View Mode 1 Press the keys on the remote control to select the desired option 2 Press or to save and exit the scree...

Page 38: ...ayed to cover the entire screen H Position Use this sub menu to adjust the horizontal position of the display V Position Use this sub menu to adjust the vertical position of the display Fine Tune Use...

Page 39: ...List Channel Edit MTS Auto Search and Manual Add Skip List Use Skip List to select the channels you want to skip Adding Channels to Skip List 1 Use the keys to select Skip List and press The Channel S...

Page 40: ...screen 3 Use the keys to move the cursor to the desired symbol and press the button to enter Select Shift to toggle different symbol tables uppercase and lowercase letters numerals and special symbol...

Page 41: ...scene in the original program Adjusting MTS 1 Use the keys to select MTS and press 2 Press the keys on the remote control to select the desired option 3 Press to save and exit the screen Auto Search S...

Page 42: ...ect Manual Search and press The Channel Add screen appears 2 Use the Channel keys on the remote control to enter the channel number and select Enter Wait a few moment for the TV to search for the chan...

Page 43: ...to select Date and Time and press 2 Press repeatedly to check enable or uncheck disable Auto Calibration 3 Press to save and exit the screen Enable this option to view the system s current time Both D...

Page 44: ...ing Daylight Saving 1 Use the keys to select Date and Time and press 2 Press repeatedly to check enable or uncheck disable Adjust for Daylight Saving Time 3 Press to save and exit the screen Closed Ca...

Page 45: ...roadcaster Solid Translucent Transparent or Flashing Background Opacity Can be set to As Broadcaster Solid Translucent Transparent or Flashing Adjusting Closed Captions Settings 1 Use the keys to sele...

Page 46: ...Press to save and exit the screen TV Rating Use this sub menu to customize US TV Rating programs Rating Description TV Y Suitable for young children TV Y7 May not be suitable for children under 7 TV...

Page 47: ...erial parents might not like to expose to their young children material that will clearly need to be examined or inquired about before children are allowed to view the film PG 13 May contain some scen...

Page 48: ...ssification categories based on Canadian ratings of allowable TV programs and movies Adjusting Canada English Rating 1 Use the keys to select Canada English Rating and press Rating Description E Exemp...

Page 49: ...R gie du cin ma du Qu bec Adjusting Canada French Rating 1 Use the keys to select Canada French Rating and press 2 Use the keys to select the desired rating and press repeatedly to block or unblock 3...

Page 50: ...to save and exit the screen Change Password Change Password allows you to change your current password Changing Password 1 Use the keys to select Change Password and press 2 Use the Channel keys to en...

Page 51: ...select 10 sec 20 sec or 30 sec 3 Press to save and exit the screen OSD Language Use OSD Language to select the language to display on the screen English French or Spanish Adjusting OSD Language 1 Use...

Page 52: ...st Adjusting Power Settings 1 Use the keys to select Power Settings and press 2 Use the keys to select a desired option 3 Use the keys to adjust the value 4 Press to save and exit the screen Reset All...

Page 53: ...SETUP MENUS 49 English Version Use this sub menu to view the LED TV s serial number and firmware version Version en...

Page 54: ...e LED TV WALL MOUNT INSTALLATION REMINDERS Remove the LED TV base first before mounting the unit on a wall It is the user s responsibility to use a UL listed wall mount unit rated to support the weigh...

Page 55: ...ork Press only one button at a time Make sure the batteries are properly inserted The batteries may already be drained out Replace batteries with new ones Remote control code cannot be detected by a u...

Page 56: ...for a signal Reduce signal splitters and excessively long cables Replace poor antenna cables and or connectors to improve signal quality Press to adjust the Aspect ratio Adjust the Noise Reduction set...

Page 57: ...If you are using the TV speakers make sure the TV Speakers option is set to On in Audio menu If you are using an external audio device press and select Audio to make sure the TV Speakers option is set...

Page 58: ...6 ms Aspect Ratio 1 77 16 9 Display color 16 7M Audio Video Input Output Terminals HDMI x2 AV with R L Audio x1 VGA with 3 5 mm mini jack x1 SPDIF Out x1 USB for service x1 Tuner x1 R L Audio Line Out...

Page 59: ...nch Without stand 657 x 438 x 39 5 mm 25 86 x 17 24 x 1 56 inch Weight Net 4 6 kg Weight Gross 6 55 kg NOTES These product specifications are subject to change without user notification Do not set you...

Page 60: ......

Reviews: