


QKGA010 2
ENGLISH
Table of Contents
Table of Contents
. . . . . . . . . . . . . . . . . . . . . . . . . . . . . . . . . . .
2
Safety Information
. . . . . . . . . . . . . . . . . . . . . . . . . . . . . . . . . .
2
Warranty
. . . . . . . . . . . . . . . . . . . . . . . . . . . . . . . . . . . . . . . . . . .
Five (5) Year Limited Warranty . . . . . . . . . . . . . . . . . . . . . . . . 3
Warranty Claim Procedure . . . . . . . . . . . . . . . . . . . . . . . . . . . 3
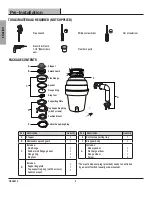
Pre-Installation
Tools/Materials Required . . . . . . . . . . . . . . . . . . . . . . . . . . . . . 4
Package Contents . . . . . . . . . . . . . . . . . . . . . . . . . . . . . . . . . . 4
Installation
. . . . . . . . . . . . . . . . . . . . . . . . . . . . . . . . . . . . . . . . .
Removal of Old Unit . . . . . . . . . . . . . . . . . . . . . . . . . . . . . . . . . 5
Installation of the Mounting Assembly . . . . . . . . . . . . . . . . . . .6
Attaching Discharge Elbow . . . . . . . . . . . . . . . . . . . . . . . . . . . 7
Removing Knockout Plug . . . . . . . . . . . . . . . . . . . . . . . . . . . . 7
Connecting Disposer to Mounting Assembly . . . . . . . . . . . . . .8
Dishwasher Connection . . . . . . . . . . . . . . . . . . . . . . . . . . . . . 9
Electrical Connection & Grounding . . . . . . . . . . . . . . . . . . . . .9
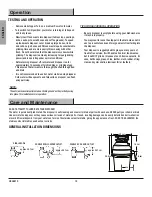
Operation
. . . . . . . . . . . . . . . . . . . . . . . . . . . . . . . . . . . . . . . .
10
Care and Maintenance
. . . . . . . . . . . . . . . . . . . . . . . . . . . . .
10
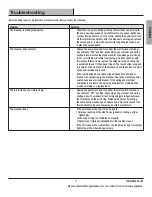
Troubleshooting
. . . . . . . . . . . . . . . . . . . . . . . . . . . . . . . . . .
11
Service Parts
. . . . . . . . . . . . . . . . . . . . . . . . . . . . . . . . . . . . .
12
Safety Information
READ ALL INSTRUCTIONS BEFORE USING THE
APPLIANCE
IMPORTANT SAFETY INSTRUCTIONS
INSTRUCTIONS PERTAINING TO A RISK OF FIRE, ELECTRIC SHOCK,
OR INJURY TO PERSONS . WARNING - WHEN USING ELECTRICAL
APPLIANCES, BASIC PRECAUTIONS SHOULD ALWAYS BE FOLLOWED,
INCLUDING THE FOLLOWING:
NOTE:
This food waste disposer has been designed to operate on 220-240 V AC,
50/60 Hz exclusively. Using any other voltage or Hz adversely affects its
performance.
1 . Inspect your unit before proceeding . Once you unpack your
unit, check for chips, scratches, cracks, dents or scuff marks .
If any damage is noticed, do not install . Please return to the
place of purchase .
2 . Use this unit only in the manner intended by the manufacturer .
If you have any questions, contact the manufacturer .
3 . Installation work and plumbing must be done by qualified
person(s) in accordance with all applicable codes and
standards .
4 . When attempting to loosen an obstruction in a waste disposer,
use a long wooden object such as a wooden spoon or the
wooden handle of a broom or a mop .
5 . When attempting to remove objects from a waste disposer, use
long-handled tongs or pliers . If the disposer is magnetically
actuated, non-magnetic tools should be used .
6 . When not operating a disposer, leave the drain cover (stopper)
in place to reduce the risk of objects falling into the disposer .
SAVE THESE INSTRUCTIONS
WARNING:
Do not put fingers or hands into a waste disposer.
WARNING:
Turn the power switch to the off position before attempting
to unblock or remove an object from the disposer .
WARNING:
Do not operate disposer unless splash guard is in place .
WARNING:
To reduce the risk of injury by materials that may be
expelled by a waste disposer, do not put the following into a disposer:
clam or oyster shells; caustic drain cleaners or similar products; glass,
china or plastic; large whole bones; metal, such as bottle caps, tin
cans, aluminum foil or utensils; hot grease or other hot liquids; whole
cornhusks .
WARNING:
To reduce the risk of injury, close supervision is necessary
when the appliance is used near children .
WARNING:
This food waste disposer has been designed to operate on
220-240 V AC, 50/60 Hz, 2 .7A and 560W .
WARNING:
This appliance is not intended for use by persons
(including children) with reduced physical, sensory or mental capabilities,
or lack of experience and knowledge, unless they are under supervision
or given instruction concerning use of the applicance by a person
responsible for their safety . Children should be supervised to ensure they
do not play with the appliance .
WARNING:
If the supply cord is damaged, it must be replaced by the
manufacturer, its service agent or similarly qualified persons in order to
avoid a hazard .
WARNING:
Do not use this appliance to dispose of hard materials such
as glass and metal .
WARNING:
Switch off or unplug the appliance before attempting
to free a jammed rotor with an implement .


