


3
Vehicles without tow hooks
:
a.
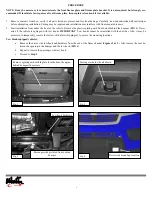
Cut out the indented area in both sides of the plastic bumper to clear the brackets as pictured in
Figures 4 & 5
, or
cut along the rectangular cut line molded into the pocket.
3. Select the driver side mounting bracket. Insert the bracket through the opening in the bumper and up to the tow hook
mounting holes
(FIG 6).
Trim the plastic as required for bracket clearance.
NOTE
: Bumper removal not necessary.
4. Line up the (2) holes in the bracket with the (2) holes in the frame for the tow hook. Select (2) M12-1.75X80 hex head cap
screws and (2) 12mm flat washers. Insert the bolts with washers through the bracket and the (2) holes through the frame.
Secure bolts with (2) 12mm serrated flange nuts. Do not fully tighten hardware at this time. Refer to
Figure 7
.
5. Repeat
steps 3 & 4
to install the passenger side mounting bracket.
6. With assistance, hold the bull bar up in position on the outside of the mounting brackets. Bolt the bull bar to the brackets
with (4) M10-1.50X30 hex head cap screws, (4) M10 bellville washers, and (4) M10-1.50 serrated flange nuts. See
Figure
7
. Do not tighten hardware at this time.
7. Check the bull bar alignment with the vehicle and for clearance between the bull bar and the bumper. Adjust as required
then fully tighten all hardware at this time. See
Figure 8
for a picture of bull bar mounted on vehicle.
8. Reinstall the plastic splash guard or skid plate removed in
Step 1 (FIG 1
).
9. Do periodic inspections to the installation to make sure that all hardware is secure and tight.
Front
Example of “no hook” model. Cut out sugges-
tion. (Passenger side shown)
Fig. 5
Tow hook mounting holes
Fig. 6
Front


