background image


Operation 

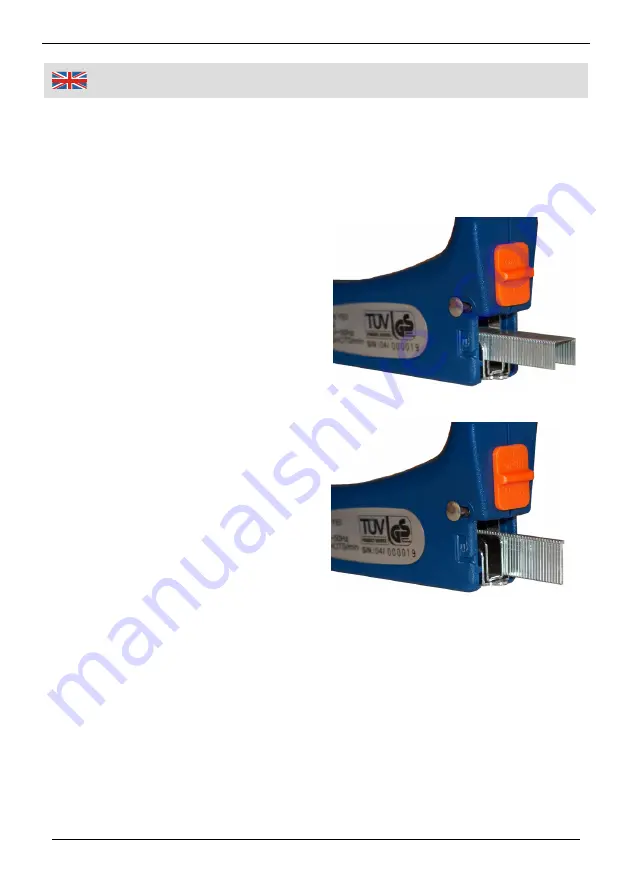
Inserting the Staples resp. Nails 

This stapler can drive staples 8 – 16 mm long and 10 mm wide and T-nails 8 – 
16 mm long. You can find a more precise list on page 8. 
Please keep in mind that staples and nails must be suited to the material they 
are used in. The harder the material is, the shorter the staples or nails should 
be. 

1.  Unplug the unit before inserting 

staples. 

2.  Unlock the lock piece (4) and lift it 

out of the unit complete with spring, 
guide rod and follower.  

3.  Slide a clip of staples or nails into 

the guide bars of the channel. Nails 
can be inserted either into the left 
or right rail, just keep in mid that the 
nails will be driven out either on the 
left ort he right side.  

4.  Slide the follower back into the 

channel and lock the lock piece 
back (4) in position. 


Clearing Stoppages 

1.  Pull the power plug. 
2.  Pull out the entire follower system and remove all staples or nails which 

are not jammed in place. Then set the latch (5) to the position OPEN. 

3.  Slide the entire magazine down and rotate it out of the unit. Remove any 

staples which are jammed in place. If necessary carefully use pliers. 

4.  Turn the magazine back into place and secure it by setting the latch to the 

position LOCK. 

Inserting Staples 

Inserting Nails 

Summary of Contents for 52 81 33

Page 1: ...Westfalia Bedienungsanleitung Nr 105785 ...

Page 2: ...Elektrotacker N 702 Artikel Nr 52 81 33 Electric Staple Gun N 702 Article No 52 81 33 Bedienungsanleitung Instruction Manual ...

Page 3: ...r for you to handle the device and help prevent misunderstandings and possible damage or injury Dieses Gerät ist der ideale Helfer beim Innenausbau Dekorationsarbeiten im Möbelbau bei Polsterarbeiten und vielen anderen Tätigkeiten Mit diesem Gerät können Sie Klammern und Nägel schnell und sicher verarbeiten Ergonomische Formgebung und geringer Rückschlag erlauben ermüdungs freies Arbeiten Bitte ma...

Page 4: ...III Übersicht Overview 2 3 4 5 1 ...

Page 5: ...IV 1 Sicherungszunge Safety Tongue 2 Sicherungsschieber Safety Rod 3 Abzug Trigger 4 Verschluss Lock Piece 5 Riegel Latch Übersicht Overview ...

Page 6: ...age 7 Cleaning and Maintenance Page 7 Technical Data Page 8 Sicherheitshinweise Seite 2 Einsetzen der Klammern bzw Nägel Seite 3 Entfernen von verklemmten Klammern oder Nägel Seite 3 Arbeiten mit dem Gerät Seite 4 Wartung Und Reinigung Seite 4 Technische Daten Seite 8 Table of Contents Inhaltsverzeichnis ...

Page 7: ...ng beheben Verwenden Sie das Gerät nicht wenn es nicht korrekt arbeitet oder durch Herunterfallen beschädigt wurde Schützen Sie das Gerät von Nässe Stellen Sie sicher dass sich das Netzkabel nirgendwo verfangen kann Knicken Sie das Netzkabel nicht und wickeln Sie es nicht um das Gerät Benutzen Sie das Kabel nicht zum Tragen des Elektrotackers Beim Herausziehen des Steckers aus der Steckdose erfass...

Page 8: ...Haken Sie den Verschluss 4 aus und ziehen Sie ihn komplett mit Feder Zubringer und Führung aus dem Gerät 3 Schieben Sie einem Streifen Klammern oder Nägel in die Füh rung Nägel können nach belieben in die rechte oder linke Führung eingelegt werden Beachten Sie nur beim Arbeiten dass der Nagel entweder rechts oder links ausge stoßen wird 4 Führen Sie dann den Zubringer in die Führung ein und haken ...

Page 9: ...ngedrückt wird 3 Betätigen Sie den Abzug 3 und Klammer oder Nagel werden in das Werkstück eingetrieben Wartung und Reinigung 1 Halten Sie das Magazin und alle Führungen frei von Fremdkörpern 2 Ziehen Sie vor allen Wartungs und Reinigungsarbeiten den Netzstecker 3 Tauchen Sie das Gerät nicht in Flüssigkeiten und verwenden Sie zum Reinigen nur ein trockenes eventuell auch leicht feuchtes Tuch 4 Der ...

Page 10: ...ction If the unit becomes clogged unplug first and remove the obstacle Do not continue using the unit if it was damaged or the unit was dropped Protect the unit from moisture Do not jam the cord or pull cord around edges Do not pinch the power cord in any way Never move the unit by pulling the cord When unplugging always grasp the plug itself to unplug Do not pull the cord to unplug Do not wind th...

Page 11: ...o the guide bars of the channel Nails can be inserted either into the left or right rail just keep in mid that the nails will be driven out either on the left ort he right side 4 Slide the follower back into the channel and lock the lock piece back 4 in position Clearing Stoppages 1 Pull the power plug 2 Pull out the entire follower system and remove all staples or nails which are not jammed in pl...

Page 12: ...ts 2 Pull the power plug before undertaking any cleaning or maintenance work 3 Do not submerge the unit in liquids of any kind and only use a dry cloth to clean it At the utmost use a slightly wet cloth 4 The staple gun does not contain any parts serviceable by you except for the troubleshooting described above 5 Do not disassemble the unit and do not attempt to repair it yourself In case of a mal...

Page 13: ...tection Class Schalldruckpegel 83 dB A Sound Pressure Level Schallleistungspegel 90 dB A Sound Power Level Hand Arm Vibration 2 6 m s2 Hand Arm Vibration Kurzzeitbetrieb S2 30 Min Short Time Operation Klammern ARROW JT 21 ESCO 530 KWB 053 AEG 312308 10 BOSCH 1609200365 7 JANN YEI 1008F 1010F 1012F 1014F 1016F Staples Nägel ESCO 300 Novus J JANN YEI T8 T10 T12 T14 T16 Nails ...

Page 14: ...N 50144 2 16 2003 Hagen den 18 November 2009 Thomas Klingbeil Qualitätsbeauftragter We the Westfalia Werkzeugcompany GmbH Werkzeugstraße 1 D 58093 Hagen declare by our own responsibility that the product Electric Staple Gun N 702 Article No 52 81 33 is according to the basic requirements which are defined in the European Directives 2004 108 EC Electromagnetic Compatibility EMC 2006 42 EC Machinery...

Page 15: ... 01 Fax 0870 0 66 41 48 Internet www westfalia versand ch Internet www westfalia net Werter Kunde bitte helfen Sie mit Abfall zu vermeiden Sollten Sie sich einmal von diesem Artikel trennen wollen so bedenken Sie bitte dass viele seiner Komponenten aus wertvollen Rohstoffen bestehen und wiederverwertet werden können Entsorgen Sie ihn daher nicht in die Mülltonne sondern führen Sie ihn bitte Ihrer ...

Reviews:

Related manuals for 52 81 33