background image


WESTELL.COM 

© 2016 Westell Technologies 


          20 April 2016 Doc. No. 030-300736 rB 

1.877.844.4274 


     Page 23 of 50 


5.4


Mounting the Repeater 

Follow the instructions in this section to mount the repeater on a wall. 


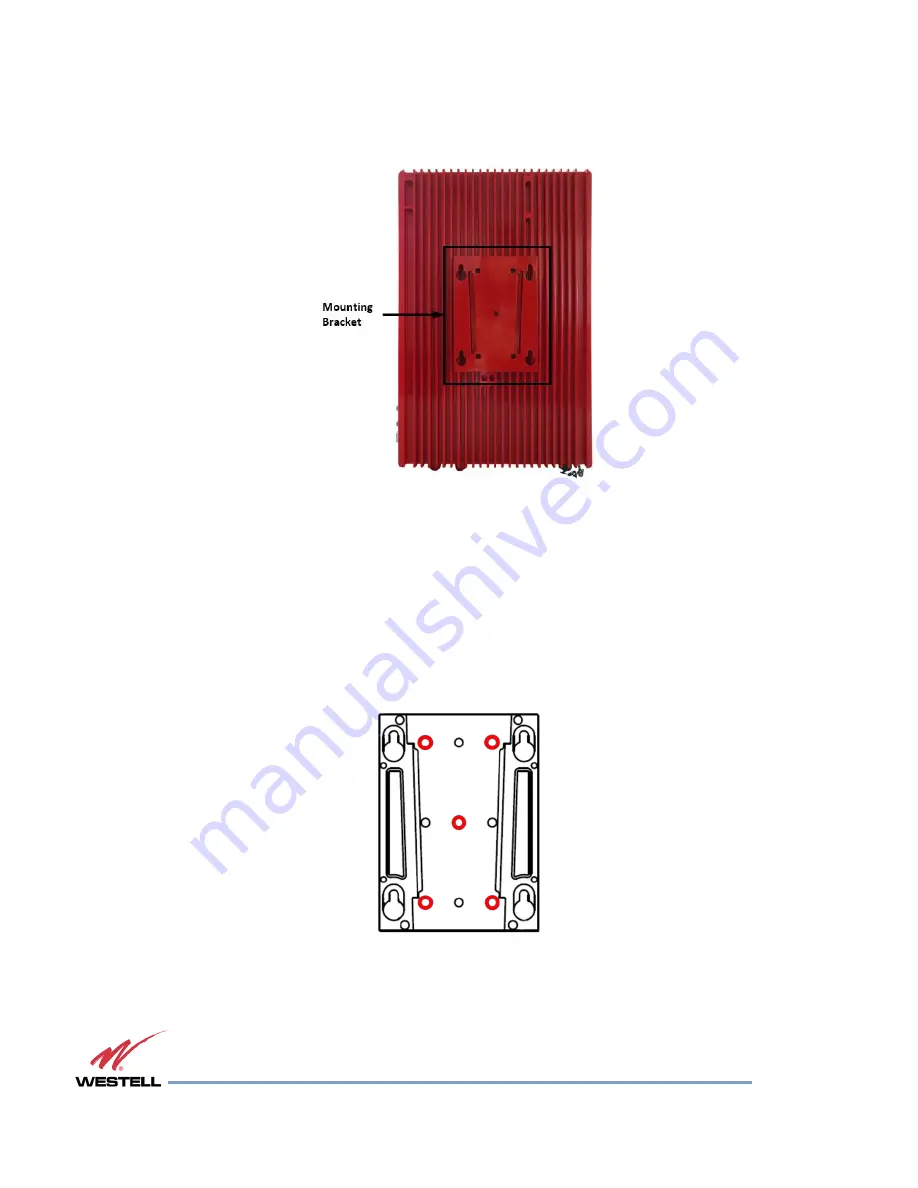
Figure 5-1: Repeater Mounting Bracket Mounted on Repeater Rear 


1.


If the mounting bracket is attached to the repeater, remove it. 

a.


Grasp the top of the mounting bracket and push firmly down to slide the bracket off 
the repeater.  

2.


Using the bracket as a template, mark the five locations for the wall anchoring system screws, 
Figure 5-2. 


Figure 5-2: Mounting Bracket with Mounting Screw Holes Highlighted in Red 


3.


Move the mounting bracket and drill the mounting holes at the marks in the wall. 

Summary of Contents for PS51080

Page 1: ...PRODUCT MANUAL WESTELL COM Westell Technologies 030 300736 rB PS51080 Public Safety Repeater User s Guide...

Page 2: ...ained from the products described herein or the infringement by such products of any property rights of any persons Use or application of such information or statements is at the users sole risk witho...

Page 3: ...Users 10 1 2 Application 10 1 2 1 Product Registration Information 10 1 3 Safety Guidelines 11 1 3 1 Important Safety Information 12 1 4 FCC Part 90 Signal Boosters 12 2 Product Overview 13 2 1 Produ...

Page 4: ...pendix A Important Product Information 48 A 1 Registration Number 48 A 2 Internal Power Supply 48 Appendix B Acronyms and Abbreviations 49 TABLE OF FIGURES Figure 1 1 Product Registration 10 Figure 4...

Page 5: ...9 File Upload Begins 46 Figure 6 10 Upgrade Complete 46 Figure 6 11 Verify New Software Version 47 Figure 7 1 IP Settings 29 Figure 7 2 Run the Software 30 Figure 7 3 Status Page after clicking conne...

Page 6: ...nts Purpose This manual contains information and procedures for the operation of the Westell PS51080 Public Safety Repeater Changes that occur after the publishing date may be incorporated by a comple...

Page 7: ...formation about GUI items alarm status and alarm relay Chapter 4 Product Appearance Provides physical specifications photographs and information about the external and internal repeater configuration...

Page 8: ...o hardware or software and actions that could result in equipment failure IMPORTANT Additional important information that the user must be aware of but is not related to a hazard NOTE Additional infor...

Page 9: ...duct in the presence of flammable gases or fumes Lightning danger Do not install or make adjustments to this unit during an electrical storm WARNING Changes and Modifications not expressly approved by...

Page 10: ...de service interruptions This document assumes the technician or engineer understands the basic principles and functionality involved with repeater and in building systems This guide has been written...

Page 11: ...tomer s failure to comply with these requirements Grounding This repeater is designed to operate at 110VAC 0 5A maximum current and must always be operated with the ground wire properly connected Expl...

Page 12: ...gulations section 1 1310 Limits for general population uncontrolled exposure Outdoor antenna must be positioned so that under normal conditions personnel cannot approach closer than 120 cm 4 ft A dire...

Page 13: ...on The repeater amplifies both the uplink mobile to base and downlink base to mobile signals thus facilitating communications to and from the intended wireless infrastructure With a maximum total of 8...

Page 14: ...2 Table 2 2 Optional Accessories Quantity Description 1 AC Power Cable 5 feet 10 inches 1 Ethernet cable 6 feet 1 inch 1 Alarm Relay Serial Cable 4 feet 9 inches 1 USB Drive containing the User Manua...

Page 15: ...Sub Band1 851 861MHz Sub Band2 Frequency selectivity UL DL 40dBc 2MHz Gain UL DL 80dB 1 0dB Sub band balance UL DL 1 0dB Gain adjustment range UL DL 30dB 30dB 1 dB 1dB step AGC Automatic Gain Control...

Page 16: ...pecifications Notes Dimensions 279 x 425 958 x 81 28 mm L x H x D 11 x 16 77 x 3 2 in L x H x D Weight 7 7 kg 17 lbs Connectors Link service antenna ports N female Power Connectors IEC320 Frame ground...

Page 17: ...D Lock Detector Isolation UL DL shutdown DC Fail Relay Status UL DL VSWR Manual Amp Displays alarm status UL DL Shutdown Setting 23dBm to 30dBm Use to set the peak power shutdown level UL DL Gain Sett...

Page 18: ...g Checking isolation data Solidly lit Off Off Normal condition at start up Solidly lit Solidly lit Solid Insufficient data isolation exists between the DL and UL antenna Remove power and re install th...

Page 19: ...Either method in Table 3 7 would trigger the following alarms Antenna Malfunction PA Failure and Power Failure Table 3 8 Alarm Relay Connections Shutdown Signal Relay Status Notes Normally Open NO pi...

Page 20: ...WESTELL COM 2016 Westell Technologies 20 April 2016 Doc No 030 300736 rB 1 877 844 4274 Page 20 of 50 4 Product Appearance 4 1 External Configuration Figure 4 1 External Product Configuration...

Page 21: ...to the 1 3 Safety Guidelines section for proper antenna selection and installation To avoid serious injury death and or damage to the repeater do not install donor or server antennas near overhead pow...

Page 22: ...less stable and it is more likely to encounter adjacent channel interference When possible shield the rear of a donor antenna by locating it so that any HVAC units and or penthouse structures are beh...

Page 23: ...d on Repeater Rear 1 If the mounting bracket is attached to the repeater remove it a Grasp the top of the mounting bracket and push firmly down to slide the bracket off the repeater 2 Using the bracke...

Page 24: ...ur handset uses but that may not always be the case If cables and alignment are acceptable and a problem persists use a spectrum analyzer to examine the signal environment in which the unit is operati...

Page 25: ...our system you will need to build one 1 Strip the outer serial cable insulation back to expose the inner conductors Figure 5 4 Only the red black and brown conductors will be used You may cut the rema...

Page 26: ...o the Alarm Relay connector on the PS51080 Figure 5 6 Be sure to fasten the connector screws securely Figure 5 6 Alarm Relay Cable Connected to Repeater 5 Connect the stripped end of the serial cable...

Page 27: ...ct the PS51080 Public Safety Repeater to an AC power source 1 Remove the cap from the AC 110V power connector on the repeater Figure 5 7 Figure 5 7 Remove the Power Connector Cap 2 Connect the power c...

Page 28: ...rB 1 877 844 4274 Page 28 of 50 Figure 5 9 Power Cable Connected to Repeater 3 Screw the connector on securely 4 When the repeater is properly set up and ready to have power applied plug the other end...

Page 29: ...s 192 168 1 150 To connect directly to the repeater from a laptop or PC with a crossover CAT 5E cable or over a LAN change the TCP IP settings on your computer to enable a connection to a host that ha...

Page 30: ...20 April 2016 Doc No 030 300736 rB 1 877 844 4274 Page 30 of 50 3 Navigate to the location where the PS51080 exe software file is saved Figure 6 2 and double click to run it The Status page Figure 6 3...

Page 31: ...ess Field editable when Connect button is displayed 2 Connect Disconnect toggle button 3 TX RX LED indicates the state of communication with the repeater and GUI 4 Verify that the IP address in the le...

Page 32: ...Page Figure 6 4 Status Mode Page continued Item Section 1 System Not User Configurable Informational Only Manufacturer Displays the repeater s manufacturer Repeater Type Displays repeater model S W Ve...

Page 33: ...tput level of the 700 MHz range Gain dB 800 MHz Displays the downlink gain in the 800 MHz range 800 MHz Output dBm Displays the output level of the 800 MHz range AGC Level dBm Sets the unit s maximum...

Page 34: ...ut level AGC Level dBm Sets the unit s maximum AGC output value HPA This allows the user to toggle the uplink High Power Amplifier on or off 6 Isolation Isolation Value Measured isolation value air in...

Page 35: ...normal red alarm Shutdown DL UL Display alarm green normal red alarm DC Fail Display alarm green normal red alarm Relay Status Display alarm green normal red alarm DL VSWR DL Path VSWR check green No...

Page 36: ...button text to and displays the Control Mode page Figure 6 5 described in this section Figure 6 5 Control Mode Page Item Section 1 700 MHz Uplink Start Frequency Displays the 700 MHz uplink start freq...

Page 37: ...on On Off AGC Level dBm Sets the unit s maximum ALC output value HPA Downlink HPA On Off 3 Shutdown Allows the shut down level to be set Downlink Shutdown Allows the downlink shut down level to be set...

Page 38: ...tart frequency End Frequency Displays the sub band 1 downlink end frequency Sub band 2 Uplink Start Frequency Displays the sub band 2 uplink start frequency End Frequency Displays the sub band 2 uplin...

Page 39: ...eding the specified maximum output level AGC Control Auto Level Control Function On Off AGC Level dBm Sets the unit s maximum AGC output value HPA Uplink HPA On Off 7 Alarm PLL LD Display alarm green...

Page 40: ...Off Do not measure the isolation Isolation Recheck The isolation check can be performed with the RF on or off Isolation Attenuation This allows control of the isolation attenuation After isolation che...

Page 41: ...re 1 Insert the included media into your computer and locate the Setup exe file Figure 7 1 2 Double click the file to begin software installation Figure 7 1 Figure 7 1 Setup exe file 3 Navigate to the...

Page 42: ...1 877 844 4274 Page 42 of 50 4 When the window shown in Figure 7 3 displays click Next The progress window Figure 7 4 displays Figure 7 3 Click Next to Begin Installation Figure 7 4 Installation Prog...

Page 43: ...WESTELL COM 2016 Westell Technologies 20 April 2016 Doc No 030 300736 rB 1 877 844 4274 Page 43 of 50 Figure 7 5 Installation Complete...

Page 44: ...tton to display the Control page 2 Click in the IP menu located on the left side of the Control page The Firmware Upgrade progress window Figure 7 6 displays Figure 7 6 Firmware Upgrade Progress Windo...

Page 45: ...elect the desired version file 6 Click in the Specify INI File to Open browser window Figure 7 7 The Firmware Version Check dialog window displays Figure 7 8 Figure 7 8 Firmware Version Check 7 Click...

Page 46: ...ete displays in the Firmware Version Check window Figure 7 10 the upgrade is complete Figure 7 10 Upgrade Complete 9 Click located at the bottom left corner of the screen to close the PS51080 software...

Page 47: ...echnologies 20 April 2016 Doc No 030 300736 rB 1 877 844 4274 Page 47 of 50 11 Verify that the new version of software is indicated in the System section of the Control page Figure 7 11 Figure 7 11 Ve...

Page 48: ...ril 2016 Doc No 030 300736 rB 1 877 844 4274 Page 48 of 50 Appendix A Important Product Information A 1 Registration Number FCC NVRCSIT51080SP78 A 2 Internal Power Supply The internal power supply for...

Page 49: ...carrier dBi Decibels relative to isotropic dBm The power ratio in decibels dB of the measured power referenced to one milliwatt mW DC Direct Current DL Downlink FCC Federal Communications Commission...

Page 50: ...WESTELL COM Westell Technologies 030 300736 rB...

Reviews: