Section BXB-19D-20A
030-100689 Rev. A
R
7
1009IARA
installed is at the bottom of the side car cabinet, the second
bolt installed is in the rear wall of the side car cabinet, then
repeat this alternating patterning by installing another
bolt at the bottom, then another at the rear wall, until all
bolts are installed). Tighten all bolts and nuts.
3.5.3
Mounting Conjoined Units on a Concrete Pad
Follow the steps below to mount the conjoined Boxer cabinets
and battery box and on a concrete pad. Order and use the op-
tional A90-BXA-19PT2 Pad Mount Template Kit for mounting
on a concrete pad. Use the numbered steps below and the in-
structions in Figure 9 to mount the conjoined Boxer cabinets
and battery box on a concrete pad.
These instructions are guide-
lines; you must design, dig, mix, pour, and install the concrete pad
per local building codes and practices.
Note the following addi-
tional concerns for concrete pad installations:
S
Verify all required floor, ceiling, and wall cabinet knock-
outs have been removed (see the
KNOCK-OUT NOTE
and
Paragraph 3.5.1
)
, in all cabinets.
S
Select a mounting location that is dry, grade level or high-
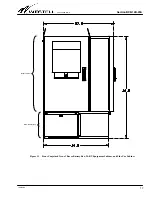
er, and will support a 63" X 52" concrete pad (min). These
dimensions include 1 foot of concrete to extend out from
each side of the conjoined units.
S
If placing the concrete pad next to an adjacent structure,
Westell suggests a 24" distance between the cable access
door panel and any structure to allow for easy cable access.
Verify the cabinet doors can be fully opened.
- CONCRETE PAD MOUNT NOTE -
For concrete pad mounting, prepare and pour the concrete pad
(and install the accompanying conduit or ductwork) per local
codes and company practices, insert anchors in the wet concrete
precisely where holes at the bottom of the battery box are located
(holes are 0.344" in diameter), and allow the concrete to dry,
prior to mounting the Boxer units. Westell recommends using the
pad mount kit to facilitate precise anchor placement.
- CONCRETE PAD HEIGHT NOTE -
The pad location must be grade-level or above - it must not be be-
low grade-level. The location must be able to support the com-
bined weight of the conjoined Boxer cabinets/box and all internal
equipment, including batteries. Always follow local installation
codes, procedures, and practices.
Concrete Pad Mounting Steps
1.
Determine exact concrete pad location.
Select and prepare
the location for the concrete pad, per company practice
and local codes. When determining the size of the pad, al-
low for 12" of concrete to extend out from
each
side of the
battery box (so the overall pad length and width measure-
ments are 2 feet wider than the battery box).
2.
Prepare template.
Perform Steps 1-3 of Figure 9.
3.
Prepare the pad for conduit or ductwork.
Dig and frame
the pad location per company practice. Once the pad is
framed for concrete, but before pouring gravel or con-
crete, install any cable conduit or ductwork that is desired
to be routed through the concrete and which will enter the
battery box from the bottom.
4.
Prepare the pad for concrete (add gravel).
Fill and com-
pact the pad site with gravel, per company practice.
5.
Prepare and join all Boxer units.
If not already done, per-
form the steps in Paragraph 3.5.2 to open all Boxer units,
to locate the bag of hardware in the battery box, to remove
knock-outs, and to join the units.
6.
Pour concrete, place the template, then set insulator gas-
ket and battery box on dry concrete.
Perform Steps 4-7 of
Figure 9 to pour the concrete, to place the template (with
anchors attached) on the wet concrete, and once the con-
crete dries, to place the insulator gasket and conjoined
Boxer units on the dry cured concrete.
7.
Test installation firmness.
Test the installation by attempt-
ing to move the conjoined units. Correct any looseness.
8.
Determine next step.
Proceed to Paragraph 3.6, 3.7, or 3.8
to make ground connections, to install conduit, ductwork,
fittings, and or cables, and make battery connections.
- GROUNDING NOTE -
Always follow local safety precautions and standard operating
procedures for grounding the equipment when installing, up-
grading, repairing or maintaining equipment. Any instructions or
information contained herein is subordinate to local codes, oper-
ating procedures or practices.
3.6
Making Ground Connections
As the battery box is designed to be mounted with a Boxer
equipment cabinet and side car cabinet, ground lugs and post
are not provided in the battery box itself, but instead provided
in the cabinets mounted above it. However, earth ground pro-
visions and connections must be considered when installing the
conjoined units, and earth ground should be brought up
through the bottom of the battery box similar to all other cable-
type access (such as electrical and signaling). Copper ground
lugs that accommodate #6 to #14 gauge wire are provided on
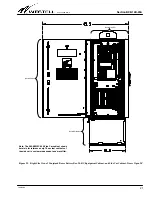
a ground plate on the interior floor of the Boxer equipment
cabinet (see Figure 10). Also on the plate are eight sets of bond
posts. One set of posts should be populated with a ground strap
to the side car cabinet.
To ground the battery box to the equipment cabinet’s ground
plate, two bonds straps (provided) must be installed, as ex-
plained in the steps that follow.
1.
Locate the bond straps.
Find the bond straps that are pro-
vided in the kit shipped with the battery box. One bond
strap is to be installed inside the battery box, and one is
installed in the cabinet, at the bottom. Note that each ring
end of each strap has a hole in it, and also note that one
hole is larger than the other.
2.
Install small end of the cabinet bond strap.
Install the ring
end with the smaller hole around a post on the Boxer
equipment cabinet’s ground plate.


