background image


15

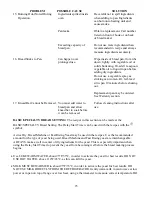
If bread is not removed immediately after the cycle is complete, the bread maker will 
automatically go into 

Keep Warm

 mode for up to 3 hours. The ON light will remain lit 

during this keep warm period as a reminder. When removing the bread pan during the 
keep warm period, always use potholders or oven mitt, as pan will be hot. Turn bread 
maker off by holding START/STOP button down until ON light goes out. Unplug cord 
from outlet after use. If the bread maker is not turned off during this 3-hour keep warm 
period, it will automatically shut itself off and signal light will go out. Unplug cord from 
electrical outlet. 
 

CAUTION: 

To avoid burn injury, do not put hands inside oven chamber or touch the 

heating unit after completion of the bake cycle, as these surfaces are hot. 


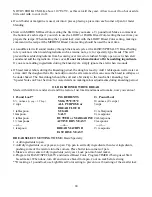
HOW TO USE DOUGH SETTING: 

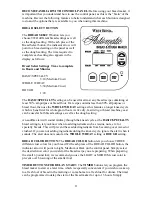
The DOUGH setting will prepare dough for you 

for hand shaping/forming and baking in your own oven. Use this setting when you wish 
to make dinner rolls, cinnamon rolls, donuts, bread sticks or even traditional shaped 
loaves of bread. The Delay Start Timer CAN be used with the DOUGH setting, however, 
the Bread Color button CANNOT be used, as the dough will not be baked. 
 
Follow these steps for using the DOUGH setting: 
 

1.Place knead bar on shaft in bottom of bread pan, matching the opening of the knead bar 

with the shape of the shaft. Make sure knead bar is pushed down onto shaft and the shaft 
area is clean. 

 
2.Add ingredients to pan in order listed in recipe, MAKING SURE to add any liquid 

ingredients first, followed by dry ingredients, then butter or margarine and lastly the 
yeast. After dry ingredients are added to the pan, tap pan several times to settle the 
ingredients, then push some of the flour mixture into the corners of pan. This prevents 
liquid from seeping up from the corners. Make slight well in center of flour and add the 
yeast to well. This is especially important when using the Delay Start Timer to prevent 
the yeast from getting wet.  

 
3.Lock bread pan into bread maker, turning the pan counterclockwise to lock in place. Pan 

must be locked in place for the bread maker to function properly. Make sure handle of 
pan is down, then close cover.  

 
4.Plug bread maker cord into a 120 volt AC electrical outlet ONLY. Press the Bread Select 

button until arrow indicator points to DOUGH on control. The process time of 1:20 (1 
hour, 20 minutes) will appear in display. If you pass by the DOUGH setting, continue to 
press the Bread Select button until DOUGH is reached. Program Delay Start Timer if 
desired. See instructions below. 
 

After the bread maker has been turned on, the programmed setting cannot be 
changed. If you wish to change settings, hold START/STOP button down until red 
ON light goes out. Then program control as desired and turn back on.  
 

5. Press START/STOP button once to turn bread maker on. When turned on, the red light 

under the word ON will glow and the colon between 1:20 or programmed time will begin 

Summary of Contents for L4805

Page 1: ...aroma of bread baking What a delight Please be sure to read the information in this booklet very thoroughly and understand how to operate your bread maker This will ensure loaf after loaf of great ta...

Page 2: ...ervision If you must use a longer cord set or an extension cord when using the bread maker the cord must be arranged so it will not drape or hang over the edge of a countertop or tabletop where it can...

Page 3: ...in display and audible alert will sound Turn bread maker off by holding START STOP Button down until red ON light goes out about 3 seconds Unlock pan using hot pads or oven mitt and shake bread out of...

Page 4: ...being prepared 3 DO NOT IMMERSE base of bread pan in water or other liquid as this can damage the bearing on the bottom of the pan that turns the knead bar See Cleaning Section in this booklet for fu...

Page 5: ...rred flour to use in your bread maker as it contains more gluten forming proteins than all purpose flour and will provide tall well formed loaves with good structure Several different brands of bread...

Page 6: ...eetener such as honey or molasses the total amount of liquid in the recipe will need to be reduced slightly by the same measurement of liquid sweetener used A special tip when measuring sticky liquid...

Page 7: ...in making bread It inhibits the yeast growth while strengthening the gluten structure to make the dough more elastic plus it adds flavor Use ordinary table salt in your bread maker Using too little or...

Page 8: ...marking not above or below A looks close enough measurement can spell disaster in bread making SPECIAL TIP Place liquid measuring cup on inside of kitchen cabinet for easier measuring at eye level 2 A...

Page 9: ...to use Simply measure all dry ingredients in recipes EXCEPT YEAST into a plastic bag and close with a twist tie Label as to the type of bread and size loaf When ready to use simply add liquid ingredi...

Page 10: ...10...
Page 11: ...ry fast rising or bread machine yeast can be used at both bread settings as well as the dough setting An audible alert will sound midway through the knead cycle at the BASIC SPECIALTY bread setting to...

Page 12: ...o mix the ingredients and proceed through the cycles until the bread is done When the process time elapses 0 00 will appear in the display and an audible alert will sound to let you know the bread is...

Page 13: ...r bread maker is now ready to use HOW TO USE BASIC STEPS IN MAKING BREAD 1 Place knead bar on shaft in bottom of bread pan matching the opening of the knead bar with the shape of the shaft Make sure k...

Page 14: ...is turned on This is the time to add ingredients such as raisins fruit nuts or cheese as directed in the recipe Simply open the cover and add the ingredients to the dough as it is being kneaded DO NOT...

Page 15: ...ed down onto shaft and the shaft area is clean 2 Add ingredients to pan in order listed in recipe MAKING SURE to add any liquid ingredients first followed by dry ingredients then butter or margarine a...

Page 16: ...Basic Specialty Setting Medium crust color and the process time of 3 10 appears in the display The time you are starting the bread maker is 9 00 pm and you wish to have the bread finished at 7 00 am w...

Page 17: ...ter to cover the knead bar Set pan in a dry sink or on a potholder and allow pan and knead bar to soak for 5 to 10 minutes or until knead bar can be lifted off center shaft The knead bar must be allow...

Page 18: ...ad settings You may hear faint clicking sounds during the rest period which is normal and indicates the dough maker is working properly in keeping the dough warm When set at the DOUGH setting the rest...

Page 19: ...ugh is then allowed to rise again but for a shorter period of time STIR DOWN After the shorter rise time the dough is again stirred down by the knead bar to remove excess gas and also to shape the dou...

Page 20: ...iquid by 1 tablespoon and reduce yeast by to teaspoon May be caused from Make recommended adjustment baking in high altitude for high altitude baking by reducing yeast by teaspoon and reducing liquid...

Page 21: ...ed Sugar or other Assemble ingredients as listed in sweetener omitted recipe If using timer yeast got Push dry ingredients into corners wet before bread making of pan and make slight well in process s...

Page 22: ...e too hot Allow bread to cool on rack at least very sticky 15 to 30 minutes before slicing to release steam Not using proper knife Use a good bread knife or electric knife 12 Open Coarse Holey texture...

Page 23: ...eaning instructions after bread pan and allow use knead bar to soak before it can be removed BASIC SPECIALTY BREAD SETTING The recipes in this section can be made at the BASIC SPECIALTY Bread Setting...

Page 24: ...ablespoon warm water at a time until the dough softens Do not add too much extra water as this can cause the bread to collapse or be under baked The bread dough should be soft and a bit sticky to the...

Page 25: ...IC SPECIALTY and desired Bread Color Program TIMER if being used Start bread maker When done turn off and remove bread from pan Cool on rack before slicing If making a 1 pound loaf use Light Bread Col...

Page 26: ...y ingredients except yeast to pan Tap pan to settle dry ingredients then level ingredients pushing some of the mixture into the corners Place butter into corners of pan 7 Make a well in center of dry...

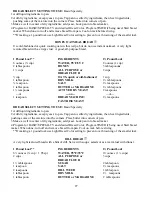
Page 27: ...espoons teaspoon SALT 1 teaspoons 1 tablespoon BUTTER or MARGARINE 1 tablespoons 1 teaspoons ACTIVE DRY YEAST 2 teaspoons or or or 1 teaspoon BREAD MACHINE 1 teaspoons FAST RISE YEAST BREAD SELECT SET...

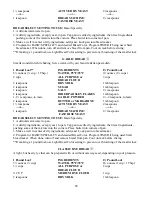
Page 28: ...on 1 teaspoon SALT 1 teaspoons 2 teaspoons DRIED PARSLEY FLAKES 1 tablespoon 1 1 teaspoons to taste GARLIC POWDER 1 2 teaspoons to taste 2 teaspoons BUTTER or MARGARINE 1 tablespoon 1 teaspoons ACTIVE...

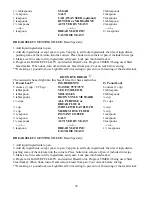
Page 29: ...into this bread Great for ham sandwiches 1 Pound Loaf INGREDIENTS 1 Pound Loaf 5 ounces cup 2 Tbsp WATER 95 F 35 C 8 ounces 1 cup 1 tablespoon VEGETABLE OIL 1 tablespoon 1 tablespoon MOLASSES 2 tables...

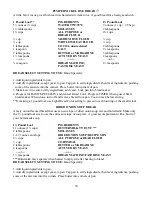
Page 30: ...BASIC SPECIALTY and desired Bread Color Program TIMER if being used Start bread maker When done turn off and remove bread from pan Cool on rack before slicing If making a 1 pound loaf use Light Bread...

Page 31: ...1 teaspoon BREAD MACHINE 1 teaspoons FAST RISE YEAST BREAD SELECT SETTING TO USE Basic Specialty 1 Add liquid ingredients to pan 2 Add dry ingredients except yeast to pan Tap pan to settle dry ingredi...

Page 32: ...be 1 Pound Loaf INGREDIENTS 1 pound Loaf 8 ounces 1 cup WATER 95 F 35 C 10 ounces 1 cups 1 Tbsp 2 cups ALL PURPOSE or 3 cups BREAD FLOUR 1 teaspoon SUGAR 1 teaspoons teaspoon SALT 1 teaspoons 1 teaspo...

Page 33: ...ter of dry ingredients add yeast Lock pan into bread maker 4 Program for BASIC SPECIALTY and desired Bread Color Program TIMER if being used Start bread maker When done turn off and remove bread from...

Page 34: ...teaspoon SALT 1 teaspoons 1 tablespoon GRATED PARMESAN 2 tablespoons CHEESE 1 teaspoons ITALIAN SEASONING 2 teaspoons 1 tablespoons BUTTER or MARGARINE 2 tablespoons 1 teaspoons ACTIVE DRY YEAST 1 tea...

Page 35: ...t Bread Color setting to prevent over browning of the smaller loaf SPECIAL TIP To make raisin bread over night or without being present to add the raisins and nuts follow Steps 1 3 above Then place ra...

Page 36: ...adds a delightful flavor to this bread Make sure the shredded cheese is frozen when added at the alert for best results 1 Pound Loaf INGREDIENTS 1 Pound Loaf 5 ounces cup 2 Tbsp WATER 95 F 35 C 7 ounc...

Page 37: ...h to use the LIGHT or DARK Bread Color setting the next time you prepare the recipe When making the 1 pound loaf start with the LIGHT Bread Color setting making a comment in the recipe if the MEDIUM B...

Page 38: ...nts pushing some of the mixture into corners Place butter into corners of pan 3 Make a well in center of dry ingredients add yeast Lock pan into bread maker 4 Program for WHOLE WHEAT and desired Bread...

Page 39: ...poon 1 teaspoons ACTIVE DRY YEAST 2 teaspoons or or or 1 teaspoon BREAD MACHINE 1 teaspoons FAST RISE YEAST BREAD SELECT SETTING TO USE Whole Wheat 1 Add liquid ingredients to pan 2 Add dry ingredient...

Page 40: ...und Loaf INGREDIENTS 1 Pound Loaf 7 ounces cup 2 Tbsp BUTTERMILK 95 F 35 C 11 ounces 1 cups 2 Tbsp 1 cup WHOLE WHEAT FLOUR 2 cups cup ALL PURPOSE or 1 cup BREAD FLOUR 1 tablespoon BROWN SUGAR packed 2...

Page 41: ...Bread Color setting to prevent over browning of the smaller loaf DOUGH SETTING The recipes in this section can be made at the DOUGH Setting The DOUGH Setting will prepare the dough for you by kneadin...

Page 42: ...d the dough is too dry Add 1 tablespoon warm water at a time until dough softens Do not add too much extra water as the dough can get too sticky The dough should be soft to the touch after kneading Do...

Page 43: ...HOW TO SHAPE DINNER ROLLS USING BASIC AND WHEAT DOUGH RECIPES FOR CRESCENT ROLLS Divide dough into 4 equal pieces Roll each piece into a circle inch thick 1 Cut each circle into 6 pie shaped wedges 2...

Page 44: ...dozen INGREDIENTS 8 ounces 1 cup 1 Tbsp WATER 95 F 35 C 1 cups ALL PURPOSE or BREAD FLOUR 1 cups WHOLE WHEAT FLOUR 2 tablespoons DRY MILK 3 tablespoons BROWN SUGAR packed 1 teaspoon SALT 3 tablespoon...

Page 45: ...for DOUGH Program TIMER if being used Start bread maker When done remove pan from bread maker Place dough onto floured surface Let rest 15 minutes 5 Knead dough about 1 minute Roll dough into a recta...

Page 46: ...r 14 inch pizza Recipe may be doubled to make 2 pizzas INGREDIENTS 6 ounces cup 1 Tbsp WATER 95 F 35 C 2 tablespoons VEGETABLE OIL 2 cups WHOLE WHEAT FLOUR teaspoon SUGAR teaspoon SALT 2 teaspoons ACT...

Page 47: ...being used Start bread maker When done remove pan from bread maker Place dough onto floured surface Let rest 15 minutes 5 Knead dough about 1 minute Roll dough into a rectangle to fit jelly roll pan...

Page 48: ...UGAR teaspoon SALT 3 tablespoons BUTTER 3 teaspoons ACTIVE DRY YEAST or or 2 teaspoons BREAD MACHINE FAST RISE YEAST Cup 1 sticks COLD BUTTER sliced thin 1 EGG WHITE slightly beaten BREAD SELECT SETTI...

Page 49: ...Diagram 4 Place croissants on greased cookie sheet curving ends so they almost touch Brush or spray lightly with water Cover and let rise in warm draft free place 30 to 50 minutes or until double in...

Page 50: ...maker When done remove pan from bread maker Place dough on floured surface Knead dough about 1 minute then let rest 15 minutes 5 Roll dough into a rectangle about 15 x 10 inches Spread cup butter ove...

Page 51: ...Cut with doughnut cutter Leave on counter to rise covered Knead together scraps of dough let rest 10 minutes and re roll Cut into doughnuts Let doughnuts rise covered in warm draft free place for 30...

Page 52: ...ch side Remove with slotted spoon drain then place on a greased baking sheet about 1 inch apart Sprinkle with poppy seeds or sesame seeds if desired or leave plain Bake in preheated 450 F oven for 12...

Page 53: ...aced with a product of equal value which may or may not be identical to the unit being replaced The defective unit must be forwarded to West Bend Housewares transportation prepaid during the warranty...

Reviews: