background image

10

HOW TO FOLD AND MOVE THE TREADMILL

HOW TO FOLD THE TREADMILL FOR STORAGE

Before folding the treadmill, unplug the power cord.

Caution: You must be able to safely lift 45 pounds (20
kg) in order to raise, lower or move the treadmill. 

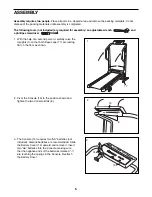
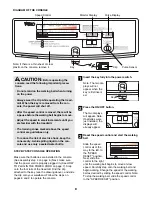
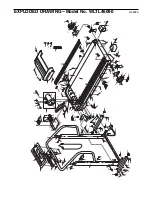
1. Hold the treadmill with your hands in the locations shown

at the right. 

To decrease the possibility of injury, bend

your legs and keep your back straight. As you raise
the treadmill, make sure to lift with your legs rather
than your back.

Raise the treadmill about halfway to the

vertical position. 

2. Move your right hand to the position shown at the right,

and hold the treadmill firmly. Raise the treadmill until the
storage latch locks over the latch catch. If necessary, turn
the Incline leg as you raise the treadmill. 

Make sure that

the storage latch closes fully over the latch catch. 

To protect the floor or carpet from damage, place a
mat under the treadmill. Keep the treadmill out of
direct sunlight. Do not leave the treadmill in the stor-
age position in temperatures above 85¡ Fahrenheit.

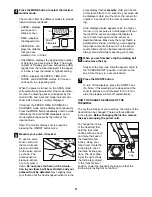
HOW TO MOVE THE TREADMILL

Before moving the treadmill, convert the treadmill to the
storage position as described above. 

Make sure that the

storage latch is locked fully over the latch catch. 

1. Hold the upper ends of the handrails. Place one foot on

one of the front wheels as shown.

2. Tilt the treadmill back until it rolls freely on the front

wheels. Carefully move the treadmill to the desired loca-
tion. 

To reduce the risk of injury, use extreme caution

while moving the treadmill. Do not attempt to move
the treadmill over an uneven surface.

3. Place one foot on the base, and carefully lower the tread-

mill until it is resting in the storage position.
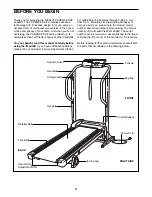
Base

Leg

Front

Wheels

Storage 

Latch

Incline Leg

Latch 

Catch

Closed

Summary of Contents for Cadence Dx8

Page 1: ...RY DELAYS PLEASE CALL DIRECT TO OUR TOLL FREE CUSTOMER HOT LINE The trained techni cians on our customer hot line will provide immediate assis tance free of charge to you CUSTOMER HOT LINE 1 800 999 3...

Page 2: ...ds 8 Never allow more than one person on the treadmill at a time 9 Wear appropriate exercise clothing when using the treadmill Do not wear loose clothing that could become caught in the treadmill Athl...

Page 3: ...into any open ing 23 DANGER Always unplug the power cord immediately after use before cleaning the treadmill and before performing the maintenance and adjustment procedures described in this manual N...

Page 4: ...ase call our Customer Service Department toll free at 1 800 999 3756 Monday through Friday 6 a m until 6 p m Mountain Time excluding holidays To help us assist you please note the product model number...

Page 5: ...erson carefully raise the Uprights 1 so that both Base Legs 77 are resting flat on the floor as shown 1 77 1 2 2 Pivot the Console 15 to the position shown and tighten the two Console Bolts 8 15 8 3 T...

Page 6: ...hat all parts are tightened before you use the treadmill To protect the floor or carpet place a mat under the treadmill 4 Attach the the Latch Catch 70 to the left side of the Frame 95 with four Screw...

Page 7: ...ly installed and grounded in accordance with all local codes and ordinances This product is for use on a nominal 120 volt circuit and has a grounding plug that looks like the plug illus trated in draw...

Page 8: ...ns to move at slow speed Carefully step onto the walking belt and begin walking Change the speed of the walking belt as desired by sliding the speed control Note To stop the walking belt slide the spe...

Page 9: ...e pulse display flashes steadily Hold your thumb at this level After 5 to 10 seconds your pulse will be displayed Hold your thumb on the sensor for another 15 seconds for the most accurate read ing If...

Page 10: ...torage latch closes fully over the latch catch To protect the floor or carpet from damage place a mat under the treadmill Keep the treadmill out of direct sunlight Do not leave the treadmill in the st...

Page 11: ...h Pivot the treadmill until the latch catch and the foot rail are past the storage latch If necessary turn the Incline leg as you lower the treadmill 2 Hold the treadmill firmly with both hands and lo...

Page 12: ...k the circuit breaker located on the treadmill frame near the power cord see the drawing above If the circuit breaker has tripped wait for five minutes and then press the switch back in b Make sure th...

Page 13: ...kwise 1 4 of a turn When the walking belt is correctly tightened you should be able to lift each side of the walking belt 2 to 3 inches off the walking platform Be careful to keep the walking belt cen...

Page 14: ...the blood For aerobic exercise adjust the speed and incline of the treadmill until your heart rate is near the highest number in your training zone WORKOUT GUIDELINES Each workout should include the...

Page 15: ...lles Stretch With one leg in front of the other reach forward and place your hands against a wall Keep your back leg straight and your back foot flat on the floor Bend your front leg lean for ward and...

Page 16: ...Clamp Screw 41 1 Tie Clamp 42 3 8 Cable Tie 43 1 Right Foot Rail 44 8 Deck Screw 45 2 Front Roller Nut 46 1 Walking Deck 47 2 Treadmill Pivot Nut 48 1 Motor Pivot Nut 49 1 Magnet Key No Qty Descripti...

Page 17: ...5 69 93 56 57 58 57 57 59 94 60 61 53 62 2 63 65 64 2 62 66 20 65 67 93 94 53 57 59 57 57 58 56 68 95 65 65 70 32 72 65 73 65 74 75 76 49 37 65 47 88 32 19 21 71 20 18 8 80 80 2 2 36 45 36 45 9 9 4 2...

Page 18: ...ON This warranty does not extend to any product or damage to a product caused by or attributable to freight damage abuse misuse improper or abnormal usage or repairs not provided by an ICON authorized...

Reviews: