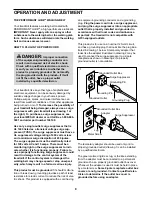
Weslo Cadence C42 User Manual Download Page 5

ASSEMBLY

Assembly requires two persons. Set the treadmill in a cleared area and remove all packing materials. Do not
dispose of the packing materials until assembly is completed.

Note: The underside of the treadmill walking belt is coated with high-performance lubricant. During shipping, a
small amount of lubricant may be transferred to the top of the walking belt or the shipping carton. This is a normal
condition and does not affect treadmill performance. If there is lubricant on top of the walking belt, simply wipe off
the lubricant with a soft cloth and a mild, non-abrasive cleaner.

Assembly requires the included small allen wrench       and your own phillips screwdriver                            ,
rubber mallet                    , wire cutters                 , adjustable wrenches                      , and needlenose
pliers               .

To identify small parts during assembly, use the PART IDENTIFICATION CHART in the center of this manual.

75

11

102

62

76

38

36

37

11

21

40

40

40

87

87

1

2

2. With the help of a second person, tip the treadmill down

to the position shown.

Attach a Wheel (37) to each side of the Base (11) with a
Wheel Bolt (36) and a Wheel Nut (38) as shown. 

Identify the Right Upright (62) and the Left Upright (76)
(there are two small holes in the side of the Left Upright).
Remove any plastic ties that are in the square holes in
the Uprights. While a second person holds the Right
Upright near the Wire Harness (21), insert the end of the
Wire Harness into the lower end of the Right Upright and
out of the upper end.

102

Holes

1. Make sure that the power cord is unplugged.

With the help of a second person, carefully tip the
treadmill onto one side. Partially fold the Frame (75) so
that the treadmill is more stable. Do not fully fold the
treadmill until it is completely assembled. 

Attach four Base Pads (40) to the Base (11) with two   
1 1/4” Tek Screws (87) and two 3/4” Tek Screws (102) in
the locations shown.

5

Summary of Contents for Cadence C42

Page 1: ...m new products prizes fitness tips and much more QUESTIONS If you have questions or if there are missing parts we will guar antee complete satisfaction through direct assistance from our factory TO AVOID DELAYS PLEASE CALL DIRECT TO OUR TOLL FREE CUSTOMER HOT LINE The trained technicians on our Customer Hot Line will provide immediate assistance free of charge to you CUSTOMER HOT LINE 1 800 999 37...

Page 2: ... Never allow more than one person on the treadmill at a time 9 Wear appropriate exercise clothes when using the treadmill Do not wear loose clothes that could become caught in the treadmill Athletic support clothes are recommended for both men and women Always wear athletic shoes Never use the treadmill with bare feet wearing only stockings or in sandals 10 When connecting the power cord see page ...

Page 3: ...d See ASSEMBLY on page 5 and HOW TO FOLD AND MOVE THE TREADMILL on page 11 You must be able to safely lift 45 pounds 20 kg to raise lower or move the treadmill 19 When folding or moving the treadmill make sure that the storage latch is fully closed 20 Inspect and properly tighten all parts of the treadmill regularly 21 Never insert any object into any opening 22 DANGER Always unplug the power cord...

Page 4: ... 999 3756 Monday through Friday 6 a m until 6 p m Mountain Time excluding holidays To help us assist you please note the product model number and serial number before calling The model number of the treadmill is WLTL29320 The serial number can be found on a decal attached to the treadmill see the front cover of this manual for the location Before reading further please review the drawing below and...

Page 5: ...ATION CHART in the center of this manual 75 11 102 62 76 38 36 37 11 21 40 40 40 87 87 1 2 2 With the help of a second person tip the treadmill down to the position shown Attach a Wheel 37 to each side of the Base 11 with a Wheel Bolt 36 and a Wheel Nut 38 as shown Identify the Right Upright 62 and the Left Upright 76 there are two small holes in the side of the Left Upright Remove any plastic tie...

Page 6: ...ver Ground Screw 96 4 Hold the Crossbar 34 between the Uprights 62 76 Attach the Crossbar with two 2 1 2 Bolts 53 and two 5 16 Washers 57 Do not tighten the Bolts yet 3 Insert a Plastic Shim 97 into each side of the post on the right side of the Base 11 Next orient the Right Upright 62 as shown and insert it into the Base Make sure that the Wire Harness 21 does not fall into the Right Upright Be c...

Page 7: ...ext insert the Wire Harness up through the indicated opening in the Console Base and through the plastic tie on the bottom of the Console Plug the widest connector on the Wire Harness 21 into the widest connector on the Console 10 If the connec tor does not fit easily rotate it and then connect it Plug the other connector on the Wire Harness into the other connector on the Console Note The locatio...

Page 8: ...ing provides a path of least resistance for electric current to reduce the risk of elec tric shock This product is equipped with a cord having an equipment grounding conductor and a grounding plug Plug the power cord into a surge suppressor and plug the surge suppressor into an appropriate outlet that is properly installed and grounded in accordance with all local codes and ordinances Important Th...

Page 9: ...ails and begin walking As you exercise change the speed of the walking belt as desired by pressing the Speed buttons Each time a button is pressed the speed setting will change by 0 1 mph if a button is held down the speed setting will change in increments of 0 5 mph Note The console can display speed and distance in either miles or kilometers see SPEED DISPLAY on page 10 For simplicity all instru...

Page 10: ...tton for a moment An E for English miles or an M for metric kilometers will appear in the Fat Calories Calories Pulse dis play Press the Speed button to change the unit of measurement When the desired unit of mea surement is selected remove the key and then reinsert it To reset the displays press the Stop button re move the key and then reinsert the key Measure your heart rate if desired To measur...

Page 11: ...s above 85 Fahrenheit HOW TO MOVE THE TREADMILL Before moving the treadmill convert the treadmill to the storage position as described above Make sure that the storage latch is fully engaged over the catch 1 Hold the upper ends of the handrails Place one foot on the base as shown 2 Tilt the treadmill back until it rolls freely on the front wheels Carefully move the treadmill to the desired locatio...

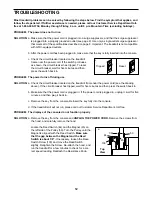
Page 12: ...OBLEM The power turns off during use SOLUTION a Check the circuit breaker located on the treadmill frame near the power cord see the drawing above If the circuit breaker has tripped wait for five minutes and then press the switch back in b Make sure that the power cord is plugged in If the power cord is plugged in unplug it wait for five minutes and then plug it back in c Remove the key from the c...

Page 13: ...belt is off center or slips when walked on SOLUTION a If the walking belt is off center first remove the key and UNPLUG THE POWER CORD If the walking belt has shifted to the left use the allen wrench to turn the left rear roller bolt clockwise 1 2 of a turn if the walking belt has shifted to the right turn the bolt counterclockwise 1 2 of a turn Be careful not to overtighten the walking belt Plug ...

Page 14: ...ur cardiovascular sys tem your exercise must be aerobic Aerobic exercise is activity that requires large amounts of oxygen for prolonged periods of time This increases the demand on the heart to pump blood to the muscles and on the lungs to oxygenate the blood For aerobic exercise adjust the speed and incline of the treadmill until your heart rate is near the highest number in your training zone W...

Page 15: ...les Stretch With one leg in front of the other reach forward and place your hands against a wall Keep your back leg straight and your back foot flat on the floor Bend your front leg lean forward and move your hips toward the wall Hold for 15 counts then relax Repeat 3 times for each leg To cause further stretching of the achilles ten dons bend your back leg as well Stretches Calves achilles ten do...

Page 16: ...d by or attributable to freight damage abuse mis use improper or abnormal usage or repairs not provided by an ICON authorized service center prod ucts used for commercial or rental purposes or products used as store display models No other war ranty beyond that specifically set forth above is authorized by ICON ICON is not responsible or liable for indirect special or consequential damages arising...

Page 17: ... 2 1 Bolt 8 10 5 16 Washer 57 2 Star Washer 9 6 May be an internal Star Washer Silver Ground Screw 96 1 2 1 2 Bolt 53 2 Remove this chart and use it to identify small parts during assembly Save this chart and the EXPLODED DRAWING PART LIST for future reference PART IDENTIFICATION CHART ...

Page 18: ...ncline Wheel 53 2 2 1 2 Bolt 54 1 Power Cord 55 1 Power Cord Grommet 56 1 Circuit Breaker 57 4 5 16 Washer 58 2 Frame Pivot Bolt 59 1 Latch Decal 60 1 Motor Belly Pan 61 2 Cable Tie Clamp 62 1 Right Upright 63 3 Releasable Tie 64 1 Choke 65 2 Belt Guide 66 2 Belly Pan Fastener 67 1 Walking Belt 68 1 Walking Platform 69 1 Belly Pan 70 12 Electronics Screw 71 1 Incline Wire Harness 72 1 Upright Grom...

Page 19: ...3 80 71 25 3 52 82 79 77 52 3 17 17 6 31 32 79 48 86 87 1 49 49 36 37 38 37 38 36 40 102 70 26 13 72 12 17 20 27 19 18 31 30 29 28 70 89 47 35 8 9 57 58 35 8 35 87 13 8 35 35 35 70 64 8 9 8 9 66 66 85 11 70 88 91 78 62 13 95 101 97 97 100 96 40 102 73 61 63 21 94 58 57 9 8 40 25 25 25 60 25 25 40 87 25 39 39 8 8 57 57 34 53 53 41 41 33 33 EXPLODED DRAWING Model No WLTL29320 R0902A ...

Reviews: