8
EN
OPERATING INSTRUCTIONS
NOTE:
Before using the tool, read the instruction
book carefully.
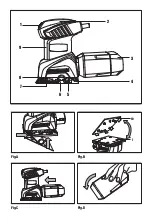
1. CHANGING THE SANDING PAPER (See Fig. A)
To fit new sanding paper, lift up the clamp lever out of
clamp lever lock to loosen the paper clamp (8), then insert
approximately 3/16”(5mm) of one end of the sanding paper
under the sanding paper clamp (8) until the paper contacts
the housing wall. Lift up the clamp lever (5) and move it to
the lever lock position. Wrap the sanding paper around the
base plate as tightly as possible and fix the end under the
other sanding paper clamp (8).
Make sure that the sanding paper is square to the base
plate. If not, remove and refit it again. The sanding paper
must be tightly fitted over the base plate and secured by
both the locking clamps (8). This will provide a safe and
efficient sanding environment.
To remove the sanding paper, lift up the clamp lever (5) and
move away from the clamp lever lock (6). The sanding paper
clamp (8) is now loose. Repeat with the other clamp on the
opposite side of your sander.
2. PAPER PUNCH (See Fig. B)
If sanding paper is unperforated, use the paper punch (10)
to create the dust extraction holes.
Position the punch over the base plate (4) with the punch
sides on the edges of the base-plate.
Press the punch into the base plate to punch holes into the
sanding paper. Then remove the punch and check all the
holes have been formed correctly.
3. USING THE DUST BOX (See Fig. C,D)
A) ATTACH THE DUST BOX (See Fig. C)
Your sander is equipped with a dust collection box. To
attach, slide the dust box onto the dust extraction outlet
piece and take care that the dust box locks in the grooves
of the outlet.
CAUTION:
To prevent the possibility of sanding
dust or foreign body being thrown into your face or
eyes, never attempt to use your sander without the dust box
properly installed.
B) EMPTYING DUST BOX (See Fig. D)
For more efficient operation, empty dust box every
5-10mins. This will create better air flow and ventilation.
To empty the dust box, pull off the dust box off of the dust
extraction outlet and shake out dust.
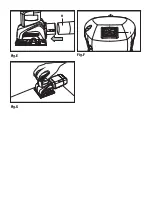
4. ATTACHING SANDER TO VACUUM ADAPTOR (See
Fig. E)
Your sander is equipped with a ø1-1/4” (inner diameter)
vacuum adapter (11).
If the outer diameter of vacuum hose is ø 1-1/4”, insert the
ø 1-1/4” adapter (11) into the back of dust extraction outlet.
Then connect the hose of a vacuum cleaner into the dust
adapter.
NOTE:
Please pull the vacuum adapter and make sure it is
tightened securely on the dust outlet.
If the outer diameter of vacuum hose is ø1-3/8”, insert the
hose directly into the back of dust outlet.
Please turn on the vacuum cleaner, and then turn on the
sander. If you stop sanding, first turn off the sander, then
turn off your vacuum cleaner.
5. OPERATING THE SWITCH (See Fig. F)
To start your sander, depress the protective cover over the
switch at the position marked“—”. To stop your sander,
depress the protective cover at the position marked “0”.
6. FLUSH SANDING FACILITY (See Fig. G)
The sander can sand flush on three sides of the baseplate
making it easy to sand corners and edges of mouldings.
7. ORBITAL SANDING
Your sander operates in small circular rotations which
allows efficient material removal. Operate your sander in
long sweeping movements across your workpiece and even
across the grain. For a finer finish, always use a fine grain
sanding paper and only move the sander in the direction
of the wood grain and never across the grain. Do not allow
your sander to remain in the same position otherwise you
will remove material and create an uneven surface.
WORKING HINTS FOR YOUR SANDER
If your power tool becomes too hot, especially when used
at low speed, set the speed to maximum and run it with
no load for 2-3 minutes to cool the motor. Avoid prolonged
usage at very low speeds. Always use sand paper that
is suitable for the material you want to sand. Always
ensure the work-piece is firmly held or clamped to prevent
movement. Any movement of the material may affect
the quality of the sanding finish. Start your sander before
sanding and turn it off only after you stop sanding. For the
best results, sand wood in the direction of the grain. Do not
start sanding without having the sandpaper fitted. Do not
allow the sandpaper to wear away it will damage the base-
plate. The guarantee does not cover base-plate wear and
tear. Use coarse grit paper to sand rough surfaces, medium
Summary of Contents for PPS240BU
Page 1: ...2 0A Palm Sander EN WS4151U 1 PPS240BU 2 ...
Page 2: ......
Page 3: ...1 9 8 7 6 5 4 10 7 3 2 Fig A Fig B Fig C Fig D ...
Page 4: ...1 11 Fig C Fig D Fig E Fig F Fig G ...
Page 10: ......
Page 11: ......
Page 12: ......


