background image

10

Note:

 The telescoping single ladder 

position is easiest completed with the 
ladder laying on the ground.

1) Coniguring the ladder into the single ladder position 

starts with changing the angle. 

Note:

 The push knob hinge will catch in each of the 3 

positions. Continue to disengage and rotate the sections 
until the fully open single ladder position is reached.

2) Unlock one set of “J” locks and extend outer  

section to desired length. If additional height is need

-

ed, repeat with opposite side. Make sure “J” locks are 
properly engaged.

3) With all locks properly engaged, lift ladder from one 

end and slowly walk ladder up until it rests against 
desired surface. Watch for overhead wires.

4) Adjust ladder to proper climbing position or  

approximately 75

°.

75°

Approximately

  • Hinges and “J” locks must be secure before climbing. 

  • Never use ladder jacks on this ladder. 

  • DO NOT stand on or above second rung from top of ladder. 

  • Refer to set up caution label on ladder for proper set up.

CAUTION

PROPER USE


HOW TO SETUP POSITIONS (continued)

Position #3

Telescoping Single 
Ladder

Summary of Contents for MT Series

Page 1: ...Operating Procedure and Safety Instructions MT 13AZ 1 08m MT 17AZ 1 39m MT 22AZ 1 69m ...

Page 2: ...GE Hinge operations adjust angle of ladder 6 4 SPRING LOADED J LOCKS Lock operation adjust height 7 5 PROPER USE How to setup positions 8 1 Read these instructions completely before using the ladder 2 Failure to comply with all instructions may result in serious injury WARNING Operating Procedure and Safety Instructions MUL TILADDER TELESCOPING SERIES ...

Page 3: ...ny other position is misuse of the product which could result in serious injury or death WARNING DO NOT overload ladder Maximum weight of person tools and materials are not to exceed load rating Refer to labels on ladder CAUTION SEE PAGE 8 SEE PAGE 10 SEE PAGE 11 Position 2 STAIRWAY STEPLADDER Position 4 requires plank and tie downs not included SEE PAGE 9 STORAGE POSITION Position 1 DOUBLE SIDED ...

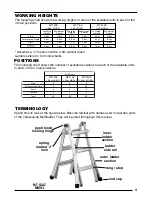
Page 4: ...in each of the 4 main positions Spend time to look at the igure below Become familiar with names used to describe parts of the Telescoping Multiladder They will be used throughout this manual Height Maximum Reach 1 39 MODEL 1 69 MODEL Workin g Height Maximum Reach Workin g Height Maximum Reach 0 9m 2 3m 0 9m 0 6m 2 9m 4 3m 2 9m 2 6m 1 5m 3 5m 1 5m 0 9m 3 5m 5 5m 3 5m 2 9m 2 0m 4 7m 2 0m 1 2m Step ...

Page 5: ...ould never use a ladder if you are not in good physical condition DO NOT use in front of unlocked doors Place feet on irm level ground If forced to use on slippery surface secure ladder from sliding before climbing The use of ladders on drop cloths may present a sliding hazard When using as a stepladder or telescop ing single ladder always face ladder and maintain irm grip For additional care use ...

Page 6: ...fold Windy conditions require extra caution Use extreme caution when pushing or pulling anything while standing on ladder Never use ladder as a brace The maximum weight of a person tools and materials not to exceed load rating Refer to labels on ladder DO NOT use any components not supplied or approved by Werner Co with this ladder To set ladder up Support ladder by laying it on its side on the gr...

Page 7: ... the ladder angle can be adjusted Note The open position can be veriied by the exposed triple inner posts on the push knob See Figure 2 Figure 1 CLOSED OPEN Triple inner posts Figure 2 3 When the ladder reaches any of the 3 set positions the push knobs will automatically spring back into the closed position 4 To close ladder to the folded position repeat steps 1 3 Note Excess pressure on the centr...

Page 8: ... Each J lock works independently allowing the end user to work the lock with one hand while holding the ladder with the other To adjust the height of the ladder 1 Unlock the 4 J locks by pulling out and rotating the J lock away from the rung hole See Figure 3 2 Raise the inner section to the desired height 3 While holding the inner ladder section with one hand lock the 4 J locks by rotating them i...

Page 9: ...the push knob locking hinge Note The stepladder position is easiest completed with the ladder standing up In this position excess pressure is not exerted on the hinge 2 At this point the height of the ladder can be changed to the desired height using the Spring Loaded J locks and the instructions for them Section 4 For every position all hinges are supporting hinges and must be locked Never stradd...

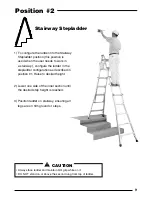
Page 10: ...coniguration as described in position 1 Raise to desired height 2 Lower one side of the inner section until the desired step height is reached 3 Position ladder on stairway ensuring all legs are on irm ground or steps Stairway Stepladder Always face ladder and maintain irm grip while on it DO NOT stand on or above the second rung from top of ladder CAUTION Position 2 ...

Page 11: ...ngth If additional height is need ed repeat with opposite side Make sure J locks are properly engaged 3 With all locks properly engaged lift ladder from one end and slowly walk ladder up until it rests against desired surface Watch for overhead wires 4 Adjust ladder to proper climbing position or approximately 75 75 Approximately Hinges and J locks must be secure before climbing Never use ladder j...

Page 12: ...the other section as shown in Figure 5 4 Lower the outer ladder section with the disengaged J locks See Figure 6 while spreading the two sections apart to form the second trestle required for the scaffold position See Figure 7 Figure 6 Figure 7 Figure 5 Plank should not be placed on top rung Plank should be secured to the ladder on both ends by tying to the ladder Use tie downs to secure plank to ...

Page 13: ...This page left intentionally blank ...

Page 14: ...www wernerladder com au 2014 Werner Co P N105100 02 Rev C 10 14 ...

Reviews: