background image

12

ASSEMBLY & ADJUSTMENTS

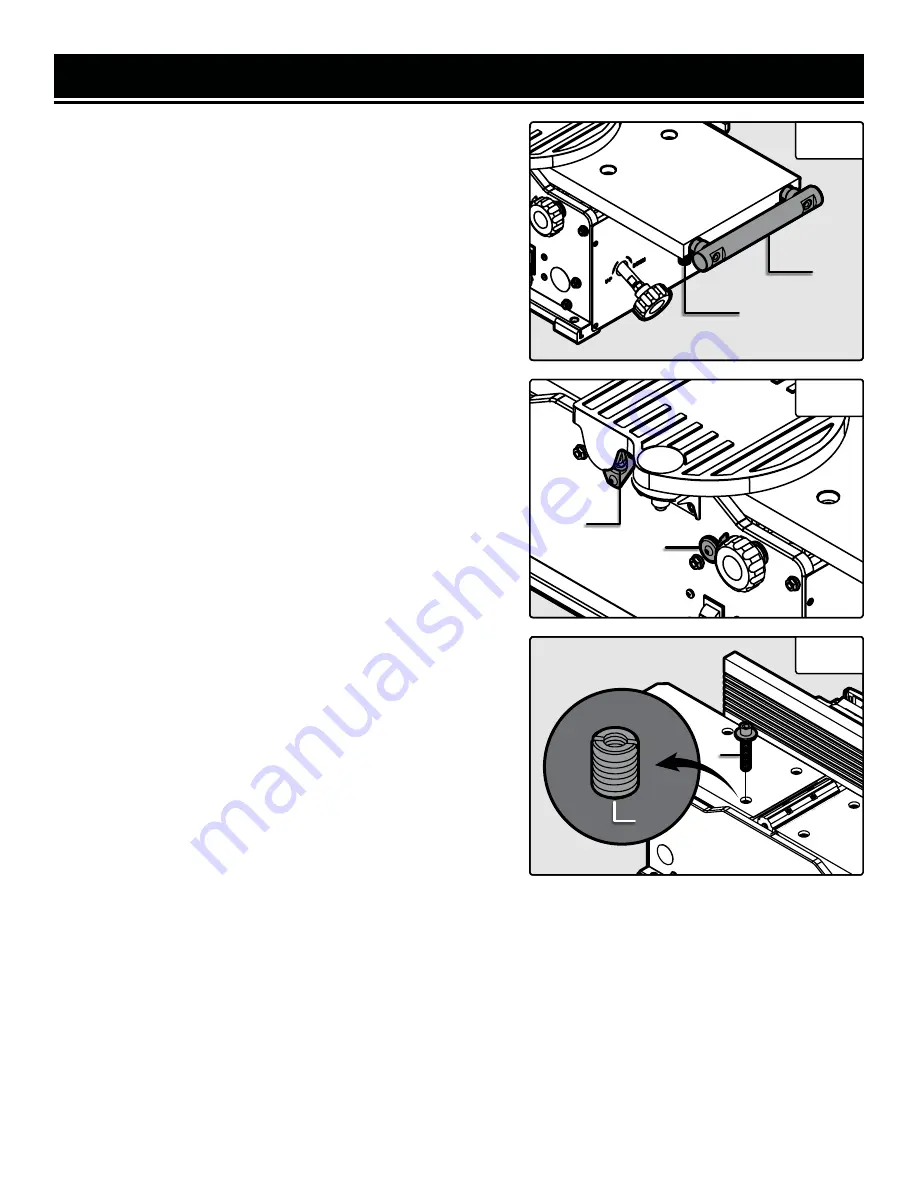
ADJUST THE TABLE SUPPORTS

The 8” jointer, JT833H, is equipped with a extendable table sup-

ports (Fig. 6 - 1). To extend the supports, loosen the two knobs 

(Fig. 6 - 2) on each side of the support bar and reposition the 

support to the desired position. Once the support is in the de-

sired position, re-tighten the knobs underneath the table.

ADJUST AND LEVEL THE TABLE 

The infeed and outfeed table have been pre-set at the factory to 

be level and in line with the blades. However, if shipping or use 

has caused the table to shift out of level, adjust the tables with 

the following steps. Make sure that the unit is unplugged from 

any power supply before adjusting the table.

NOTE:

 This procedure involves close proximity to the helical 

blades. To avoid cuts, wear cut-proof or cut-resistant gloves 

when performing maintenance work. Remove the gloves before 

operating the jointer. 
1. Set the depth of cut scale (Fig. 7 - 1) to “0” to bring the infeed 

table to its most up most position. 
2. Rotate the cutterhead such that some of the blades are at 

their highest point. The cutterhead can be safety rotated using 

the included 4 mm hex wrench at the front end of the cutterhead 

under the blade guard flange (Fig. 7 - 2). 
3. Use a long metal straight edge to check the height of the 

outfeed table. Place the straight edge over the outfeed table and 

the cutterhead blades. Check that the blades barely touch the 

straight edge at both the front and back of the cutterhead. You 

will need to rotate the cutterhead to check both the front and 

back alignment of the table. 
4. If the blades do not touch the straight edge or drastically hit 

the straight edge, the outfeed table will need to be adjusted. 

a. Use the included 4 mm hex wrench to loosen and remove 

the bolt (Fig. 8 - 1) countersunk in the table. Remove the 

washer as well to access the slotted (Fig. 8 - 2) screw under-

neath. 

Fig. 6 

1

2

Fig. 7 

1

b. Use a flat head screwdriver to adjust the slotted screw. Turning the screw clockwise will lift the table up and 

turning counterclockwise will lower the table. Adjustments to the screw should be minimal, with only a 1/20th 

turn before rechecking the table’s position with the straight edge. 

c. Once the table is level and at the correct height, reinstall the washer and bolt to secure the table. 

5. Once the outfeed table is set at the correct height, follow the steps above to ensure that the infeed table is at the 

correct height.

Directions continue on the next page.

Fig. 8 

2

1

2

Summary of Contents for JT630H

Page 1: ...d trouble free performance Pay close attention to the rules for safe operation warnings and cautions If you use your tool properly and for its intended purpose you will enjoy years of safe reliable se...

Page 2: ...tion 8 BEFORE OPERATING 9 Unpacking Packing List 9 Know Your Jointer 10 Assembly Adjustments 11 OPERATION MAINTENANCE 14 Operation 14 Maintenance 16 Troubleshooting Guide 18 Exploded View Parts List 1...

Page 3: ...lable to all users during the entire life of the tool and review it frequently to maximize safety for both yourself and others Indicates danger warning or caution The safety symbols and the explanatio...

Page 4: ...ock PERSONAL SAFETY 1 Stay alert watch what you are doing and use com mon sense when operating a power tool Do not use a power tool while you are tired or under the influence of drugs alcohol or medic...

Page 5: ...ordance with these instructions taking into ac count the working conditions and the work to be per formed Use of the power tool for operations different from those intended could result in a hazardous...

Page 6: ...rush or compressed air to remove chips or debris Never use your hands to remove excess material and debris 7 Allow the jointer to come to full speed before using the machine 8 WORKPIECE REQUIREMENTS C...

Page 7: ...is plugged in during an accessory change or adjustment 21 CLEANING Never use solvents to clean plastic parts Solvents could dissolve or otherwise damage the material Use only a soft damp cloth to cle...

Page 8: ...n of the equipment grounding conductor can result in electric shock The conductor with the green insulation with or without yellow stripes is the equipment grounding conductor If repair or replacement...

Page 9: ...king list below to make sure you have all of the parts and accessories If any part is missing or broken please contact customer service at 1 800 232 1195 M F 8 5 CST or email techsupport wenproducts c...

Page 10: ...hly Apply a light coat of good quality paste wax to the table and fence to protect the sur faces and make boards slide smoothly JT630H JT833H Dust Port Outfeed Table Infeed Table Fence Cutterhead Guar...

Page 11: ...der the fence support bracket so that it fits snuggly into the groove with the flat side up Thread the sliding handle through the nut until it is tight and the fence is secured NOTE The fence sliding...

Page 12: ...hex wrench at the front end of the cutterhead under the blade guard flange Fig 7 2 3 Use a long metal straight edge to check the height of the outfeed table Place the straight edge over the outfeed ta...

Page 13: ...will shorten the lifespan of your jointer and give you a rougher finish BEVEL THE FENCE NOTE The fence can easily be set to 0 and 45 using the limit stops Fig 10 2 on the fence However it is always ad...

Page 14: ...er the cutterhead remove your leading hand and place behind your trailing hand and repeat until the entire length of the workpiece has been cut Use a push block Fig 13 1 to hold and feed the workpiece...

Page 15: ...CUUM HOSE A 2 1 2 or 4 with the dust port adapter on JT833H dust collection hose can be attached to the dust port underneath the outfeed table The jointer will perform properly at all depths of cuts u...

Page 16: ...be produced where the blades have been nicked Blades on this jointer should always replaced as a matched set Keeping a spare set of blades on hand is recommended Replacement blades part no BP510H can...

Page 17: ...ge to hold the cutterhead still while working with the blades 2 Use the star wrench to remove the retaining screw and the blade from the cutterhead 3 While the blade is removed check the cutterhead fo...

Page 18: ...ke shallower cuts Restricted air circulation due to dust accumulation Clean out the dust and restore normal air circulation Snipe gouging at end of boards Dull blades Replace or sharpen blades Inadequ...

Page 19: ...19 EXPLODED VIEW PARTS LIST JT630H...

Page 20: ...040 Belt 1 41 JT630H 041 Belt Guard 1 43 JT630H 043 Table 2 No Part No Description Qty 43a JT630H 043A Screw M12 1 25x15 8 46 JT630H 046 M6 Star Screw 8 48 JT630H 048 Flange Nut 16 49 JT630H 049 Suppo...

Page 21: ...19 JT630H 319 Brush Holder 2 320 JT630H 320 Carbon Brush 2 321 JT630H 321 Brush Cover 2 EXPLODED VIEW PARTS LIST No Part No Description Qty 323 JT630H 323 Switch 1 323a JT630H 323A Switch Cover 1 324...

Page 22: ...EXPLODED VIEW PARTS LIST JT833H 22...

Page 23: ...30H 035 Hole Plug 4 36_S JT630H 036ASM Bearing Retainer Assy 1 No Part No Description Qty 37 JT630H 166 Star Wrench 1 39 JT630H 039 Cutterhead Pulley 1 40 JT630H 040 Belt 1 41 JT630H 041 Belt Guard 1...

Page 24: ...M Motor Assy 1 319 JT630H 319 Brush Holder 2 320 JT630H 320 Carbon Brush 2 321 JT630H 321 Brush Cover 2 No Part No Description Qty 323 JT630H 323 Switch 1 323a JT630H 323A Switch Cover 1 324 JT630H 32...

Page 25: ...arts and products may need to be sent to WEN before the replacements can be shipped out turning a product for warranty service the shipping charges must be prepaid by the purchaser The product must be...

Page 26: ...26 NOTES...

Page 27: ...27 NOTES...

Page 28: ...THANKS FOR REMEMBERING V 2020 07 15...

Reviews: