background image

USING YOUR GENERATOR

CO SENSOR INFORMATION

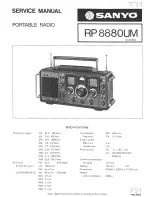
The CO Watchdog carbon monoxide monitoring system (Fig. 

26 - 1) measures the accumulation of poisonous CO gas 

while the generator is running. If the level of CO gas gets too 

high, the CO Watchdog system will automatically shut down 

the generator. 

This system is not a substitute for an indoor 

CO alarm.

Whenever the CO Watchdog system shuts down the genera-

tor, the LED on the generator control panel (Fig. 26 - 1) will 

blink red

 for at least 5 minutes after the generator is shut 

down. 

If you notice that the LED is blinking red, vacate the 

area immediately.

 Go to an open, outdoor area. Ventilate 

the area around the generator thoroughly before returning. 

Let the generator stay shut down for a few minutes before 

restarting the engine. This should allow carbon monoxide to 

dissipate from the area. If you restart the generator and the 

CO Watchdog detects that CO levels are still too high, it will 

shut down the generator again. If CO levels are low enough, 

the generator will run normally.

1

Ensure that the generator is located in an open outdoor area, with the exhaust pointing away from occupied struc-

tures, and pointing away from the prevailing winds, such that those winds do not blow engine exhaust towards the 

sensor module. If anyone experiences dizziness, headaches, nausea, fatigue, or other symptoms of CO poisoning, 

get to fresh air immediately and seek the attention of a qualified medical professional. Follow all other directions in 

this manual regarding the connection and disconnection of electrical devices when starting or shutting down the 

generator.
When starting the generator, the CO Watchdog LED on the panel may flash. This indicates that the system is running 

a self-test procedure, and does not indicate a problem.
If the CO Watchdog LED on the panel is 

yellow

, a system error has occurred, or the CO sensor has reached the end 

of its life. Contact WEN customer service (

1-800-232-1195

, M – F 8 – 5 CST, or 

[email protected]

for assistance.

When operating your generator, please note the following:

• The CO Watchdog does not discriminate in its input; any source of carbon monoxide in the area around the genera-

tor could cause it to activate. If the CO Watchdog LED is blinking red, safety measures should be taken immediately.
• Tampering with, disconnecting, or bypassing the CO sensor could cause hazardous conditions, including but not 

necessarily limited to injury or death, and will void your warranty. The generator will not run with the CO sensor 

disconnected or bypassed, or if the CO sensor indicates an error.
• The CO sensor has a lifetime of about 7 years, and is capable of monitoring its lifetime. If your generator shows 

an error light several years after purchase, it may be time to replace the CO sensor. Contact WEN customer service 

for assistance.

NOTE:

 if the generator is oriented so that the 

engine exhaust is blown towards the CO sensor, 

the generator may shut down.

Fig. 26 

29

Summary of Contents for DF400iX

Page 1: ...rules for safe operation warnings and cautions If you use your tool properly and for its intended purpose you will enjoy years of safe reliable service NEED HELP CONTACT US Have product questions Need...

Page 2: ...ATION MAINTENANCE 20 Starting Your Generator 20 Using Your Generator 23 Shutting Off Your Generator 30 Maintenance 32 Transportation Storage 40 Troubleshooting Guide 41 Warranty Statement 42 To purcha...

Page 3: ...idth 18 in 456 mm Height 20 1 in 511 mm Product Net Weight 100 0 lbs 45 5 kg GENERATOR ENGINE Engine Type 4 Stroke OHV Single Cylinder with Forced Air Cooling System Engine Displacement 212cc Engine S...

Page 4: ...______ Purchased From ________________________________________________ Serial Number _________________________________________________ TO MAXIMIZE THE LIFESPAN OF YOUR GENERATOR We recommend running y...

Page 5: ...ols is to attract your attention to possible dangers The safety symbols and their explanations deserve your careful attention and understanding The safety warnings do not by themselves eliminate any d...

Page 6: ...ctly in contact with gasoline Do not operate near open flame heat or any other ignition source Do not smoke near the generator Always operate on a firm level surface Always turn generator off before r...

Page 7: ...ld only be performed by a qualified technician Do not use receptacles or cords that show signs of damage such as broken or cracked insulation 4 Use a ground fault circuit interrupter GFCI in highly co...

Page 8: ...e generator that be come hot during use 8 Turn off all connected electrical devices before stop ping the generator 9 Always turn generator off before refueling Allow generator to cool for at least 2 m...

Page 9: ...cessories Do not discard the packaging until everything is removed Check the packing list below to make sure you have all of the parts and accessories If any part is missing or broken please contact c...

Page 10: ...all the parts and controls of your Generator The components will be referred to later in the manual for assembly and operation instructions GENERATOR Fuel Cap Carrying Handle Control Panel Battery Acc...

Page 11: ...er Style Receptacle 7 LPG Inlet 8 Grounding Nut Ground generator to reduce risk of electric shock 11 2 3 5 11 9 DC Circuit Breaker 10A 10 AC 120V NEMA TT 30 Receptacle 11 AC Circuit Breaker 20A 12 AC...

Page 12: ...could lead to engine damage To remove the mounting plates 1 With the help of another person place generator on an elevated platform such as table or workbench Make sure the generator is stable Do not...

Page 13: ...e of oil that matches the expected operating temperature F C 20 0 20 32 40 60 80 100 40 20 0 20 10 10 30 30 To add oil follow these steps 1 Place the generator on a level surface Make sure the en gine...

Page 14: ...tick or when you can see the oil coming halfway up the oil fill threads 4 Wipe clean any oil leaks and firmly tighten the dipstick Reinstall the oil access cover OIL LEVEL SHUTDOWN To protect the unit...

Page 15: ...ne rating The genera tor performs best with ethanol free gasoline DO NOT use gasoline with over 10 ethanol The capacity of the fuel tank is 2 2 US gallons 8 3 L Do not mix oil with gasoline To add gas...

Page 16: ...f bubbles appear become larger in size or increase in number a leak exists This MUST be corrected before using generator Contact WEN customer service at 1 800 232 1195 M F 8 5 CST or email techsupport...

Page 17: ...pacity falls to just 80 of its capacity when new Weakened cells in an aged battery are no longer capable of meet ing the high power requirements needed for the proper operation of your generator and t...

Page 18: ...rator s positive terminal has already been connected Double check that the positive terminal s connection is secure 4 Slide the battery back into the generator Pull downwards on the rub ber belt Fig 1...

Page 19: ...Operating this generator without said kit may increase the engine s emissions and decrease both fuel economy and performance You can order the kit at wenproducts com by searching part DF400i HA There...

Page 20: ...use a generator correctly CO may leak into the home ALWAYS use a battery powered or battery backup CO alarm in the home If you start to feel sick dizzy or weak after the generator has been running mo...

Page 21: ...an damage the starter NOTE The lithium ion battery is shipped partially charged in order to maximize its service life and may not have enough charge to start the engine during the first use of the gen...

Page 22: ...s the generator to stabilize its speed and temperature Fig 19 Fig 20 Fig 21 Option A Electric Start 6 Push engine switch to START II position for 2 3 seconds or until the engine starts Then release th...

Page 23: ...Wattage Calculation Find the wattage information of each device you plan to connect The information should be listed on the device or in its instruction manual or you may refer to page 22 Table 2 The...

Page 24: ...HP 1500 3000 Window Air Conditioner 1200 1800 Saw Miter 1200 1200 Microwave 1000 0 Well Water Pump 1000 1000 Sump Pump 800 1200 Refrigerator Freezer 800 1200 Furnace Blower 800 1300 Computer 800 0 El...

Page 25: ...vices are turned off Start plugging in each electric device from the highest wattage to the lowest Check the power indicator light green to ensure the generator is producing power 3 Do not overload th...

Page 26: ...TRICAL SYSTEM without a qualified electrician and connected to a transfer switch as a separately derived system Such connections must comply with local electrical laws and codes Failure to comply can...

Page 27: ...your generator When you ve overloaded the generator the overload light will stay on and the reset button Fig 24 will activate to cut off the output in 3 to 16 seconds depending on the load Reduce the...

Page 28: ...SSION DOES THE METER RESET COMMENTS 1 1 hr 30 min 1 5 Yes to 0 0 Meter will show 1 5 just before it is shut off but it has not been run for 2 hours at a time yet 2 30 min 0 5 Yes to 0 0 Meter will sho...

Page 29: ...ir immediately and seek the attention of a qualified medical professional Follow all other directions in this manual regarding the connection and disconnection of electrical devices when starting or s...

Page 30: ...ut off automatically This feature helps to prevent the car buretor from being clogged by stale fuel extending your genera tor s lifespan 6 Turn the engine switch to the OFF 0 position Fig 28 OPTION 1B...

Page 31: ...engine with elec trical devices connected and running OPTION 2 MANUAL SHUTOFF In case you are in a hurry and do not want to wait for the generator to automatically shut down the manual shutoff featur...

Page 32: ...ance Schedule Clean change more often under dusty conditions or operating under heavy load IMPORTANT GENERATOR MAINTENANCE TIPS Drain your carburetor after each use and before storage to prevent it fr...

Page 33: ...shut down to protect it from running without oil To check the oil level and add oil 1 Make sure the generator is on a level surface Do not tilt the generator as oil will flow into engine areas and cau...

Page 34: ...3 Using a Phillips head screwdriver unscrew the top two screws and remove the service panel on the opposite side of the recoil starter 4 The carburetor Fig 31 1 can be ac cessed between the engine and...

Page 35: ...s can be ordered from wenproducts com by searching part no 56380i 1001B 1 4 Reinstall the air filter element air filter cover and service panel WARNING Running the engine with a dirty damaged or missi...

Page 36: ...plug 4 Visually inspect the spark plug If it is cracked or chipped or if the electrodes are worn or burned discard it and replace with a new spark plug We recommend replacing with a NGK BPR6ES Torch F...

Page 37: ...o the unlocked position and remove the cover from the side panel 3 Prepare an approved oil storage container and place it be low the oil drainage valve Fig 37 to catch oil as it drains 4 Open the oil...

Page 38: ...en up the fuel valve 5 Open up the carburetor drain screw Fig 38 with a Phillips screwdriver Fuel will start draining from the carburetor and fuel tank through the drain tube NOTE The draining process...

Page 39: ...negative black battery cable disconnected and covered with an insulator such as electrical tape and then connecting the battery This will allow the inside of the generator to warm up and will greatly...

Page 40: ...oper power output PRODUCT DISPOSAL Do not dispose of a used generator or parts with your household waste This product contains electrical or elec tronic components that should be recycled Please take...

Page 41: ...f and unplug all electrical devices Press reset button Check the total wattage of the devices and reduce the load if it exceeds the capacity of the generator for your particular fuel LPG or gasoline 2...

Page 42: ...required part numbers and proof of purchase Damaged or defective parts and products may need to be sent to WEN before the replacements can be shipped out Upon the confirmation of a WEN representative...

Reviews: