background image

ASSEMBLY & ADJUSTMENTS

WARNING:

 To prevent injury from accidental operation, turn OFF and unplug the tool from the power 

source before assembling or making any adjustments to the tool.

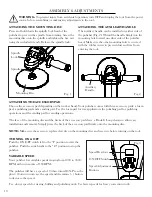
ATTACHING THE ACCESSORY PAD

Choose the accessory pad depending on the work at hand. Your polisher comes with three accessory pads: a foam 
pad, a polishing pad and a sanding pad. Use the foam pad for wax application, the polishing pad for polishing 
operations and the sanding pad for sanding operations.

The face of the mounting disc and the backs of the accessory pads have a Hook & Loop design to allow easy 
installation and removal. Simply press the back of the accessory pad firmly onto the mounting disc.

NOTE:

 Make sure the accessory is placed evenly on the mounting disc and is secure before turning on the tool.

Fig. 1

Fig. 2

Mounting Disc

Spindle
Lock

Spindle

Auxiliary 
Handle

VARIABLE SPEED

Your polisher has variable speeds ranging from 1000 to 3500 
RPM, with increments of 100 RPM.

The polisher will have a speed of 0 when turned ON. Press the 
plus (+) button to increase the speed and the minus ( - ) button 
to decrease the speed. 

TURNING ON & OFF

Push the ON/OFF switch left to the “I” position to start the 
polisher. Push the switch right to the “O” position to stop the 
polisher.

Speed Readout

ON/OFF Switch

Speed Adjustment
Buttons

ATTACHING THE AUXILIARY HANDLE 

The auxiliary handle can be installed on either side of 
the polisher (Fig. 2). Thread the handle firmly into the 
mounting hole located on either side of the polisher 
head. Make sure the other mounting hole is covered 
with the rubber insert to prevent dust and wax from 
entering the tool. 

ATTACHING THE MOUNTING DISC

Press and hold down the spindle lock head of the 
polisher to prevent the spindle from rotating. Screw the 
mounting disc onto the spindle and tighten the hex nut 
using the included wrench. Release the spindle lock.

Fig. 3

Use slower speeds for waxing, buffing and polishing work. Use faster speeds for heavy correction work.

10

Summary of Contents for 94810

Page 1: ...rules for safe operation warnings and cautions If you use your tool properly and for its intended purpose you will enjoy years of safe reliable service IMPORTANT NEED HELP CONTACT US Have product que...

Page 2: ...t Weight 94810 AC 120V 60 Hz 10A 1000 to 3500 RPM 7 inch Hook Loop 5 8 11 TPI Threads Per Inch 18 1 x 7 1 x 5 5 in 6 7 lbs Product Specifications Safety Introduction General Safety Rules Safety Rules...

Page 3: ...he safety symbols and the explanations with them deserve your careful attention and understanding Always follow the safety precautions to reduce the risk of fire electric shock and personal injury How...

Page 4: ...way from heat oil sharp edges or moving parts Damaged or entangled cords increase the risk of electric shock e When operating a power tool outdoors use an extension cord suitable for outdoor use Use o...

Page 5: ...age of parts and any other condition that may affect the power tool s operation If damaged have the power tool repaired before use Many accidents are caused by poorly maintained power tools f Keep cut...

Page 6: ...h a live wire will make exposed metal parts of the tool live and shock the operator Always be aware of power cord location to avoid accidentally contacting the power cord 6 USE THE RIGHT ACCESSORY PAD...

Page 7: ...RULES FOR THE POLISHER REDUCING KICKBACK Kickback is a sudden reaction to a pinched or snagged rotating wheel backing pad brush or any other accessory Pinching or snagging causes rapid stalling of th...

Page 8: ...doubt use a heavier cord The smaller the gauge number the heavier the cord DOUBLE INSULATED TOOLS The tool s electrical system is double insulated where two systems of insulation are provided This el...

Page 9: ...lease contact our customer service at 800 232 1195 M F 8 5 CST or email us at techsupport wenproducts com Auxiliary Handle Ventilation Slots Spindle Lock 7 Inch Hoop Loop Mounting Disc ON OFF Switch D...

Page 10: ...her has variable speeds ranging from 1000 to 3500 RPM with increments of 100 RPM The polisher will have a speed of 0 when turned ON Press the plus button to increase the speed and the minus button to...

Page 11: ...e polished grip the tool firmly with both hands and turn ON the tool Only use slower speeds for waxing and polishing Otherwise damage may occur to the paint being polished WARNING To prevent serious i...

Page 12: ...are not limited to gasoline carbon tetrachloride chlorinated cleaning solvents ammonia and household detergents that contain ammonia 5 Store the tool in a clean and dry place away from the reach of ch...

Page 13: ...at its own pace The extension cord is too long or too thin See page 7 for selecting the proper size of extension cord for your tool Blocked motor housing vents Remove dust out of the motor housing ven...

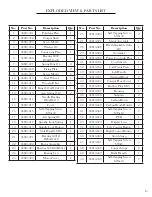
Page 14: ...EXPLODED VIEW PARTS LIST 14...

Page 15: ...sembly 1 23 94810 023 Bearing 608 22x 8x7 1 24 94810 024 Bearing Cap 1 25 94810 025 Motor Cover 1 No Part No Description Qty 26 94810 026 Self Tapping Screw ST4x55 2 27 94810 027 Stator Assembly 1 28...

Page 16: ...aid by the purchaser The prod uct must be shipped in its original container or an equivalent properly packed to withstand the hazards of ship ment The product must be fully insured with a copy of the...

Reviews: