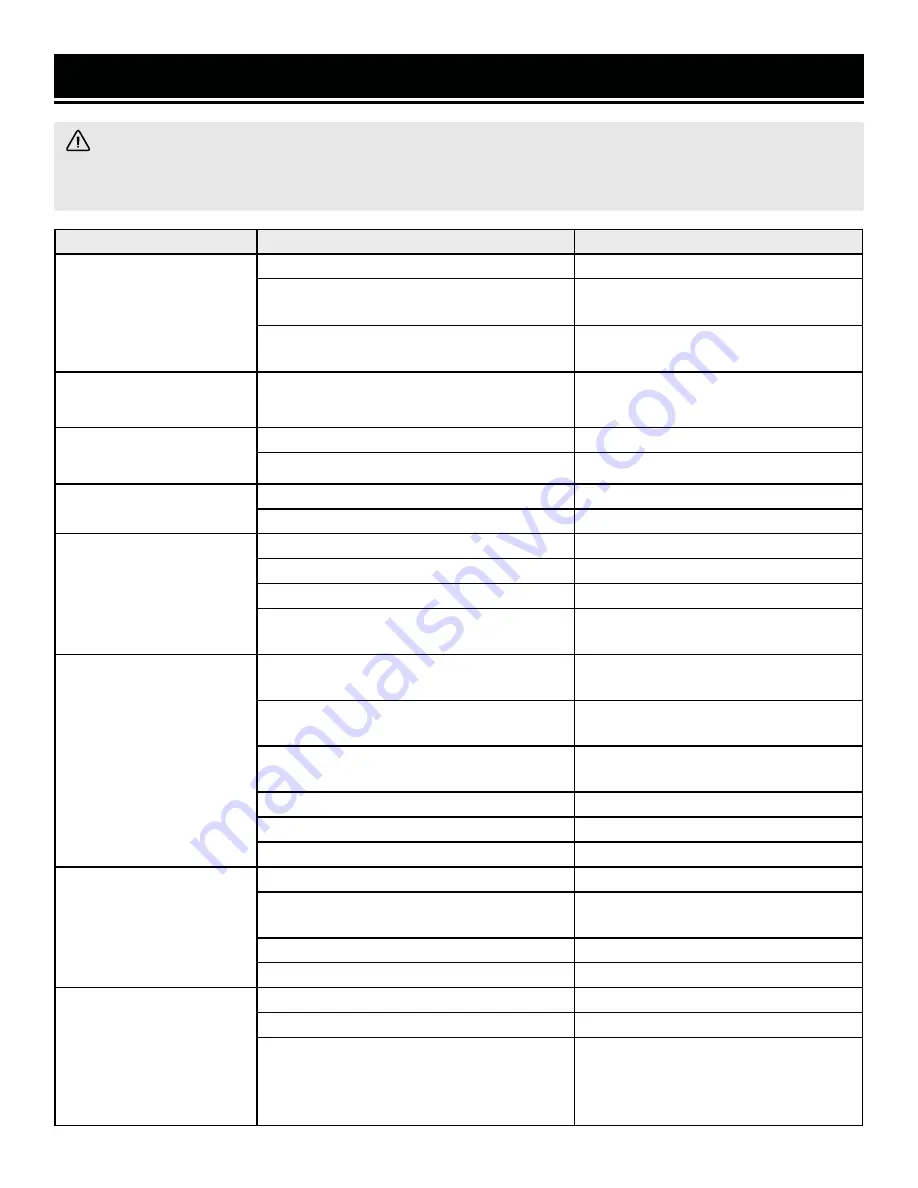
background image

13

PROBLEM

CAUSE

SOLUTION

Air leaking at trigger

area

1. O-ring in trigger valve is damaged.

1. Check and replace O-ring.

2. Trigger valve head is damaged.

2. Check and replace trigger

valve head.

3. Trigger valve stem, seal or O-ring is     

damaged.

3. Check and replace trigger

valve stem, seal or O-ring.

Air leaking between

body and drive guide

1. Damaged piston O-ring or bumper.

1. Check and replace O-ring or

bumper.

Air leaking between

body and cylinder cap

1. Screw loose.

1. Tighten screws.

2. Damaged gasket.

2. Check and replace seal.

Blade driving fastener

too deeply

1. Worn bumper.

1. Replace bumper.

2. Air pressure is too high.

2. Adjust the air pressure.

Runs slowly or has

power loss

1. Insufficient oil.

1. Lubricate as instructed.

2. Insufficient air supply.

2. Check air supply.

3. Broken spring in cylinder cap.

3. Replace spring.

4. Exhaust port in cylinder cap is blocked. 4. Replace damaged internal

parts.

Tool skips a fastener

1. Worn bumper or damaged spring (72).

1. Replace bumper or pusher

spring.

2. Dirt in drive guide.

2. Clean drive channel of front

plate.

3. Inadequate airflow to tool.

3. Check hose and compressor

fittings.

4. Worn or dry O-ring on piston.

4. Replace O-ring or lubricate.

5. Damaged O-ring on trigger valve.

5. Replace O-ring.

6. Cylinder cap seal leaking.

6. Replace seal.

Fasteners are jammed

1. Joint guider is worn.

1. Replace joint guider.

2. Fasteners are wrong size or damaged.

2. Use the recommended and

undamaged fasteners.

3. Magazine or front plate screws are loose. 3. Tighten screws.
4. Blade in piston assembly is damaged.

4. Replace piston assembly.

Tool will not drive

down tight

1. Worn blade in piston assembly.

1. Replace piston assembly.

2. Lack of power.

2 . Ad just to adequate air pressure.

3. Slow cycling and loss of power.

3. Check cylinder cap spring for

broken coils or reduced length.

Check if exhaust port of cylinder

cap is restricted.

TROUBLESHOOTING GUIDE

WARNING!

 Stop using the tool immediately if any of the following problems occur. Repairs and replace-

ments should only be performed by an authorized technician. For any questions, please contact our customer 

service at 

1-(800) 232-1195

, M-F 8-5 CST or email us at [email protected].

Summary of Contents for 61722

Page 1: ...ged trouble free performance Pay close attention to the rules for safe operation warnings and cautions If you use your tool properly and for its intended purpose you will enjoy years of safe reliable...

Page 2: ...s 6 BEFORE OPERATING 7 Unpacking Packing List 7 Know Your Brad Nailer Stapler 7 Preparation Adjustments 8 OPERATION MAINTENANCE 10 Operation 10 Maintenance 12 Troubleshooting Guide 13 Exploded View Pa...

Page 3: ...nual please visit wenproducts com for the most up to date manual or contact our customer service at 1 800 232 1195 Keep this manual available to all users during the entire life of the tool and review...

Page 4: ...ock PERSONAL SAFETY 1 Stay alert watch what you are doing and use com mon sense when operating a power tool Do not use a power tool while you are tired or under the influence of drugs alcohol or medic...

Page 5: ...ordance with these instructions taking into ac count the working conditions and the work to be per formed Use of the power tool for operations different from those intended could result in a hazardous...

Page 6: ...E of material thickness when using the nailer A protruding nail may cause injury 9 WHEN THE TOOL IS BEING UTILIZED AT PRESSURES ON THE HIGH END of its operating range fasteners can be driven completel...

Page 7: ...email techsupport wenproducts com UNPACKING PACKING LIST PACKING LIST TOOL PURPOSE Install trim build birdhouses and more with the help of your handy dandy newfangled 2 in 1 brad nailer and stapler R...

Page 8: ...to lubricate the internal parts of the tool Wipe off any excess oil from the exhaust cap and the air inlet CONNECTING THE TOOL TO AN AIR SUPPLY Your tool should be connected to a properly installed c...

Page 9: ...to 1 5 8 long Up to 100 fasteners may be loaded in the magazine Loading staples Place a clip of staples over the fixed magazine track Fig 3a Loading nails Place a clip of nails into the grooves of the...

Page 10: ...od If the fasteners penetrate too deeply decrease the firing depth or adjust the regulator to lower air pressure If the fasten ers penetrate too shallowly increase the firing depth or adjust the regul...

Page 11: ...isconnect air line from the tool and remove all other fasteners before removing jammed fasten ers in order to avoid personal injury Keep the tool pointed away from yourself and others 1 Disconnect the...

Page 12: ...e internal parts INSPECTION 1 Inspect trigger and safety mechanism to assure system is complete and functional no loose or missing parts no binding or sticking parts Do not operate if any portion of t...

Page 13: ...er spring 2 Dirt in drive guide 2 Clean drive channel of front plate 3 Inadequate airflow to tool 3 Check hose and compressor fittings 4 Worn or dry O ring on piston 4 Replace O ring or lubricate 5 Da...

Page 14: ...EXPLODED VIEW PARTS LIST 14...

Page 15: ...2 37 61720 038 Trigger Valve Guide 1 38 61720 037 O Ring 15x1 9 1 39 61721 042 Spring 1 40 61720 044 Washer 1 41 61721 044 Trigger 1 No Part No Description Qty 42 61720 042 Trigger Pin 1 43 61722 043...

Page 16: ...d products may need to be sent to WEN before the replacements can be shipped out turning a product for warranty service the shipping charges must be prepaid by the purchaser The product must be shippe...

Reviews: