1. Getting Started
Kit Contents
●
ME-541S Dual Bay Enclosure
●
USB Cable
●
Power Supply
●
QIG (Quick Install Guide)
Minimum System Requirements
●
Available OHCI-compliant USB port
●
USB3.0-equipped WIN XP / VISTA / 7
●
USB3.0-equipped Mac OS X 10.5 or above
2. Assembling The 3.5" SATA HDD
Please kindly open the caddy and insert the drive in the enclosure with correct position.
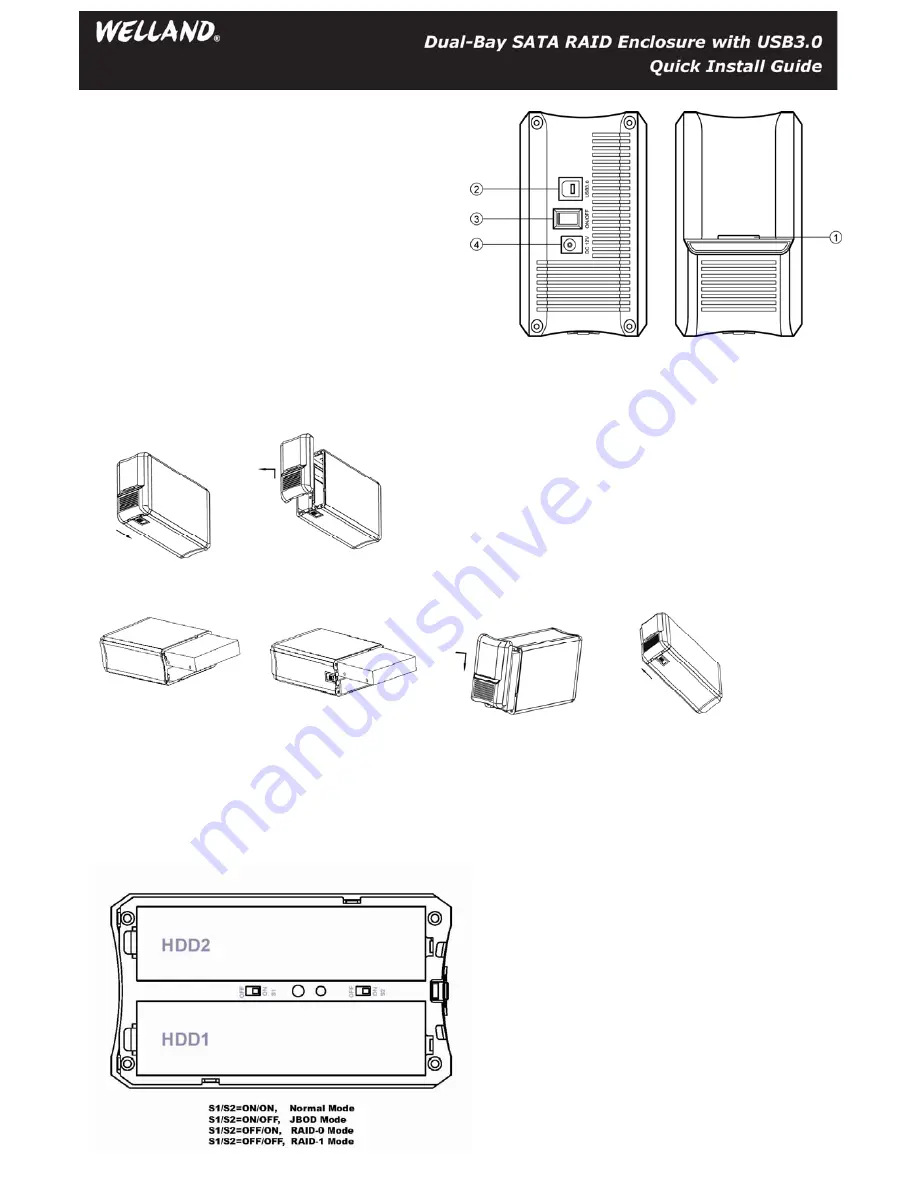
Step 1: Unlock the switch at the bottom side of the enclosure and take out the front panel smoothly.
Step 2: Install the hard drives with correct position. Set your RAID mode by adjusting the dip switch and put the front panel back to the enclosure.
Note : In order to support combined capacity than 4TB , the OS needs to support large volumes (Windows Vista/7 or above ; Mac
OS X 10.5 or above)
Note : The maximum capacity support for Windows XP is 2TB, for Linux is 3TB. DO NOT insert hard drives if the existing data totals
more than 2TB as Windows XP might overwrite or delete it.
3. RAID Mode Setting
The RAID mode can be changed by using the RAID switch. Please remove the front cover, and you will see the setup switch as below :
Product Overview
1. LED Indicator
2. USB3.0 Port
3. Power On/Off Switch
4. Power Socket
Note : Changing the RAID mode will require you to re-format
the drives. Make sure to backup all existing data first !
Please follow below steps to select RAID mode.
1.
Turn off the power.
2.
Select your RAID mode. There are 2 switches, S1 and S2,
they form 4 different RAID functions. Adjusting the switch to
the correct position to form the RAID mode. Normal mode
means non-RAID.
3.
After the RAID mode is selected, install the hard drives and
put on the front panel.
4.
Turn on the power.
5.
Format the drives. (This is the must when every time you
change RAID modes, check chapter 4 for more info.)
6.
You can use the drive now.
Note : ME-541S features TOOL-FREE hard drive
installation, no screws or screwdriver is required. The
lock switch is at the bottom side of the enclosure.


