Contact us for assistance: (866) 985-7877 | www.wtliving.com
4
1
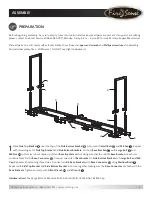
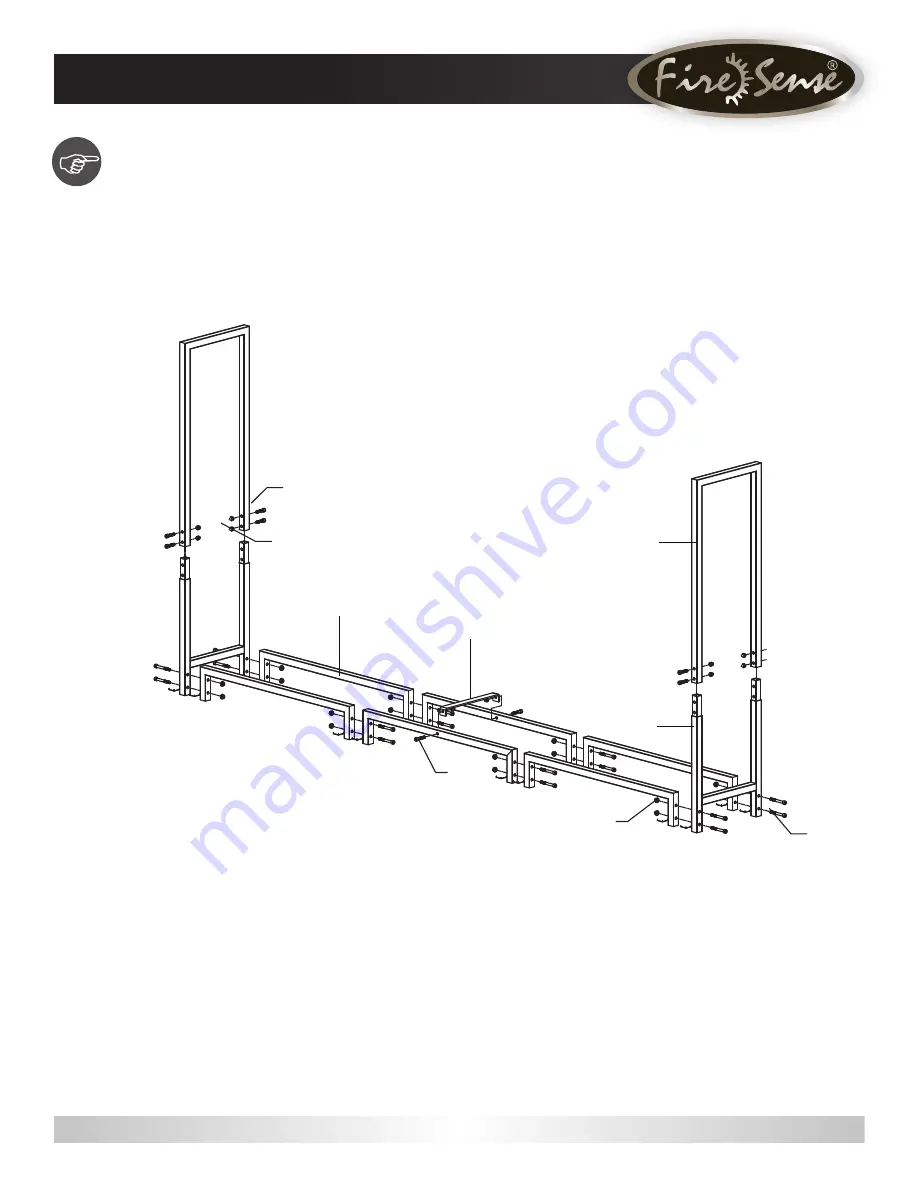
Place
Side Top bracket
A
over the top of the
Side bottom bracket
B
. Secure with
Small bolt
G
and
M8 Cap
I
. Repeat
with remaining set of
Side Top bracket
and
Side bottom brackets
. Connect
base brackets
C
with
large bolt
E
and
M8 Nut
H
to form two rows made up of three
base brackets
each making sure that the middle
base bracket
in each row
contains holes for the
base Connector
D
. Connect one side of
base bracket
to
Side bottom bracket
with
large bolt
and M8
Cap.
Repeat with remaining three sides. Connect middle
base brackets
with
base Connector
D
using
Medium bolts
F
.
Repeat with
Side Top bracket
and
Side bottom bracket
to secure together making sure the
base Connector
sits flush with the
base brackets
. Tighten securely with
Allen Wrench
H
and
Wrench
I
.
Hardware Used:
16x Large Bolts, 2x Medium Bolts, 8x Small Bolts, 18x M8 Nut, 8x M8 Cap
ASSEMblY
PREPARATION
Before beginning assembly, be sure to empty contents of carton and make sure all parts are present. If any parts are missing,
please contact Customer Service at (866)-985-7877, Monday-Friday, 9 a.m. - 6 p.m. EST or email at [email protected].
Place all parts on a soft, level surface for assembly. You will need an
open-end wrench
and
Phillips screwdriver
for assembly.
Estimated Assembly Time: 20 Minutes | DO NOT over tighten hardware!
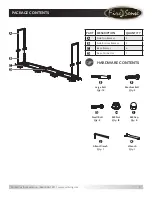
G
E
A
F
I
1
M8*L75mm
16pcs
2
M8*L35mm
8pcs
3
M8*L45mm
2pcs
4
M8
18pcs
5
M8
8pcs
1-877-527-0313
H
Wrench
Allen wrench
1pc
6
7
1pc
D
C
B

