background image

CHARGING UP FROM A WALL OUTLET (cont’d):

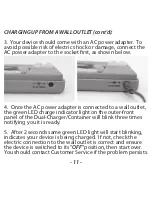
3.  Your device should come with an AC power adapter.  To 

avoid possible risk of electric shock or damage, connect the 

AC power adapter to the socket first, as shown below.

4.  Once the AC power adapter is connected to a wall outlet, 

the green LED charge indicator light on the outer-front 

panel of the Dual-Charger/Container will blink three times 

notifying you it is ready.
5.  After 2 seconds same green LED light will start blinking, 

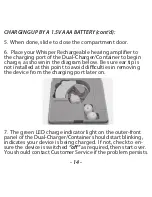
indicates your device is being charged.  If not, check the 

electric connection to the wall outlet is correct and ensure 

the device is switched to its “

OFF

” position, then start over.  

You should contact Customer Service if the problem persists.

- 11 -

Summary of Contents for WBI-144

Page 1: ...Whis er p tm Rechargeable Hearing Amplifier User s Manual...

Page 2: ......

Page 3: ...ust sound volume 8 Charging up the device 9 Wearingthedevice 16 Use care 20 Warning to hearing aid dispensers 23 Important notice for prospective hearing aid user 24 Children with hearing loss 26 Prod...

Page 4: ...age you to let us know your opinions about using the device and to share your experience with us It is important for you to read this user s manual before using your Whisper Rechargeable hearing ampli...

Page 5: ...This will help you comfortably adjusted to the device in identifying sounds and voices surrounding you When you first start wearing the device you should concentrate particularly on those sounds and v...

Page 6: ...ice you purchased consists of one Whisper Rechargeable hearing amplifier unit two silicone ear tips a Dual Charger Container with one AC power adapter and a user s manual but without the 1 5V AAA alka...

Page 7: ...side view of the Whisper Rechargeable hearing amplifier indicating the function of all controls intended for user adjustment 5 Volume controller Microphone Silicone eartip Flex audio wire ON OFF swit...

Page 8: ...er of the Whisper Rechargeable hearing amplifier showing the location of the charging port and the AAA alkaline battery compartment 6 ACadapter socket LEDindicating lights Charging port Silicone Earti...

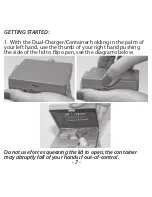
Page 9: ...er holding in the palm of your left hand use the thumb of your right hand pushing the side of the lid to flip open see the diagrams below Do not use force squeezing the lid to open the container may a...

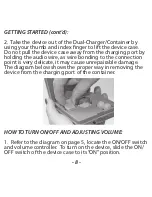
Page 10: ...udio wire as wire bonding to the connection point is very delicate it may cause unrepairable damage The diagram below shows the proper way in removing the device from the charging port of the containe...

Page 11: ...reference Do not set the volume too high High volume may cause excessive feedback and pose health risk CHARGING UP THE DEVICE Your Whisper Rechargeable hearing amplifier is embedded with a Ni MH recha...

Page 12: ...low CHARGING UP FROM A WALL OUTLET 1 Before charging up the device make sure it is turned off Follow Step 2 of HOW TO TURN ON OFF AND ADJUSTING VOLUME on the previous page to power off the device 2 Pl...

Page 13: ...wall outlet the green LED charge indicator light on the outer front panel of the Dual Charger Container will blink three times notifying you it is ready 5 After 2 seconds same green LED light will sta...

Page 14: ...r Rechargeable hearing ampli fier from a wall outlet can take up to 1 hour Each charge should last 10 hours of continuous use before the next recharging is needed When not using your Whisper Rechargea...

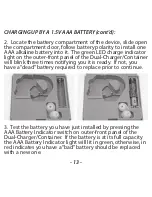
Page 15: ...Dual Charger Container will blink three times notifying you it is ready If not you have a dead battery required to replace prior to continue 3 Test the battery you have just installed by pressing the...

Page 16: ...am below Be sure ear tip is not installed at this point to avoid difficulties in removing the device from the charging port later on 7 The green LED charge indicator light on the outer front panel of...

Page 17: ...hours Each charge should last 10 hours of continuous use before the next recharging is needed When not using the Whisper Rechargeable BTE hearing amplifier turn off the device this will help save batt...

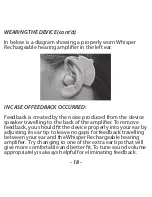
Page 18: ...he ear mold will remain securely in your ear Repeat same process with different size of ear tips until the desired fit is achieved See diagram below WEARING THE DEVICE The Whsiper Rechargeable hearing...

Page 19: ...humb and index finger of your RIGHT hand adjusting the ear mold to fit in your LEFT ear Often wiggling the ear mold will help to secure better See diagrams below for proper fitting 2 Follow the same p...

Page 20: ...peaker travelling to the back of the amplifier To remove feedback you should fit the device properly into your ear by adjusting its ear tip to leave no gaps for feedback travelling between your ear an...

Page 21: ...ts wax from building up 2 Make sure the receiver end is cleared of debris and dirt 3 Wipe the case with damp cloth only Do not use liquid or aerosol cleaners to clean the device 4 When not using your...

Page 22: ...n water as the device is not designed to operate in these conditions Avoid using your Whisper Rechargeable hearing amplifier in a hot and humid environment the device can be sensitive to excessive hea...

Page 23: ...The replacement may either be a free of charge new device or re conditioned upon return of the defective unit You should however send the defective unit to us on paid shipping We offer NO WARRANTY in...

Page 24: ...l benefit from it The use of a hearing aid is only part of hearing habilitation and may need to be supplemented by auditory training and instruction in lip reading IDENTIFICATION OF KNOWN SIDE EFFECTS...

Page 25: ...concerning the prospective user that the prospective user has any of the following conditions 1 Visible congenital or traumatic deformity of the ear 2 History of active drainage from the ear within th...

Page 26: ...ser IMPORTANT NOTICE FOR PROSPECTIVE HEARING AID USERS Good health practice requires that a person with a hearing loss have a medical evaluation by a licensed physician preferably a physician who spec...

Page 27: ...r hearing aid dispenser will conduct a hearing aid evaluation to assess your ability to hear with and without a hearing aid The hearing aid evaluation will enable the audiologist or dispenser to selec...

Page 28: ...on with a physician The exercise of such a waiver is not in your best health interest and its use is strongly discouraged CHILDREN WITH HEARING LOSS In addition to seeing a physician for a medical eva...

Page 29: ...t procedures Battery rechargeable Ni MH 1 2V Battery current drain 6mA Equivalent input noise 50 0dB Frequency range 200 3000Hz Frequency response curve 100dB at 1KHz Saturation output SSPL90 133 0dB...

Page 30: ...Concordia Plaza 1 Science Museum Road TST Kowloon Hong Kong FDA registration number 3004950644 FDA operator number 9032154 Initial Importer to the U S Richmix Distributors LLC 119 N Commercial Street...

Page 31: ......
Page 32: ...ntinuous product development most of the photos graphic illustrations in this user s manual may slightly vary from the actual device delivered WPXL 041810 Copyright 2010 Well Brain International Ltd a...

Reviews: